CoreML (4)
Create ML로 텍스트 분류기 만들기
이번 섹션에서는 코드로 Create ML을 써서 텍스트 분류기 모델을 만든다. 분류기는 레이블이 붙은 텍스트 데이터로 학습시켜야 하는데, Create ML은 JSON이나 CSV 파일로 된 학습 데이터를 쓸 수도 있고, 앞서 이미지 분류기에서 썼던 것처럼 레이블별로 폴더를 나눈 구조를 쓸 수도 있다. 후자는 텍스트 파일이 낱개로 여러 개 있을 때 잘 맞는다. 이번엔 JSON 형식을 쓴다.
학습 데이터는 Amazon의 실제 상품 리뷰와 그에 대한 감정(sentiment) 레이블로 구성된다. JSON 파일 안에는 텍스트(리뷰 내용)와 label(긍정/부정) 두 필드를 가진 약 1000개의 항목이 들어있다. 자연어 분류기를 학습시키려면 어느 정도 규모 있는 데이터가 필요하다. 세상에 존재하는 모든 리뷰를 모을 수 있다면 모델이 항상 100% 정확하겠지만, 현실적으로는 불가능하니 대표성 있는 데이터셋을 만드는 게 중요하다. 학습에 쓰는 고유 데이터가 많을수록 분류기의 정확도도 올라간다.
Playground 준비하기
Create ML은 모바일 기기에서 동작하지 않으므로, iOS나 tvOS가 아니라 macOS Blank 템플릿으로 Playground를 만든다.
1
2
import CreateML
import Cocoa
기본으로 생성되는 boilerplate 코드는 지우고, CreateML과 Cocoa(main bundle에 접근하기 위해)를 import한다.
학습/테스트 데이터 준비하기
학습 데이터로 amazon-reviews.json, 테스트 데이터로 testing-reviews.json 두 파일을 쓴다. amazon-reviews.json은 항목 수가 많아 학습용, testing-reviews.json은 상대적으로 적어서 테스트용이다. 두 파일 모두 Xcode 프로젝트의 Resources 폴더에 추가해둔다.
1
2
3
4
guard let trainingDataFileURL = Bundle.main.url(forResource: "amazon-reviews", withExtension: "json"),
    let testingDataFileURL = Bundle.main.url(forResource: "testing-reviews", withExtension: "json") else {
        fatalError("Error! Could not load resource files.")
}
각 파일의 URL을 main bundle에서 가져온다. 리소스를 못 찾으면 더 이상 진행할 이유가 없으니 fatalError()로 즉시 중단시킨다.
MLDataTable 생성하기
1
2
3
4
5
6
7
8
9
10
11
12
13
14
15
do {
    let trainingDataTable = try MLDataTable(contentsOf: trainingDataFileURL)
    let testingDataTable = try MLDataTable(contentsOf: testingDataFileURL)

    let stats = """

    ==========================================
    Entries used for training: \(trainingDataTable.size)
    Entries used for testing: \(testingDataTable.size)

    """
    print(stats)
} catch {
    print(error.localizedDescription)
}
MLDataTable은 학습 데이터셋 내용을 담는 테이블과, 학습된 분류기를 테스트할 데이터를 담는 테이블 두 개를 만든다. MLDataTable의 초기화 함수는 JSON 파일의 URL을 받아서 그 내용으로 테이블을 구성하는데, 이 초기화가 실패할 수 있어서 try로 호출하고 do-catch로 감싼다.
데이터 통계 확인하기
1
2
3
4
5
let trainingStats = "Training data: \(trainingDataTable.rows.count) rows"
let testingStats = "Testing data: \(testingDataTable.rows.count) rows"

print(trainingStats)
print(testingStats)
Playground를 실행해보면 콘솔에 JSON 파일이 정상적으로 파싱된 결과가 찍힌다. 학습용 항목은 거의 1000개, 테스트용 항목은 약 50개로, 테스트 데이터 크기가 학습 데이터의 약 5% 수준이다. 학습셋과 테스트셋 사이의 적절한 비율이다.
1
2
3
4
5
6
7
8
Parsing JSON records from /var/folders/xf/gqhkn9cn24l0lrjpzx6xm3gc0000gn/T/com.apple.dt.Xcode.pg/resources/08E80453-AA96-4BEF-9CA6-195184440CE6/amazon-reviews.json
Successfully parsed 935 elements from the JSON file /var/folders/xf/gqhkn9cn24l0lrjpzx6xm3gc0000gn/T/com.apple.dt.Xcode.pg/resources/08E80453-AA96-4BEF-9CA6-195184440CE6/amazon-reviews.json
Parsing JSON records from /var/folders/xf/gqhkn9cn24l0lrjpzx6xm3gc0000gn/T/com.apple.dt.Xcode.pg/resources/08E80453-AA96-4BEF-9CA6-195184440CE6/testing-reviews.json
Successfully parsed 46 elements from the JSON file /var/folders/xf/gqhkn9cn24l0lrjpzx6xm3gc0000gn/T/com.apple.dt.Xcode.pg/resources/08E80453-AA96-4BEF-9CA6-195184440CE6/testing-reviews.json

==========================================
Entries used for training: (rows: 935, columns: 2)
Entries used for testing: (rows: 46, columns: 2)
MLTextClassifier 학습시키기
이제 실제로 모델을 학습시킨다.
MLTextClassifier 생성하기
1
let sentimentClassifier = try MLTextClassifier(trainingData: trainingDataTable, textColumn: "text", labelColumn: "label")
학습 과정은 MLTextClassifier 인스턴스를 만드는 것으로 시작한다. 초기화 함수는 학습 데이터 테이블과, 텍스트가 담긴 컬럼 이름(text), 레이블이 담긴 컬럼 이름(label)을 받는다. (왜냐면 json 파일의 구조가 text, label로 되어있기 때문)
이 초기화도 에러를 던질 수 있어서 try로 호출한다.
기본적으로 텍스트 감정 분류기를 학습시키는 데 필요한 건 이게 전부다.
Playground를 실행하면 제공한 학습 데이터로 MLTextClassifier가 몇 초 안에 만들어지는 걸 콘솔 로그로 확인할 수 있다. 로그를 보면 학습 데이터의 5%를 validation set으로 자동으로 떼어낸다는 걸 알 수 있다. 예를 들어 총 1000개 가까운 데이터 중 928개만 실제 학습에 쓰이고, 나머지 validation set이 모델 성능을 확인하는 데 쓰인다. 분류기를 학습시킬 때마다 이 5%가 무작위로 선택되기 때문에 실행할 때마다 결과가 조금씩 달라질 수 있다.
강의에서는 단 세 번의 반복(iteration)만으로 학습 정확도가 100%에 가까워졌고, 정확도가 이미 충분히 높다고 판단되어 학습 과정이 거기서 멈췄다.
내 경우엔 4번이 실행되었다.
1
2
3
4
5
6
7
8
9
10
11
12
13
14
15
16
17
18
Parsing JSON records from /var/folders/xf/gqhkn9cn24l0lrjpzx6xm3gc0000gn/T/com.apple.dt.Xcode.pg/resources/8C09EB2C-D2E9-4AEC-B694-2AED37F31FD7/amazon-reviews.json
Successfully parsed 935 elements from the JSON file /var/folders/xf/gqhkn9cn24l0lrjpzx6xm3gc0000gn/T/com.apple.dt.Xcode.pg/resources/8C09EB2C-D2E9-4AEC-B694-2AED37F31FD7/amazon-reviews.json
Parsing JSON records from /var/folders/xf/gqhkn9cn24l0lrjpzx6xm3gc0000gn/T/com.apple.dt.Xcode.pg/resources/8C09EB2C-D2E9-4AEC-B694-2AED37F31FD7/testing-reviews.json
Successfully parsed 46 elements from the JSON file /var/folders/xf/gqhkn9cn24l0lrjpzx6xm3gc0000gn/T/com.apple.dt.Xcode.pg/resources/8C09EB2C-D2E9-4AEC-B694-2AED37F31FD7/testing-reviews.json

==========================================
Entries used for training: (rows: 935, columns: 2)
Entries used for testing: (rows: 46, columns: 2)

Tokenizing data and extracting features
50% complete
100% complete
Starting MaxEnt training with 889 samples
Iteration 1 training accuracy 0.001125
Iteration 2 training accuracy 0.917885
Iteration 3 training accuracy 0.991001
Iteration 4 training accuracy 0.998875
Finished MaxEnt training in 0.01 seconds
학습/검증 정확도 확인하기
1
2
3
4
5
6
7
8
9
10
let trainingAccuracy = (1.0 - sentimentClassifier.trainingMetrics.classificationError) * 100
let validationAccuracy = (1.0 - sentimentClassifier.validationMetrics.classificationError) * 100

let message = """

==========================================
Training accuracy: \(trainingAccuracy)
Validation accuracy: \(validationAccuracy)
"""
print(message)
trainingMetrics, validationMetrics 프로퍼티로 학습/검증 정확도를 확인할 수 있다. 둘 다 MLClassifierMetrics 타입이고, classificationError 프로퍼티를 갖고 있는데 이건 모델이 잘못 분류한 예제의 비율을 나타낸다. 그래서 1 - classificationError에 100을 곱하면 정확도를 백분율로 계산할 수 있다.
1
2
3
4
5
6
7
8
9
10
11
12
13
14
15
16
17
==========================================
Entries used for training: (rows: 935, columns: 2)
Entries used for testing: (rows: 46, columns: 2)

Tokenizing data and extracting features
50% complete
100% complete
Starting MaxEnt training with 889 samples
Iteration 1 training accuracy 0.001125
Iteration 2 training accuracy 0.917885
Iteration 3 training accuracy 0.991001
Iteration 4 training accuracy 0.998875
Finished MaxEnt training in 0.01 seconds

==========================================
Training accuracy: 99.8875140607424
Validation accuracy: 86.95652173913044
테스트 데이터로 평가하기
1
2
3
4
5
6
7
8
9
10
11
12
let evaluationMetrics = sentimentClassifier.evaluation(on: testingDataTable, textColumn: "text", labelColumn: "label")
let evaluationAccuracy = (1.0 - evaluationMetrics.classificationError) * 100

let message = """

==========================================
Training accuracy: \(trainingAccuracy)
Validation accuracy: \(validationAccuracy)
Evaluation accuracy: \(evaluationAccuracy)

"""
print(message)
학습/검증 정확도는 어디까지나 학습 과정 안에서 나온 수치이고, 진짜 검증은 앞서 따로 준비해둔 테스트 데이터로 하는 것이다. evaluate(on:)이 아니라 evaluation(on:)이 테스트 데이터 테이블을 받아서 MLClassifierMetrics 인스턴스를 반환하고, 여기서도 마찬가지로 classificationError를 통해 정확도를 계산할 수 있다.
Playground를 실행해보면 학습 정확도, 검증 정확도에 이어 평가 정확도까지 콘솔에서 확인할 수 있다.
학습된 모델이 준비됐으니, 이걸 파일로 저장해서 실제로 재사용 가능한 형태로 만드는 작업이 남아있다.
겪었던 문제: evaluation(on:) 관련 컴파일 에러
1
2
3
4
5
6
error: no exact matches in call to instance method 'evaluation'
let evaluationMetrics = sentimentClassifier.evaluation(on: testingDataTable)
^

CreateML.MLTextClassifier.evaluation:2:13: candidate expects value of type 'MLTextClassifier.DataSource' for parameter #1 (got 'MLDataTable')
CreateML.MLTextClassifier.evaluation:2:13: candidate expects value of type '[String : [String]]' for parameter #1 (got 'MLDataTable')
evaluation(on:)을 testingDataTable(MLDataTable) 하나만 인자로 넘겨서 호출했더니, 컴파일러가 MLDataTable을 직접 받는 overload를 못 찾겠다고 했다. 후보로 제시된 건 MLTextClassifier.DataSource를 받는 버전과 [String: [String]]을 받는 버전, 두 가지뿐이었다.
원인은 단순했다. evaluation에는 on: 하나만 받는 형태 말고, on:textColumn:labelColumn: 세 개를 받는 overload가 따로 있는데, 그걸 빼먹고 on:만 넘긴 게 문제였다. MLTextClassifier를 만들 때 trainingData:textColumn:labelColumn:으로 컬럼 이름을 같이 넘겼던 것처럼, 평가할 때도 어떤 컬럼이 텍스트고 어떤 컬럼이 레이블인지 명시적으로 알려줘야 했던 것.
1
let evaluationMetrics = sentimentClassifier.evaluation(on: testingDataTable, textColumn: "text", labelColumn: "label")
이렇게 textColumn, labelColumn을 같이 넘기니 정상적으로 컴파일됐다.
1
2
3
4
5
6
7
8
9
10
11
12
13
14
15
16
17
18
19
20
21
22
23
Parsing JSON records from /var/folders/xf/gqhkn9cn24l0lrjpzx6xm3gc0000gn/T/com.apple.dt.Xcode.pg/resources/8C09EB2C-D2E9-4AEC-B694-2AED37F31FD7/amazon-reviews.json
Successfully parsed 935 elements from the JSON file /var/folders/xf/gqhkn9cn24l0lrjpzx6xm3gc0000gn/T/com.apple.dt.Xcode.pg/resources/8C09EB2C-D2E9-4AEC-B694-2AED37F31FD7/amazon-reviews.json
Parsing JSON records from /var/folders/xf/gqhkn9cn24l0lrjpzx6xm3gc0000gn/T/com.apple.dt.Xcode.pg/resources/8C09EB2C-D2E9-4AEC-B694-2AED37F31FD7/testing-reviews.json
Successfully parsed 46 elements from the JSON file /var/folders/xf/gqhkn9cn24l0lrjpzx6xm3gc0000gn/T/com.apple.dt.Xcode.pg/resources/8C09EB2C-D2E9-4AEC-B694-2AED37F31FD7/testing-reviews.json

==========================================
Entries used for training: (rows: 935, columns: 2)
Entries used for testing: (rows: 46, columns: 2)

Tokenizing data and extracting features
50% complete
100% complete
Starting MaxEnt training with 889 samples
Iteration 1 training accuracy 0.001125
Iteration 2 training accuracy 0.917885
Iteration 3 training accuracy 0.991001
Iteration 4 training accuracy 0.998875
Finished MaxEnt training in 0.01 seconds

==========================================
Training accuracy: 99.8875140607424
Validation accuracy: 86.95652173913044
Evaluation accuracy: 69.56521739130434
학습된 모델을 .mlmodel로 저장하기
학습 정확도 거의 100%에 검증/평가 정확도도 매우 높게 나왔다. 즉 이 모델은 한 번도 본 적 없는 입력에 대해서도 꽤 신뢰할 수 있는 예측을 내놓을 거라는 뜻이다. 이제 이 모델을 앱에서 쓸 수 있도록 Core ML 모델 파일로 내보낸다.
write(to:metadata:) 호출하기
1
2
3
4
5
6
7
8
9
let modelFileURL = URL(fileURLWithPath: "/Users/dongik/Desktop/ReviewClassifier.mlmodel")

let metadata = MLModelMetadata(
    author: "Harold",
    shortDescription: "A model trained to classify product review sentiment.",
    version: "1.0"
)

try sentimentClassifier.write(to: modelFileURL, metadata: metadata)
MLTextClassifier의 write(to:metadata:) 인스턴스 메서드로 모델을 내보낸다. 첫 번째 인자는 저장할 .mlmodel 파일의 경로(URL)이고, 두 번째 인자는 모델에 대한 부가 정보를 담는 MLModelMetadata 인스턴스다. 여기 넣은 경로는 실행하는 컴퓨터에서 실제로 유효한 경로로 바꿔줘야 한다.
MLModelMetadata에는 author, shortDescription, version 등을 지정할 수 있다. license나 다른 부가 파라미터는 선택 사항이라 생략해도 된다. write(to:metadata:)도 에러를 던질 수 있는 메서드라 try로 호출한다.
결과 확인
Playground를 실행하면 모델을 학습시키고 파일로 저장하는 두 작업이 한 번에 진행된다. 콘솔 로그에 학습된 모델이 지정한 경로에 성공적으로 저장됐다는 메시지가 뜨고, 실제로 해당 경로를 열어보면 ReviewClassifier.mlmodel 파일이 생성되어 있는 걸 확인할 수 있다.
ReviewClassifier 모델 연결하기
학습해서 디스크에 저장해둔 .mlmodel 파일을 프로젝트 내비게이터로 드래그해서 추가한다.
NLModel로 감정 분류기 인스턴스 만들기
NaturalLanguage framework를 import하고, view controller 안에서만 쓸 private lazy 프로퍼티를 만든다.
1
2
3
4
5
6
import NaturalLanguage

private lazy var sentimentClassifier: NLModel? = {
    let model = try? NLModel(mlModel: ReviewClassifier().model)
    return model
}()
NLModel의 초기화 함수는 MLModel을 입력으로 받는데, ReviewClassifier().model로 방금 추가한 모델의 MLModel 인스턴스를 꺼내서 넘긴다. 이 초기화가 실패할 수 있어서 try?를 쓰고 optional로 선언한다.
UITextViewDelegate 확장으로 입력 감지하기
view controller를 깔끔하게 유지하려고, delegate 구현은 별도 extension으로 뺀다.
1
2
3
4
5
6
7
8
9
10
11
12
13
14
15
16
17
18
19
20
21
extension ViewController: UITextViewDelegate {
    func textView(_ textView: UITextView, shouldChangeTextIn range: NSRange, replacementText text: String) -> Bool {
        if textView.text.isEmpty == false,
            text == "\n" {
            //...
            if let label = sentimentClassifier?.predictedLabel(for: textView.text) {
                switch label {
                case "positive":
                    sentimentImageView.image = UIImage(named: "positive")
                case "negative":
                    sentimentImageView.image = UIImage(named: "negative")
                default:
                    sentimentImageView.image = UIImage(named: "what")
                }
            }

            textView.resignFirstResponder()
        }
        return true
    }
}
textView(_:shouldChangeTextIn:replacementText:)는 사용자가 키보드에서 Return(줄바꿈)을 눌렀는지 감지하는 데 쓴다. text view에 내용이 있고 입력된 문자가 줄바꿈("\n")이면, if let으로 sentimentClassifier의 predictedLabel(for:) 결과를 꺼낸다. 이 메서드는 학습 데이터에 있던 레이블 중 하나("positive" 또는 "negative")를 문자열로 반환한다.
switch 문으로 결과에 따라 sentimentImageView의 이미지를 바꾼다. 긍정이면 “positive” 이미지, 부정이면 “negative” 이미지를 쓰고, default 케이스는 “what” 이미지로 처리한다. 분류기가 항상 “positive”나 “negative” 둘 중 하나만 반환하기 때문에 이 default 케이스에 실제로 도달할 일은 없지만, switch가 모든 경우를 다뤄야 하니 형식상 넣어둔다.
resignFirstResponder()를 호출해서 키보드를 내리지만, 이 메서드는 조건과 무관하게 항상 true를 반환한다. 즉 줄바꿈 문자 자체는 그대로 text view에 입력되도록 허용하면서, 그 시점에 예측과 키보드 내리기 동작을 함께 수행하는 구조다.
같은 extension에 textViewDidChange(_:)도 함께 구현해서, text view 내용이 비어있지 않으면 clear 버튼을 활성화하도록 처리한다.
이후 과정은 생략…
실제 데이터로 테스트해보기
학습 정확도는 꽤 높게 나왔는데, 실제 데이터에서는 앱이 얼마나 잘 동작할까? 학습 데이터셋에 포함되지 않은, 진짜 Amazon 리뷰들로 직접 테스트해본다.
Amazon 리뷰로 테스트
우산처럼 평점이 높은 제품을 골라 리뷰 하나를 복사해서 앱에 붙여넣고 Return을 누르면, 예상대로 “positive”로 판별된다. 반대로 헤드폰처럼 평점이 낮은 제품의 부정적인 리뷰를 붙여넣으면 “negative”로 잘 판별된다.
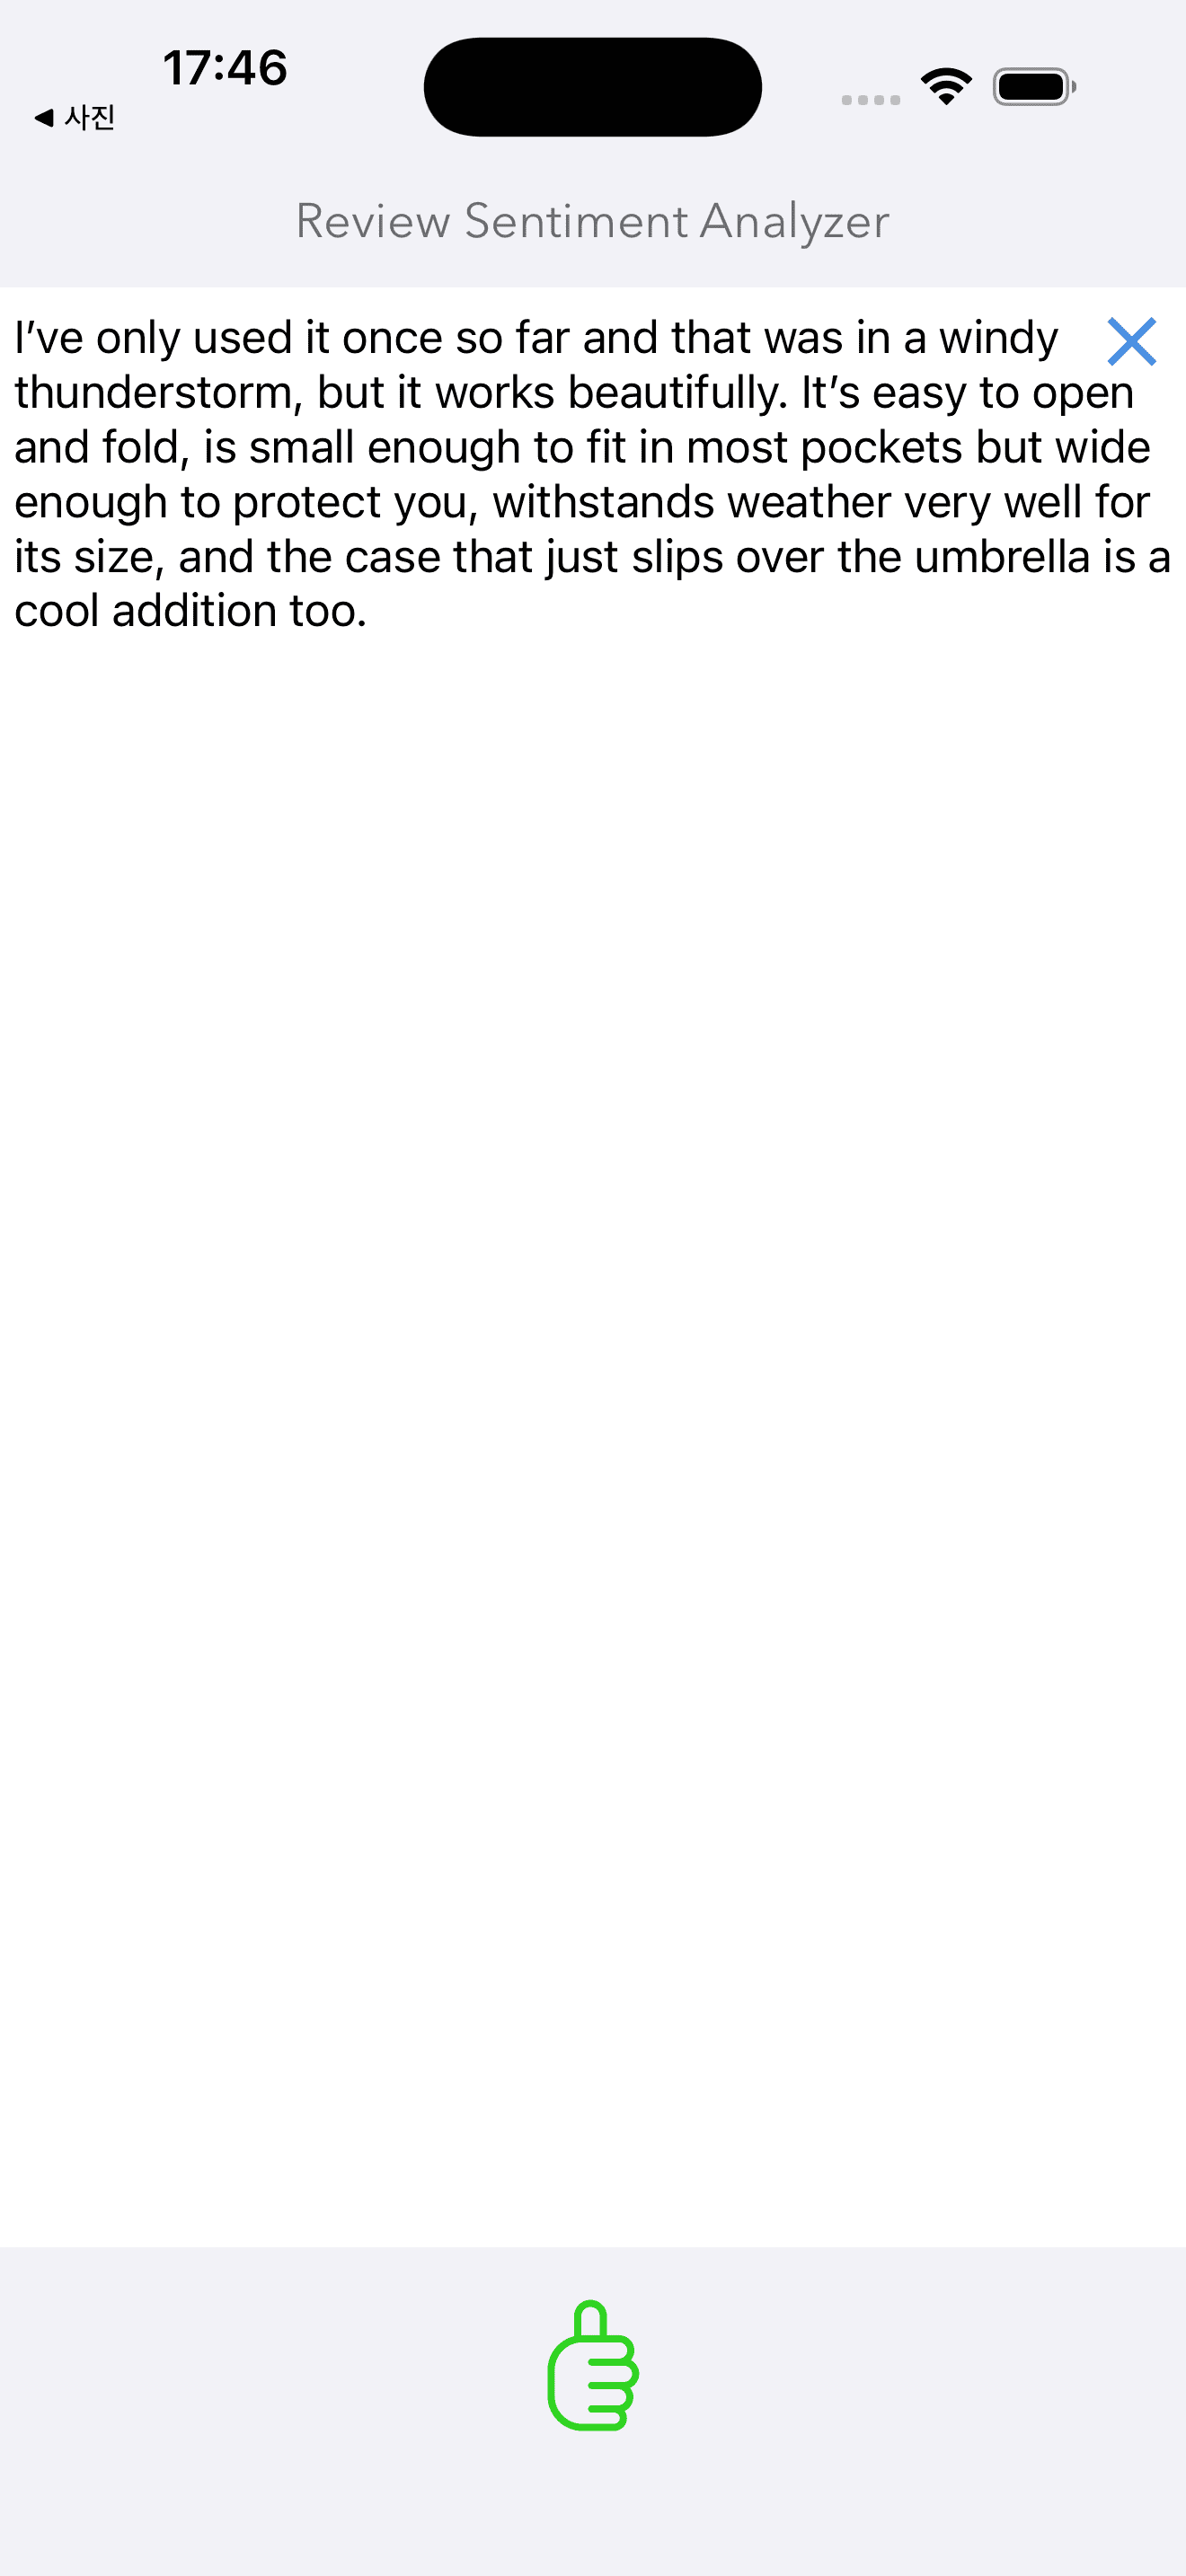
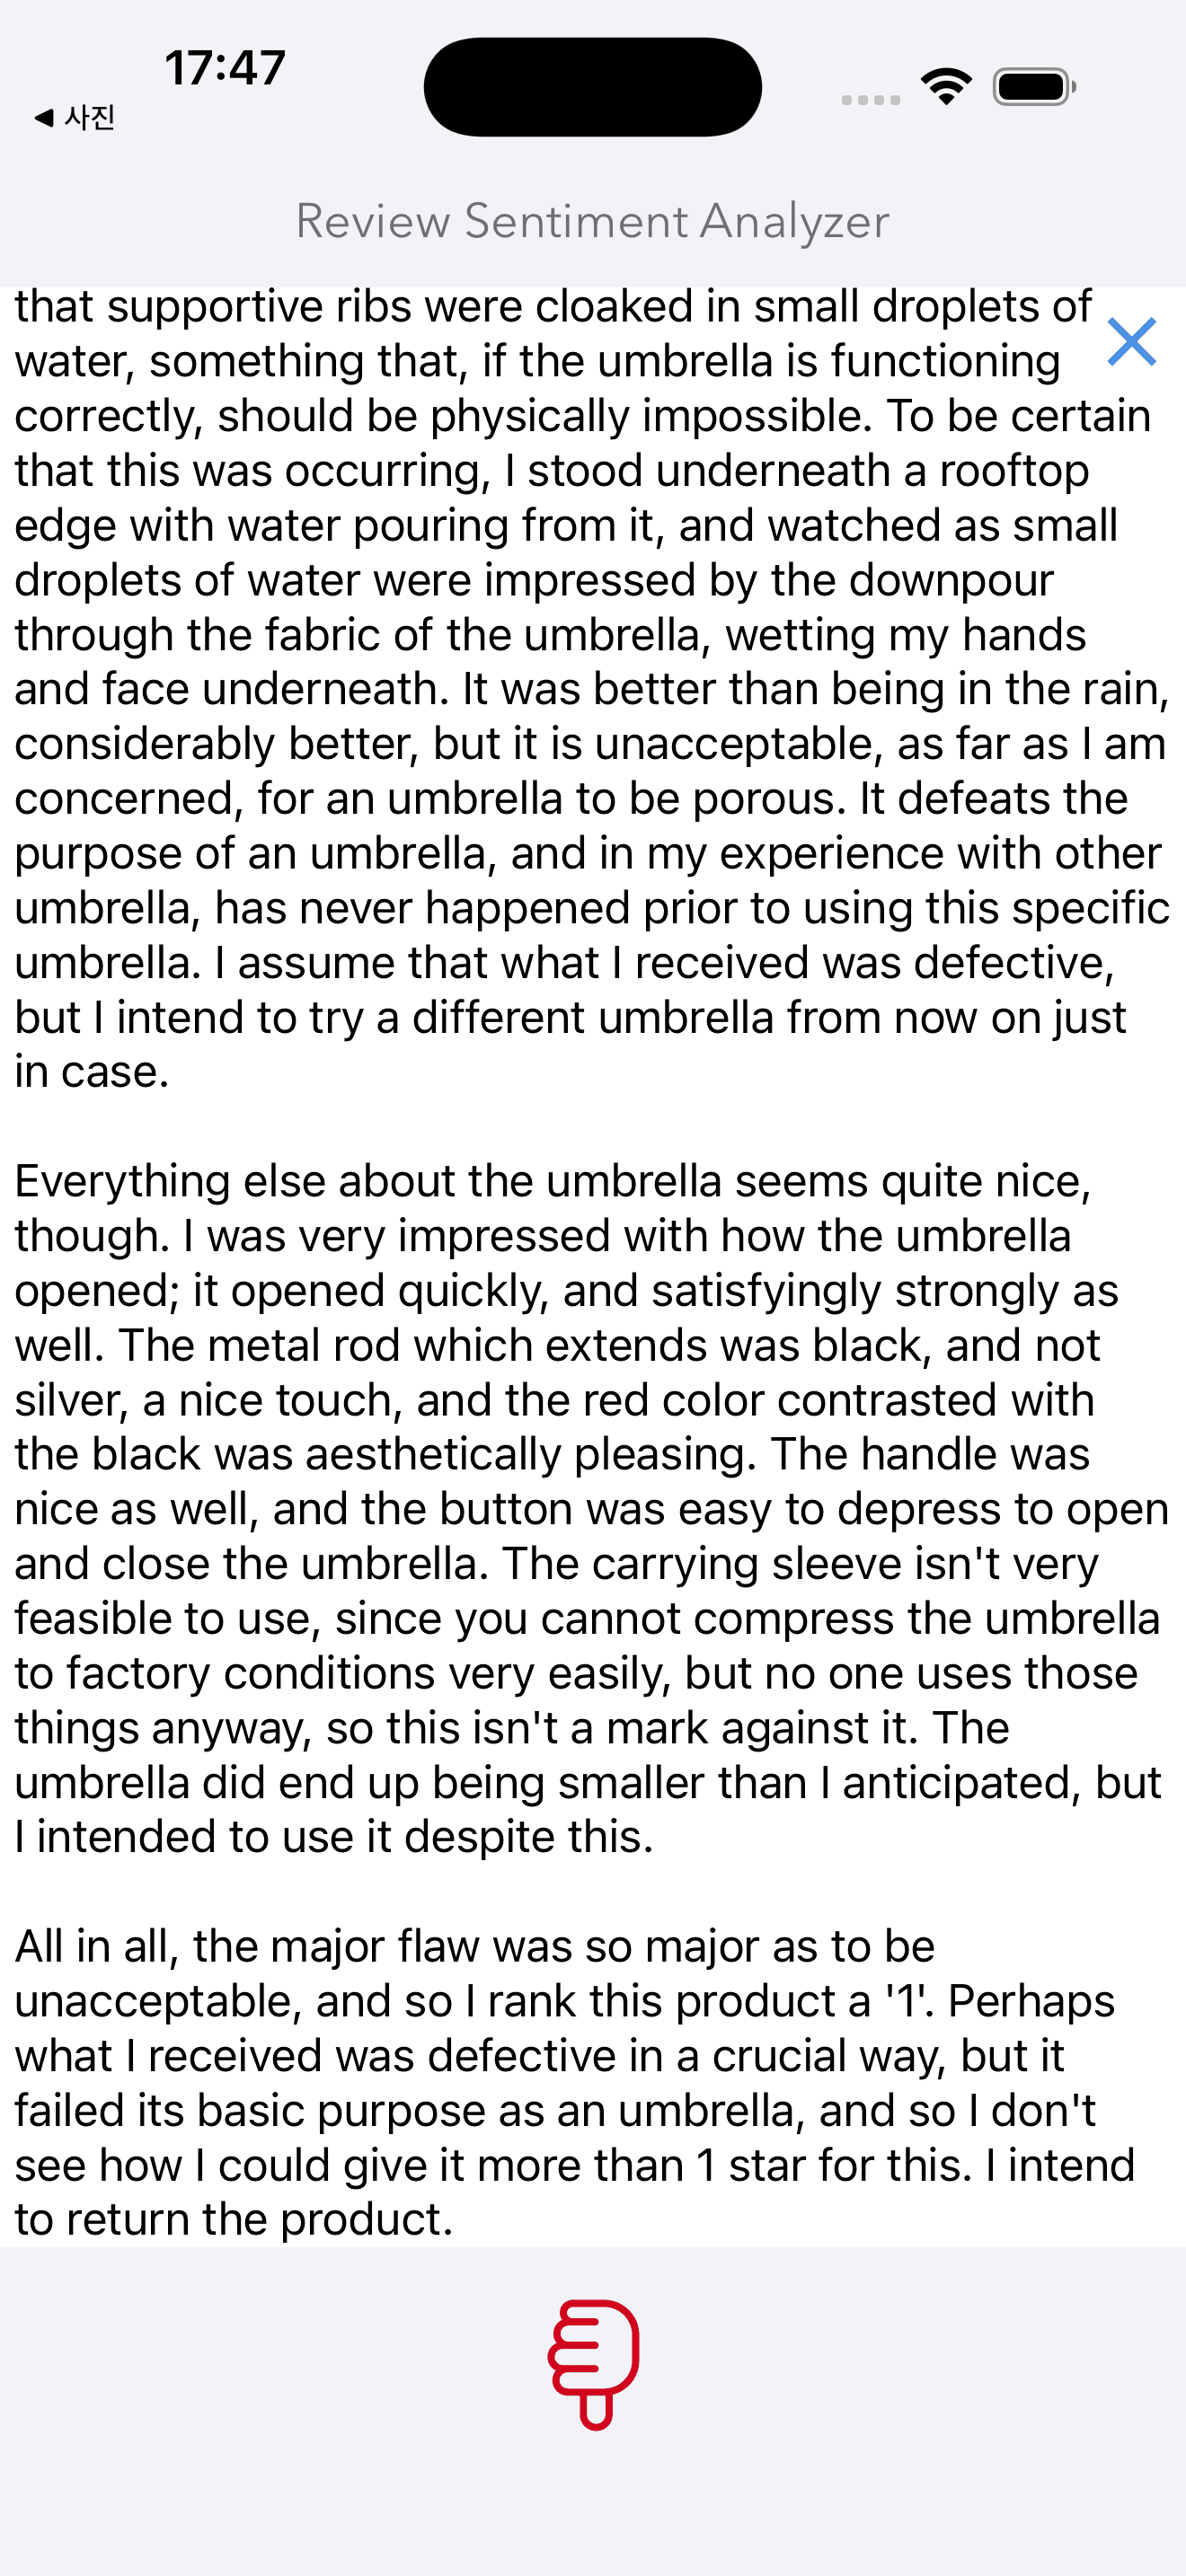
흥미로운 케이스는 별점이 애매한 리뷰들이었다. 별 4개짜리 리뷰 중 “소리는 좋지만 돈은 아깝다”처럼 모순적인 표현이 섞인 문장도 전체적으로는 긍정적인 어조라 “positive”로 판별됐고, 별 3개짜리 리뷰는 문구 자체가 부정적인 인상이 강해서 “negative”로 판별됐다. 두 경우 모두 사람이 읽어봐도 납득할 만한 결과였다.
도메인이 다른 데이터로 실험: IMDB 영화 리뷰
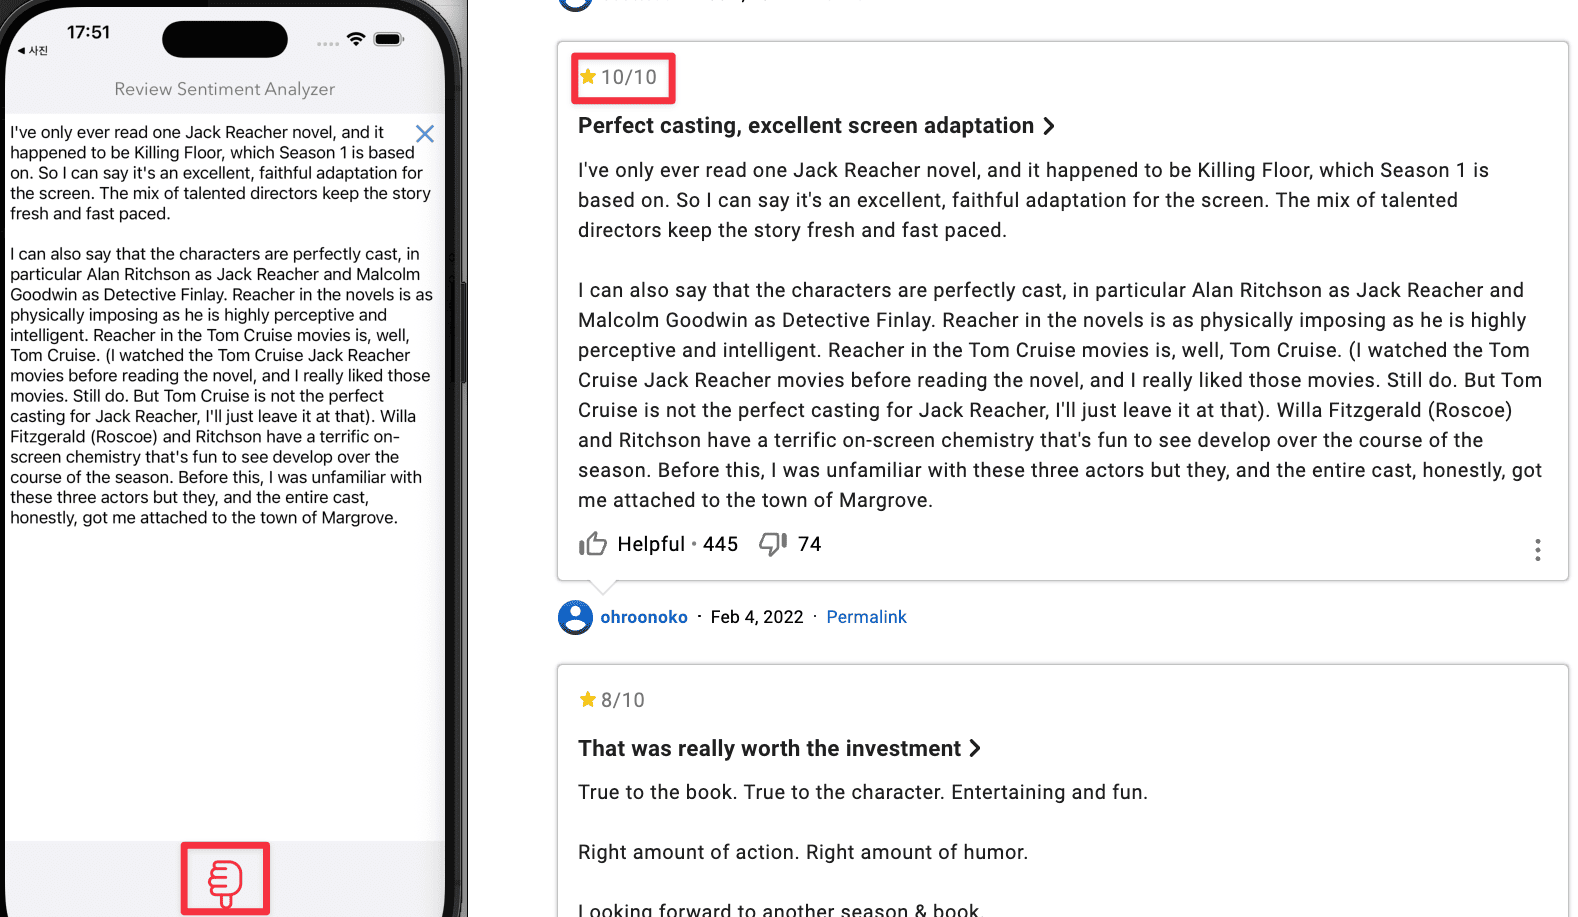
이 모델은 Amazon 상품 리뷰로만 학습됐으니, 완전히 다른 도메인인 IMDB 영화 리뷰로도 테스트해보는 건 흥미로운 실험이다. “10점 만점에 8점” 같은 리뷰는 긍정으로, 다른 몇 개는 부정으로 잘 판별됐고, “10점 만점에 10점” 리뷰도 긍정으로 정확히 나왔다.
다만 리뷰를 더 넣어보면, Amazon 리뷰를 테스트했을 때보다 실패율이 눈에 띄게 높아진다는 걸 알 수 있다. 학습 데이터가 Amazon 상품 리뷰 도메인에 치우쳐 있다 보니, 영화 리뷰처럼 다른 스타일의 텍스트에는 상대적으로 덜 정확한 것. 정확도를 높이려면 IMDB 리뷰 데이터도 함께 학습에 포함시켜서 모델을 다시 학습시켜야 한다.
정리 및 확장 아이디어
이번에 만든 모델은 제품 리뷰가 긍정적인지 아닌지를 꽤 정확하게 판별해낸다. 이걸 활용하면, 리뷰를 하나하나 사람이 읽는 대신, 한 제품에 달린 모든 리뷰를 이 모델로 처리해서 전체적인 감성 경향을 요약해주는 애플리케이션도 만들 수 있다. 평점과 리뷰 내용이 실제로는 일치하지 않는 경우도 드물지 않기 때문에, 이런 자동화된 감성 분석이 평점만 보는 것보다 더 유용한 신호를 줄 수 있다.
확장 방향도 여러 가지가 있다. 프랑스어, 한국어, 독일어 등 다른 언어로 작성된 리뷰의 어조를 판별하도록 모델을 다국어로 학습시킬 수도 있다. 머신러닝이 열어주는 가능성은 이렇게 계속 넓어진다.