MapKit (11)
CheckedIn/out 상태에 따라 ui 다르게 구분하기
1
2
3
4
5
6
7
8
9
10
11
12
13
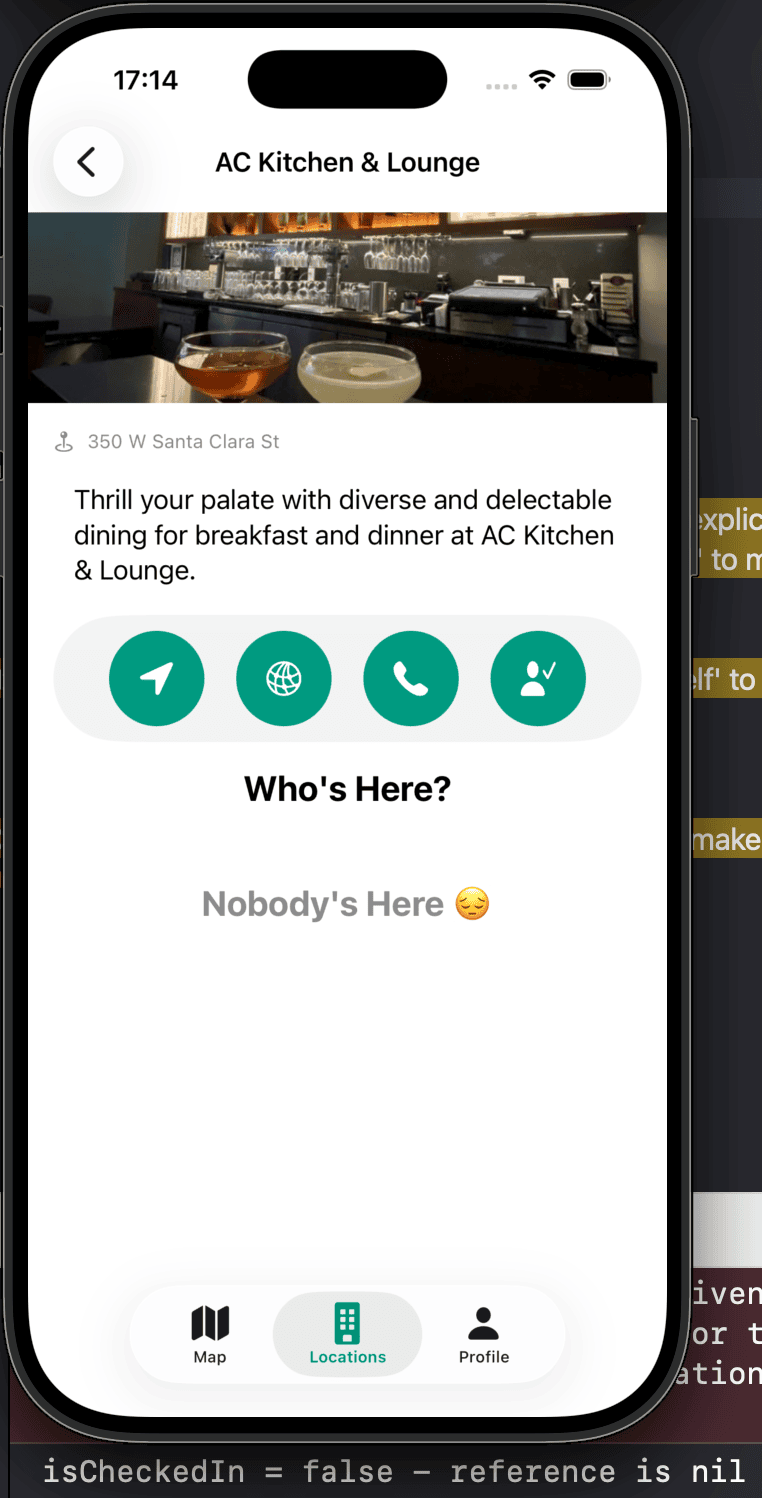
if viewModel.checkedInProfiles.isEmpty {
// empty state
Text("Nobody's Here 😞")
.bold()
.font(.title2)
.foregroundStyle(.secondary)
.padding(.top, 30)
} else {
ScrollView {
// 생략
}
}
사실 여긴 딱히 크게 언급할게 없다. checkedinProfiles는 하나의 배열인데 그 배열에 어떠한 값도 없을때 즉, 체크인 한 사람이 아무도 없을때는 Nobody’s here 이라는 문구가 보이게 하는것이다.
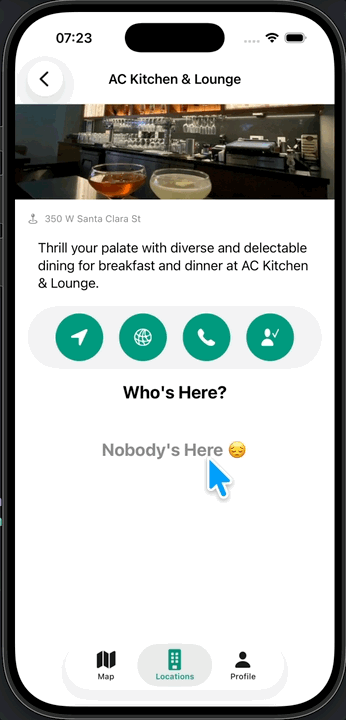
그러면 위와 같이 작동이 잘 되는걸 알 수 있다.
체크인 profile Loading 부분 만들어주기
체크인 기능을 확인했으니, 체크인을 가져올때 로딩을 띄워주는 걸 해보려고한다.
이렇게 하게되면 사용자입장에서도 데이터를 가져오는 중이라는걸 직관적으로 알수있기에 UX 측면에서도 꽤나 중요하다.
우선 ZStack으로 감싸준다.
특정 코드 블럭을 {} 같은 Curly Brace로 감쌀때는 그냥 Curly Brace 그 자체를 코드 블럭을 잡고 입력하면 자동으로 감싸진다.
1
2
3
4
5
6
7
ZStack {
    if viewModel.checkedInProfiles.isEmpty {
        // 생략
    } else {
       //  생략
    }
}
LocationVM에 기존에 ProfileVM에 있던 로딩과 관련된 부분을 가져와서 그대로 붙여넣기 해준다
1
2
3
4
@Published var isLoading = false

private func showLoadingView() { isLoading = true }
private func hideLoadingView() { isLoading = false }
그리고 checkedinProfile을 가져오는 함수에 로딩뷰를 띄워주는 함수를 넣어준다.
1
2
3
4
5
6
7
8
9
10
11
func getCheckedInProfiles() {
    showLoadingView() // new
    CloudKitManager.shared.getCheckedInProfiles(for: location.id) { [self] result in
        DispatchQueue.main.async {
            switch result {
            // 생략
            }
            hideLoadingView() // new
        }
    }
}
다시 DetailView로 가서 ZStack 부분에 if를 넣어 로딩중이라면 LoadingView를 보이도록 하는 코드를 추가해준다.
1
2
3
4
5
6
7
8
9
10
11
ZStack {
    if viewModel.checkedInProfiles.isEmpty {
        // 생략
    } else {
       //  생략
    }

    if viewModel.isLoading {
        LoadingView()
    }
}
그리고 실행해보면?
위와같이 loading indicator가 보이는걸 알 수 있다.
체크인 상태 확인하여 버튼을 다르게 만들기
우선 체크인 상태를 확인할 함수를 만들어 줘야한다.
1
2
3
4
5
6
7
8
9
10
11
12
13
14
15
16
17
18
19
20
21
22
func getCheckedInStatus() {
    guard let profileRecordID = CloudKitManager.shared.profileRecordID else {
        return
    }

    CloudKitManager.shared.fetchRecord(with: profileRecordID) { [self] result in
        switch result {
        case .success(let record):
            if let reference = record[DDGProfile.kIsCheckedIn] as? CKRecord.Reference {
                if reference.recordID == location.id {
                    isCheckedIn = true
                    print("isCheckedIn = true")
                } else {
                    isCheckedIn = false
                    print("isCheckedIn = false")
                }
            }
        case .failure(_):
            print("Failed to Fetch Record")
        }
    }
}
updateCheckInStatus 함수와 결이 비슷하다.
이후 detailview로 가서
1
2
3
4
.onAppear(perform: {
    viewModel.getCheckedInProfiles()
    viewModel.getCheckedInStatus() // new
})
해당 코드를 추가해주면 된다.
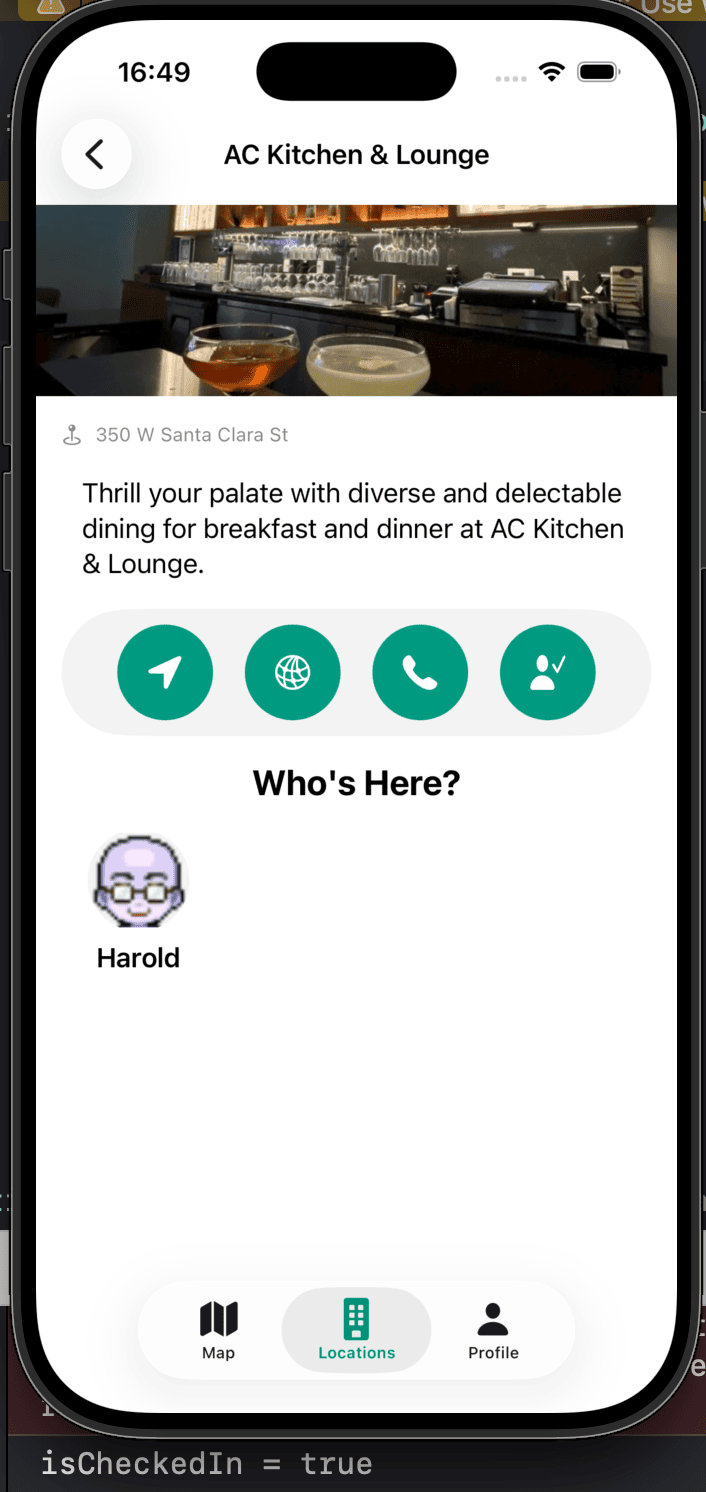
실행하면 이렇게 현재 콘솔에서 true라고 보이는걸 알 수 있다.
이때
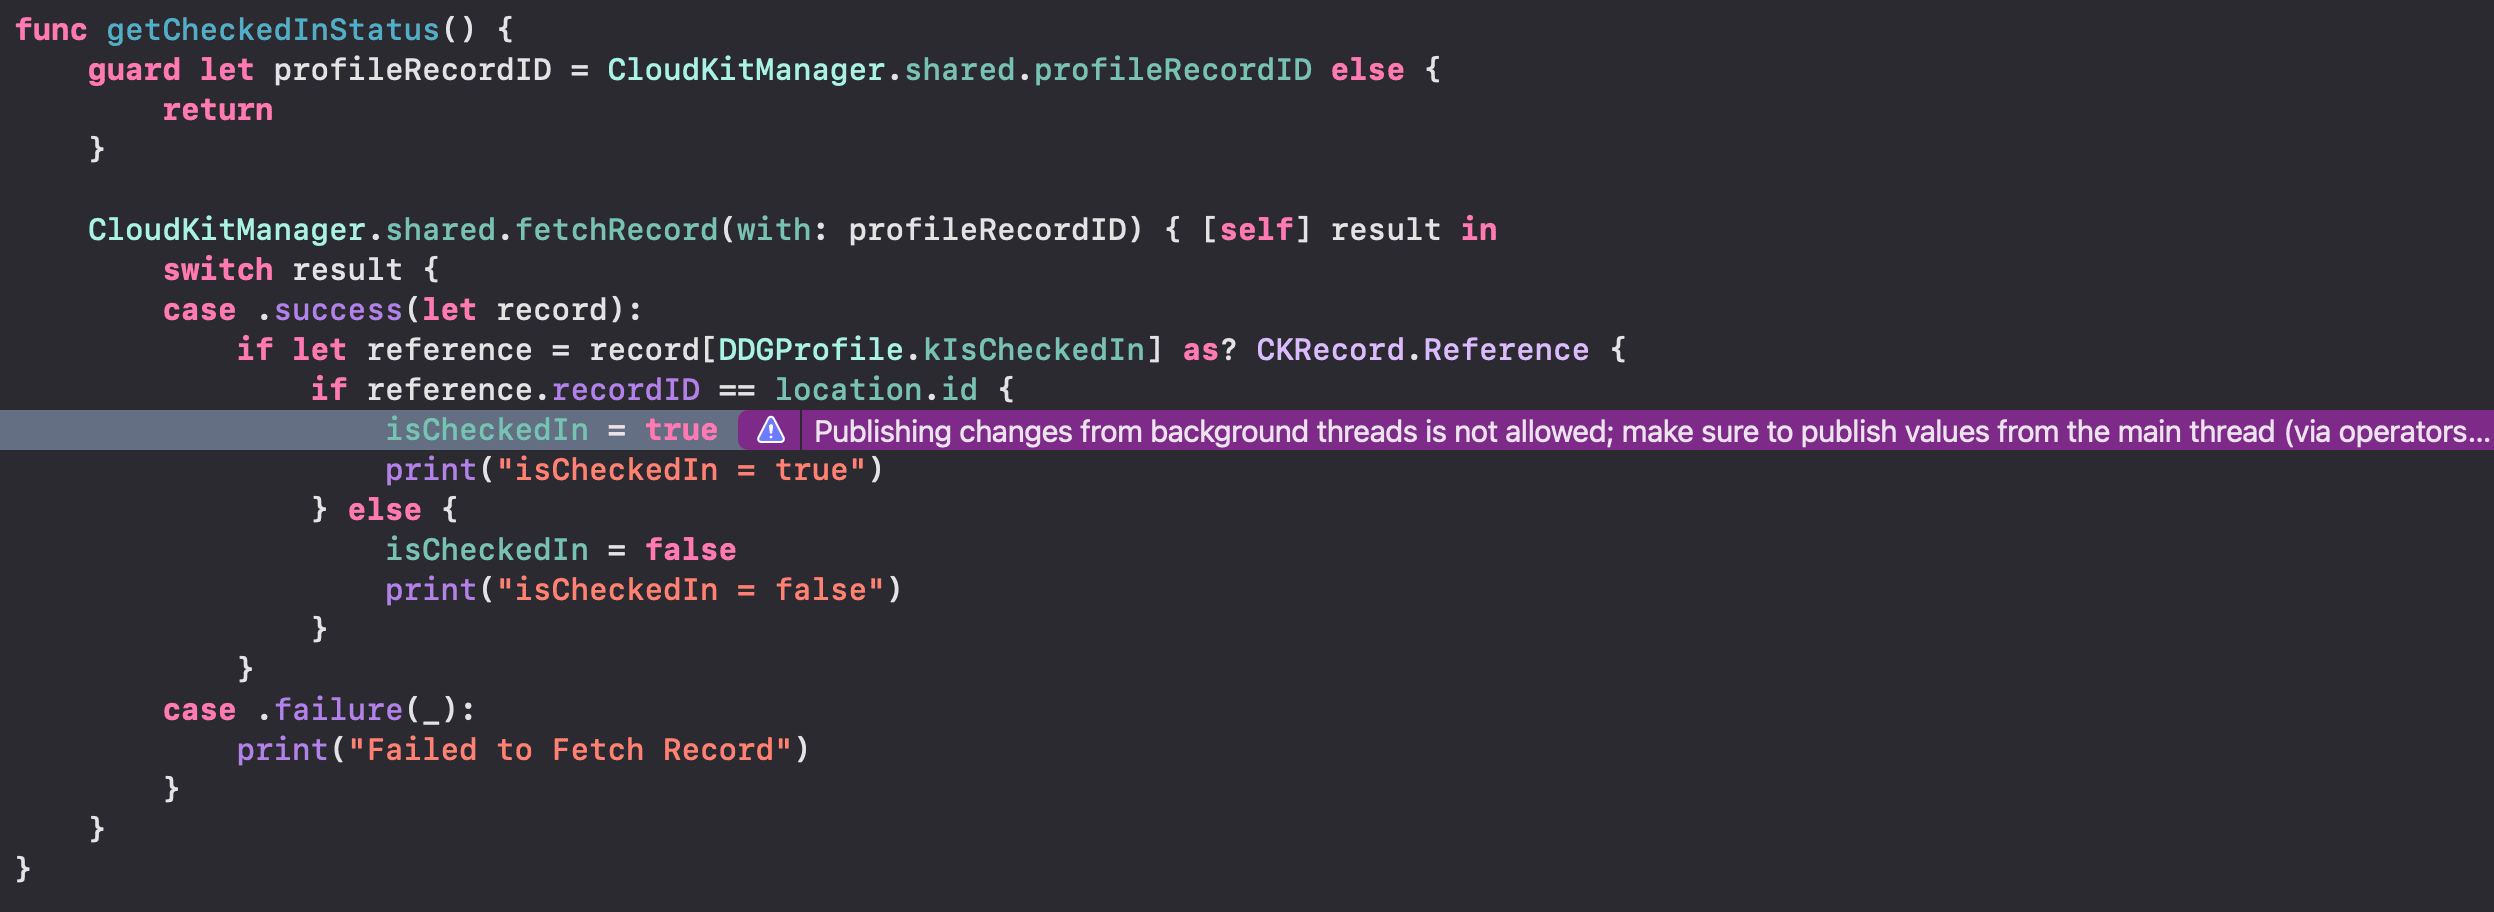
이렇게 또 background 에서 실행하는게 허용되지 않는다고 뜬다.
DispatchQueue를 통해 해결하도록 하자.
1
2
3
4
5
6
7
8
9
10
11
12
13
14
15
16
17
CloudKitManager.shared.fetchRecord(with: profileRecordID) { [self] result in
    DispatchQueue.main.async {
        switch result {
        case .success(let record):
            if let reference = record[DDGProfile.kIsCheckedIn] as? CKRecord.Reference {
                if reference.recordID == location.id {
                    // 생략
                }
            } else {
                isCheckedIn = false // new
                print("isCheckedIn = false - reference is nil")
            }
        case .failure(_):
            print("Failed to Fetch Record")
        }
    }
}
그리고 reference 자체가 없는 경우(아무도 체크인을 안했을 경우)에도 체크인을 하지 않은 경우이므로 예외처리를 해준다.
이렇게 아무도 체크인을 안했을때도 false라고 콘솔에서 확인이 가능하다.
1
2
3
4
5
6
7
if reference.recordID == location.id {
    isCheckedIn = true
    print("isCheckedIn = true")
} else {
    isCheckedIn = false
    print("isCheckedIn = false")
}
이 부분을 이전글과 같은 방식으로
1
 isCheckedIn = reference.recordID == location.id
이렇게 대체해준다.
그리고 이제 진짜 버튼을 다르게 해보도록 한다.
이미 여러 강의에서도 알다시피 이럴땐 삼항연산자를 쓰는게 제일 깔끔하다.
1
LocationActionButton(color: viewModel.isCheckedIn ? .grubRed : .brandPrimary, imageName: viewModel.isCheckedIn ? "person.fill.xmark" : "person.fill.checkmark")
이제 실행해서 작동을 확인해보도록 한다.
아주 작동이 잘 되는걸 알 수 있다.
앱 새로 설치시 체크인 버튼 안나오게 하기
앱을 새로 설치했을때는 당연히 클라우드에 해당 유저에 대한 정보가 없기때문에 체크인이 작동해서는 안된다.
그러므로 해당 버튼을 비활성화하고, 유져가 클라우드에 등록했을때 즉 profile이 생성이 되었을때 버튼을 보여주게 하면된다.
1
2
3
4
5
if let _ = CloudKitManager.shared.profileRecordID {
    Button {
        // 생략
    }
}
let 뒤에 _를 붙인 이유는 해당 변수를 우리가 사용할 일이 없기 때문이다.
RecordID가 존재한다면 버튼을 보여지게 하는 코드이다.

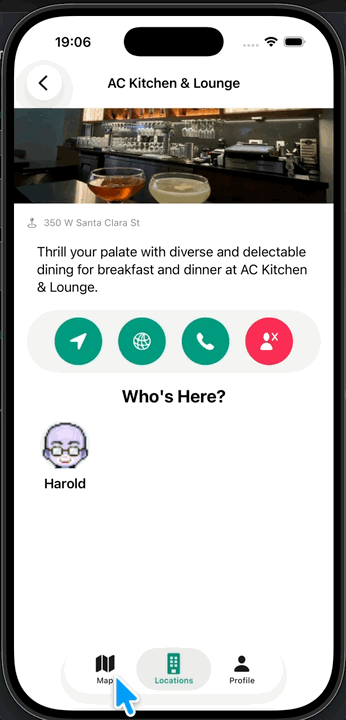
첫화면을 넘어가서 바로 spot을 찾아 들어가면 버튼이 3개만 있는걸 알 수 있다

현재 다른 시뮬레이터에서 체크인을 했기때문에 아래 harold가 보이는 상태.
실패시 Alert 추가
지금까지 제대로 된 통신이 성공했을때의 경우만 코드를 작성했는데 이제는 실패했을 때의 경우도 단순히 Console에 출력 또는 Guard let 부분의 경우 단순히 return으로 만 끝냈었는데 이제는 Alert를 통해 유져에게도 전달을 해보려 한다.
먼저 Alert 전체를 관리하는 Alertitem에서 아래와 같이 코드를 추가해준다.
1
2
3
4
5
6
7
8
9
10
11
static let unableToGetCheckInStatus = AlertItem(title: Text("Server Error"),
                message: Text("Unable to retrieve checked in status of the current user.\nPlease try again."),
                dismissButton: .default(Text("Ok")))

static let unableToCheckInOrOut         = AlertItem(title: Text("Server Error"),
                message: Text("We are unable to check in/out at this time.\nPlease try again."),
                dismissButton: .default(Text("Ok")))

static let unableToGetCheckedInProfiles = AlertItem(title: Text("Server Error"),
                message: Text("We are unable to get users checked into this location at this time.\nPlease try again."),
                dismissButton: .default(Text("Ok")))
이후 LocationDetailVM으로 가서
관련된 부분에 failure 부분을 전부 수정해준다. (해당 부분은 코드가 길어서 생략)
Github: Dub-Dub-Grub Repository