MapKit (19)
VoiceOver 기능 사용하기.
이전글에서 해본적이 있긴한데, 여기선 아마 간단하게 할 듯
참고자료 2019 - Accessibility in SwiftUI 2021 - SwiftUI Accessibility: Beyond the basics Human InterfaceGuidelines - Accessibility How to Navigate Your Phone with VoiceOver(Youtube)
VoiceOver는 보통 App Accessibility 다시 말해 앱 접근성에 관한 내용인데, 화면을 보지 않아도 앱의 인터페이스를 경험할 수 있도록 돕는 화면 읽기 프로그램이다. (from Docs)
MapView
우선 MapView에 적용을 해보려 한다
1
2
3
4
5
6
7
8
9
10
// LogoView
Image(decorative: "ddg-map-logo")

// LocationMapView
VStack {
        LogoView(frameWith: 125)
            .shadow(radius: 10)
            .accessibilityHidden(true)
        Spacer()
        }
여기서 한가지 특이한 점이라면 기존에는
1
2
Image("ddg-map-logo") // before
Image(decorative: "ddg-map-logo") // after
위와 같이 그냥 이미지 명을 해주었는데, 새롭게 하면서 decorative를 추가해주었다는 점이다.
두개 모두 화면에 그려지는 시각적 결과물은 동일하지만, 접근성(Accessibility) 레이어에서의 동작은 아래와 같이 차이가 있다.
| 특징 | Image("name") | Image(decorative: "name") |
|---|---|---|
| 보이스오버(VoiceOver) | 인식함 (포커스 잡힘) | 무시함 (포커스 건너뜀) |
| Label 상태 | 파일명 기반 자동 생성 시도 | 레이블 없음 (Unlabeled) |
| 접근성 트리 | 포함됨 (Accessibility Tree) | 제외됨 (Hidden) |
| 주요 용도 | 의미 있는 정보(로고, 사진 등) 전달 | 단순 배경, 장식용 아이콘, 구분선 |
그리고 accessibilityHidden을 true로 해주었는데 이건 accessibility를 사용하지 않겠다는 것이다. 즉 LogoView는 accessibility를 사용하지않겠다는 것. 그러면 당연히 VoiceOver를 쓸때 이부분은 패스하게 될것이다.
1
2
3
4
5
DDGAnnotation(location: location, number: viewModel.checkedInProfiles[location.id, default: 0])
    .accessibilityLabel(Text("Map Pin \(location.name) \(viewModel.checkedInProfiles[location.id, default: 0]) people checked in."))
    .onTapGesture {
        // 생략
    }
그리고 여기엔 Label을 달아주었다.
오래된 강의인데 당시에는 MapPin만 읽는 버그가 있다고 했다.
테스트를 해보려했는데 Annotation Pin말고 자꾸 Road같은거만 읽어서 패스
List/DetailView
ListView
1
2
3
4
5
6
7
8
9
10
11
12
13
14
// ListVM
func createVoiceOverSummary(for location: DDGLocation) -> String {
    let count = checkedInProfiles[location.id, default: []].count
    let personPlurality = count == 1 ? "person" : "people"

    return "\(location.name) \(count) \(personPlurality) checked in"
}

// ListView
NavigationLink(destination: LocationDetailView(viewModel: LocationDetailViewModel(location: location))) {
    LocationCell(location: location, profiles: viewModel.checkedInProfiles[location.id, default: []])
        .accessibilityElement(children: .ignore)
        .accessibilityLabel(Text(viewModel.createVoiceOverSummary(for: location)))
}
우선 인원수를 말해줄 함수를 만들어 준다. 삼항연산자를 사용했고 사실 여기는 크게 언급할만한 부분이 없어보인다.
accessibilityElement에서 ignore를 한건, Cell의 하위 component에 대해선 VoiceOver를 사용하지 않겠다는 것이다. (사실 accessibility에 대해서 안하겠다는 것)
DetailView
여긴 추가한 Modifier가 많아서 코드는 생략
하지만 하나만 굳이 적어보자면
1
2
3
4
5
6
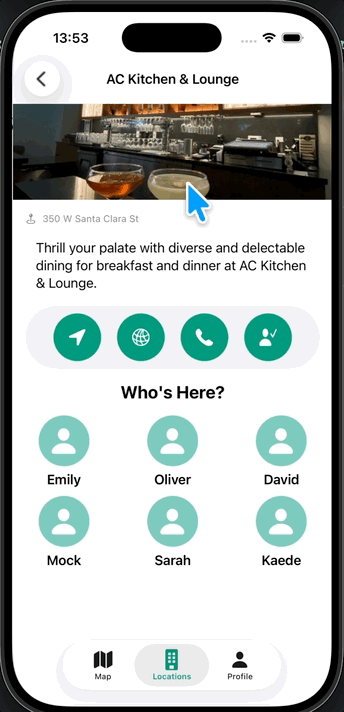
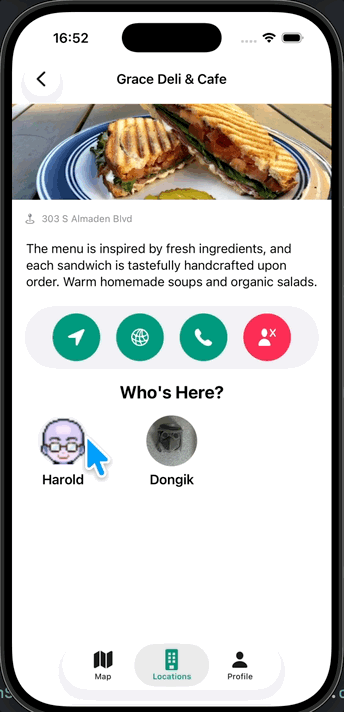
Text("Who's Here?")
.bold()
.font(.title2)
.accessibility(addTraits: .isHeader)
.accessibilityLabel(Text("Who's Here? \(viewModel.checkedInProfiles.count) checked in"))
.accessibilityHint(Text("Bottom section is scrollable"))
순서대로 좀 간단하게 설명을 적어보려 한다.
- addTraits (.isHeader): 해당 요소의 성격(역할)을 정의함. 여기서는 이 텍스트가 섹션의 ‘제목’임을 알려주어 보이스오버 사용자가 헤더 간 이동을 빠르게 할 수 있도록 도움.
- accessibilityLabel: 보이스오버가 읽어줄 기본 텍스트를 대체함. 화면의 텍스트 외에 현재 체크인 인원수 같은 추가적인 정보를 포함하여 더 풍부한 맥락을 전달함.
- accessibilityHint: 해당 요소를 선택했을 때 어떤 동작이 가능한지나 추가 결과를 설명함. 여기서는 하단 섹션을 스크롤 할 수 있다는 가이드를 제공하여 사용자 혼란을 방지함.
Medium 글 참고
ProfileModal
Profile 데이터 연결하기
이부분은 VoiceOver를 하기 앞서, 아직 기능을 완전히 마무리 짓지 않았기에 먼저 끝내려고한다.
Profile을 클릭하면
이렇게 유져 상관없이 Test User가 나오게 된다.
1
2
3
4
5
6
7
8
9
10
11
12
13
// DetailVM
var selectedProfile: DDGProfile? {
    didSet { isShowingProfileModal = true }
}

// DetailView
FirstNameAvatarView(profile: profile)
    // 생략
    .onTapGesture {
        viewModel.selectedProfile = profile
    }

ProfileModalView(isShowingProfileModal: $viewModel.isShowingProfileModal, profile: viewModel.selectedProfile!)
작동이 잘 되는걸 알 수있다.
VoiceOver 구현
1
2
3
4
5
6
7
8
9
10
11
12
13
14
ScrollView {
    LazyVGrid(columns: viewModel.columns) {
        ForEach(viewModel.checkedInProfiles) { profile in
            FirstNameAvatarView(profile: profile)
                .accessibilityElement(children: .ignore)
                .accessibilityAddTraits(.isButton) // new
                .accessibilityHint(Text("Show's \(profile.firstName) profile pop up")) // new
                .accessibilityLabel(Text("\(profile.firstName) \(profile.lastName)"))
                .onTapGesture {
                    viewModel.selectedProfile = profile
                }
        }
    }
}
trait을 추가하고 hint를 사용하여 해당 메세지가 나오도록 해주었다.
그리고
1
2
3
4
5
6
7
8
9
10
11
if viewModel.isShowingProfileModal {
                Color(.systemBackground)
                    // 생략
                    .accessibilityHidden(true)

    ProfileModalView(isShowingProfileModal: $viewModel.isShowingProfileModal, profile: viewModel.selectedProfile!)
    .accessibilityAddTraits(.isModal)
    .transition(.opacity.combined(with: .slide))
    .animation(.easeOut)
    .zIndex(2)
}
이부분은 별도로 voiceover에서 언급을 하지않게 하기위해 숨겨주도록 한다.
그리고 modalview는 말 그대로 Modal 이기에 traits를 추가할때 isModal로 해주도록 한다.
1
2
3
4
VStack(spacing: 16) {
    // 생략
}
.accessibilityHidden(viewModel.isShowingProfileModal)
modal을 보여주나 안보여주냐에 따라 Vstack에 대해 voiceover가 패싱할지 아닐지를 해주도록 한다.
ProfileModalView
1
2
3
4
5
6
7
8
9
10
11
Text(profile.companyName)
    // 생략
    .accessibilityLabel(Text("Works at \(profile.companyName)"))

Text(profile.bio)
    // 생략
    .accessibilityLabel(Text("Bio, \(profile.bio)"))

Image(uiImage: profile.createAvatarImage())
            // 생략
            .accessibilityHidden(true)
이렇게 해주었다. 이미지는 따로 voiceover가 필요없어서 hide
ProfileView
1
2
3
4
5
6
7
8
9
ZStack {
    // 생략
}
.accessibilityElement(children: .ignore)
.accessibilityAddTraits(.isButton)
.accessibilityLabel(Text("Profile Photo"))
.accessibilityHint(Text("Opens the iPhone's photo picker"))

// 생략
이외에도 몇군데 더 추가해주었다.
Deprecated 및 코드 일부 수정
LocationDetailView 쪽의 코드를 일부 수정하도록 한다.
1
2
Text("Who's Here?")
    .accessibilityAddTraits(.isHeader)
기존 .accessibility(addTraits: .isHeader)에서 위의 코드로 바뀌었다.
그리고 코드가 길어서 여기에 적진 않았지만,
1
2
3
4
5
6
7
8
9
10
11
12
13
14
15
// before
Button {
    viewModel.getDirectionsToLocation()
} label: {
    LocationActionButton(color: .brandPrimary, imageName: "location.fill")
        .accessibilityLabel(Text("Get directions"))
}

// after
Button {
    viewModel.getDirectionsToLocation()
} label: {
    LocationActionButton(color: .brandPrimary, imageName: "location.fill")
}
.accessibilityLabel(Text("Get directions"))
이렇게 label 전체의 modifier로 위치가 바뀌었다.
그리고
1
2
3
4
5
Link(destination: URL(string: viewModel.location.websiteURL)!) {
    LocationActionButton(color: .brandPrimary, imageName: "network")
}
.accessibilityRemoveTraits(.isButton)
.accessibilityLabel(Text("Go to website"))
이것도 옮겨주면서 accessibilityRemoveTraits를 추가해주었다. 왜냐면 이건 버튼이 아니라 Link이기 때문
Github: Dub-Dub-Grub Repository