MapKit (23)
LocationDetailView 보강
Extension의 문제점?
1
2
3
4
5
extension LocationDetailView {
    final class LocationDetailViewModel: ObservableObject {
        // 생략
    }
}
이렇게 이전글에서 extension을 사용해서 View와 ViewModel을 1:1 매칭 처럼 해두었다.
근데 약간의 단점이라고 볼수 있는것이,
1
2
3
4
5
6
7
8
9
@ViewBuilder func createLocationDetailView(for location: DDGLocation, in sizeCategory: ContentSizeCategory) -> some View {
    if sizeCategory >= .accessibilityMedium {
        LocationDetailView(viewModel:
        LocationDetailView.LocationDetailViewModel(location: location)).embedInScrollView()
    } else {
        LocationDetailView(viewModel:
        LocationDetailView.LocationDetailViewModel(location: location))
    }
}
이런식으로 LocationDetailView.LocationDetailViewModel 식으로 코드가 길어진다는 것이다. 이로인해 코드의 가독성이 좋아지지 않는다는 단점이 존재한다.
그래서 Extension으로 1:1 매칭을 할지 말지는 본인 판단에 따라 하면 좋지 않을까 싶다
UX 보완
데이터를 가져오는 동안 로딩 인디케이터를 표시하여, 사용자에게 앱이 현재 작동 중임을 직관적으로 전달해보도록 한다.
1
2
3
4
5
6
7
8
9
10
11
12
13
14
15
16
17
18
19
20
func updateCheckInStatus(to checkinStatus: CheckInStatus) {
        // Retrieve the DDGProfile
    guard let profileRecordID = CloudKitManager.shared.profileRecordID else {
        // 생략
    }

    showLoadingView() // new
    // 생략

        CloudKitManager.shared.save(record: record) { result in
            DispatchQueue.main.async {
                hideLoadingView() // new
            }
        }

    // 생략
     case .failure(_):
        hideLoadingView() // new
        alertItem = AlertContext.unableToCheckInOrOut
}
생략이 많아 두서 없지만 뭐 대충 보면 어디인지는 알듯 하다.
그리고 DetailView의 체크인에서 로딩중일때는 버튼을 비활성화 하도록 한다.
1
2
3
4
5
6
7
8
9
if let _ = CloudKitManager.shared.profileRecordID {
    Button {
       // 생략
       playHaptic()
    } label: {
        // 생략
    }
    .disabled(viewModel.isLoading)
}
코드 다듬기
그리고 위의 코드에 playHaptic()이 있었는데, 버튼을 누를때마다 햅틱이 작동하는게 아니라
CloudKit에서 제대로 update가 되었을때 햅틱을 작동하게 하도록 바꾼다.
하지만 playHaptic은 View에서만 작동하도록 View+Extension에서 관리를 했다.
이제 이부분을 별도로 HapticManager를 만들어서 관리를 한다.
1
2
3
4
5
6
7
8
9
10
11
12
13
14
15
16
17
18
19
20
struct HapticManager {

    static func playSuccess() {
        let generator = UINotificationFeedbackGenerator()
        generator.notificationOccurred(.success)
    }

}

// LocationDetailVM
CloudKitManager.shared.save(record: record) { result in
    DispatchQueue.main.async {
        hideLoadingView()
        switch result {
        case .success(let record):
            HapticManager.playSuccess()
            // 생략
        }
    }
}
실행해보면
이렇게 잘 되는걸 알 수 있다.
실제로 로딩중에는 눌러도 작동이 안되는걸 알 수 있었다.
그리고
updateCheckInStatus 함수안에
1
2
3
4
// before
isCheckedIn = checkinStatus == .checkedIn
// After
isCheckedIn.toggle()
코드 가독성을 위해 위와 같이 바꾸어 주었다.
그리고 VM에
1
2
3
4
5
6
7
8
//VM
func show(profile: DDGProfile, in sizeCategory: ContentSizeCategory) {
    // 생략
}
//View
.onTapGesture {
    viewModel.show(profile: profile, in: sizeCategory)
}
여기 파라미터의 profile을 굳이 profile: profile 이렇게 할필요가 없기에 가독성을 높여주기위해 파라미터 앞에 _를 붙여준다.
1
2
3
4
5
6
7
func show(_ profile: DDGProfile, in sizeCategory: ContentSizeCategory) {
    // 생략
}

.onTapGesture {
    viewModel.show(profile, in: sizeCategory)
}
ProfileView 보완
현재 MockData에
1
2
3
4
5
6
7
8
9
static var profile: CKRecord {
    let record = CKRecord(recordType: RecordType.profile)
    record[DDGProfile.kFirstName] = "Test"
    record[DDGProfile.kLastName] = "User"
    record[DDGProfile.kCompanyName] = "Best Company Ever"
    record[DDGProfile.kBio]     = "This is my bio, I hope it's not too long I can't check character count"

    return record
}
유져의 이름을 보면 4글자로 아주 간단하다.
그렇다면 이름이 엄청 길땐 어떤 현상이 발생할까?
1
2
3
record[DDGProfile.kFirstName] = "SuperLongFirstName"
record[DDGProfile.kLastName] = "SuperLongLastNameSenior"
record[DDGProfile.kCompanyName] = "Super Long Company Incorporated"
1
2
3
4
5
6
7
8
// ProfileModalView
Text(profile.firstName + " " + profile.lastName)
    // 생략
    .padding(.horizontal)

Text(profile.companyName)
    // 생략
    .padding(.horizontal)
이렇게 패딩을 추가하면
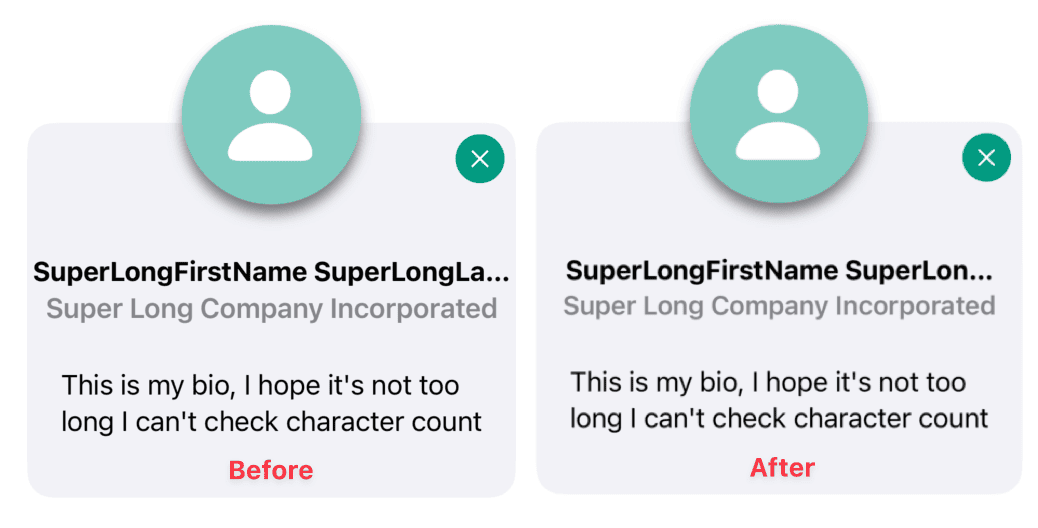
글자가 길더라도 Frame에 꽉 차지 않고 패딩을 주어 약간은 여유있게 보이게 된다.
그리고 DetailView에 profile을 내릴때ㄸ spacer때문에 하단쪽이 조금 가려지는데 이부분을 보완하기위해 spacer도 지워준다
1
2
3
4
if viewModel.isLoading {
    LoadingView()
}
// Spacer() <- Delete
Before & After 
Text, Color를 별도의 View로 관리
현재 detailview에서 다른 부분은 StackView로 관리 되지만,
1
2
Text("Who's Here?")
    // 생략
여기만 현재 그냥 Text로 덩그러니 있다.
그래서 이부분도 별도의 View를 만들어 관리를 해본다.
1
2
3
4
5
6
7
8
9
fileprivate struct GridHeaderTextView: View {

    var number: Int

    var body: some View {
        Text("Who's Here?")
            // 생략
    }
}
이렇게 GridHeaderTextView를 만들어 주었다.
물론 LocationDetailView 파일 내에서만 쓰이므로 fileprivate를 사용
Color 부분도
1
2
3
4
5
6
7
fileprivate struct FullScreenBlackTransparencyView: View {

    var body: some View {
        Color(.black)
            // 생략
    }
}
이렇게 별도의 View를 만들어준다.
Modifer 관리
1
2
3
4
5
6
7
8
FirstNameAvatarView(profile: profile)
    .accessibilityElement(children: .ignore)
    .accessibilityAddTraits(.isButton)
    .accessibilityHint(Text("Show's \(profile.firstName) profile pop up"))
    .accessibilityLabel(Text("\(profile.firstName) \(profile.lastName)"))
    .onTapGesture {
        viewModel.show(profile, in: sizeCategory)
    }
이런식으로 VoiceOver 기능을 추가하다보니 Modifier가 상당히 많아졌다.
그래서 정말 View에 필요한 Modifier를 빼고 다른 Modifier들은 옮겨주어 메인 코드의 가독성을 높이고 좀 더 관리하기 용이하게 해본다.
1
2
3
4
5
6
7
8
9
10
11
12
13
14
15
16
17
18
19
20
21
22
fileprivate struct FirstNameAvatarView: View {

    @Environment(\.sizeCategory) var sizeCategory
    var profile: DDGProfile

    var body: some View {
        VStack {
            AvatarView(image: profile.avatarImage,
                       size: sizeCategory >= .accessibilityMedium ? 100 : 64)

            Text(profile.firstName)
                .bold()
                .lineLimit(1)
                .font(.headline)
                .minimumScaleFactor(0.75)
        }
        .accessibilityElement(children: .ignore)
        .accessibilityAddTraits(.isButton)
        .accessibilityHint(Text("Show's \(profile.firstName) profile pop up"))
        .accessibilityLabel(Text("\(profile.firstName) \(profile.lastName)"))
    }
}
이건 전체 코드를 다 적었는데 FirstNameAvatarView 자체 내부의 Vstack에 Modifier를 옮겨주었다.
그러면
1
2
FirstNameAvatarView(profile: profile)
    .onTapGesture { viewModel.show(profile, in: sizeCategory) }
이렇게 깔끔하게 관리가 된다.
1
ProfileModalView(isShowingProfileModal: $viewModel.isShowingProfileModal, profile: viewModel.selectedProfile!)
이부분도 Modifer를 ProfileModalView로 가서 ZStack 끝단에 옮겨주자. (코드는 생략)
그리고 다시 앱을 실행해서 제대로 작동하는지도 확인을 해보자.
코드 관리 & 정돈
그리고
1
2
3
4
5
6
ZStack {
    Capsule()
        .frame(height: 80)
        .foregroundStyle(.secondary.opacity(0.1))
}
.padding(.horizontal)
이부분을 지워준다.
그리고 Vstack의 Modifier로
1
2
3
.padding(EdgeInsets(top: 10, leading: 20, bottom: 10, trailing: 20))
.background(Color(.secondarySystemBackground))
.clipShape(Capsule())
를 추가해주었다.
그리고 Button도
1
2
LocationActionButton(color: viewModel.isCheckedIn ? .grubRed : .brandPrimary, imageName: viewModel.isCheckedIn ? "person.fill.xmark" : "person.fill.checkmark")
    .accessibilityLabel(Text(viewModel.isCheckedIn ? "Check out of location" : "Check into location"))
색을 정하는 부분의 코드가 길어서 VM에서 관리하게 코드를 조금 다듬어 본다.
1
2
3
4
5
6
7
8
//DetailVM
var buttonColor: Color { isCheckedIn ? .grubRed : .brandPrimary }
var buttonImageTitle: String { isCheckedIn ? "person.fill.xmark" : "person.fill.checkmark" }
var buttonA11yLabel: String { isCheckedIn ? "Check out of location" : "Check into location" }

//DetailView
LocationActionButton(color: viewModel.buttonColor, imageName: viewModel.buttonImageTitle)
    .accessibilityLabel(Text(viewModel.buttonA11yLabel))
이렇게 3항연산자 부분을 일종의 Computed Property화 해서 깔끔하게 다듬어 주었다.
그리고 기조 Hstack 부분을
1
2
3
4
5
6
7
8
9
10
11
12
fileprivate struct ActionButtonHStack: View {

    @ObservedObject var viewModel: LocationDetailViewModel

    var body: some View {
        HStack(spacing: 20) {
            Button {
                // 생략
            }
        }
    }
}
이렇게 별도의 View로 또 빼준다. (사실 이부분의 코드가 길긴했다.)
이건 뭐 이전 프로젝트때도 그랬지만, View의 가독성과 코드의 효율적인 관리를 위해 크게 한 화면을 기준으로 구성에따라 Section으로 구분을 하는데, 그 Section을 다시 View로 분할 해서 Main View의 관점에선 그 View를 가져다 쓰기만 하면 되므로 코드 가독성이 훨씬 상승하게 된다. 그리고 유지 보수도 용이해진다.
그리고 또
1
2
3
4
5
HStack {
    AddressView(address: viewModel.location.address)
    Spacer()
}
.padding(.horizontal)
이 부분 역시도 AddressView에 HStack과 padding을 넣어주면 보기 더 편하므로,
1
2
3
4
5
6
7
8
9
10
fileprivate struct AddressHStackView: View {
    // 생략
    var body: some View {
        HStack{
            // 생략
            Spacer()
        }
        .padding(.horizontal)
    }
}
이렇게 해주도록 한다.
그리고 AddressHStackView로 이름을 바꿔주었다.
같은 방법으로 Grid가 있던 부분도, AvatarGridView로 별도로 만들어서 정리를 해주도록 하자 (코드생략)
그 결과
1
2
3
4
5
6
BannerImageView(image: viewModel.location.bannerImage)
AddressHStackView(address: viewModel.location.address)
DescriptionView(description: viewModel.location.description)
ActionButtonHStack(viewModel: viewModel)
GridHeaderTextView(number: viewModel.checkedInProfiles.count)
AvatarGridView(viewModel: viewModel)
DetailView에 복잡했던 코드가 이렇게 간결해진걸 알 수 있다. (물론 아래에 코드가 많긴하다.)
동일한 방법으로 ProfileView도 다듬는다. (코드는 생략)
Github: Dub-Dub-Grub Repository