MapKit (24)
CloudKitManager
코드 다듬기
1. 관계 정보 추출 로직 최적화
1
2
3
4
5
6
7
8
9
10
11
12
13
14
15
16
17
18
// Before
operation.recordFetchedBlock = { record in
    // Build our dictionary
    let profile = DDGProfile(record: record)

    guard let locationReference = profile.isCheckedIn else { return }

    checkedInProfiles[locationReference.recordID, default: []].append(profile)
}
// After
operation.recordFetchedBlock = { record in
    // Build our dictionary
    let profile = DDGProfile(record: record)

    guard let locationReference = record[DDGProfile.kIsCheckedIn] as? CKRecord.Reference else { return }

    checkedInProfiles[locationReference.recordID, default: []].append(profile)
}
CloudKit 원본 레코드 직접 접근 방식으로 변경한 이유
기존 profile.isCheckedIn 방식에서 record[DDGProfile.kIsCheckedIn] as? CKRecord.Reference 방식으로 변경한 이유는 다음과 같다.
- 데이터 무결성 및 안전성:
- 모델 객체(
DDGProfile) 내부의 가공된 로직을 거치지 않고, CloudKit이 내려준 원본 데이터(CKRecord)에서 직접 값을 추출함으로써 데이터 오염이나 모델 로직 오류로 인한 사이드 이펙트를 방지한다.
- 모델 객체(
- 성능 및 효율성:
profile객체를 생성(초기화)하는 과정과 별개로, 필요한 키(kIsCheckedIn)에만 즉각적으로 접근하여 타입 캐스팅을 수행하므로 더 가볍고 빠르다.
- 의도의 명확성:
- 이 로직의 목적이 ‘레퍼런스 ID’를 추출하여 딕셔너리의 키로 사용하는 것임을 명확히 한다. 즉, 객체의 상태를 이용하는 것이 아니라 원본 레코드의 관계(Reference) 정보를 직구로 가져오는 것에 포커스를 둔다.
- 결론:
- 모델(Model)에 의존하기보다 원본 레코드(Raw Data)에서 직접 관계 정보를 뽑아 쓰는 것이 CloudKit 작업 시 더 안전하고 표준적인 관습(Best Practice)에 가깝다.
그에따라 DDGProfile에 있던 isCheckedIn 부분은 지워준다.
2. 데이터 변환 로직의 모델 통합 및 축약
CloudKit 데이터 변환 방식 개선 (convertToDDGLocation 제거)
1
2
3
4
5
6
7
8
9
10
11
12
13
14
15
16
17
18
19
//before
func getLocation(completed: @escaping (Result<[DDGLocation], Error>) -> Void) {
    // 생략
    CKContainer.default().publicCloudDatabase.perform(query, inZoneWith: nil) { records, error in
        // 생략
        let locations = records.map { $0.convertToDDGLocation() }
        completed(.success(locations))
    }
}
//after
func getLocations(completed: @escaping (Result<[DDGLocation], Error>) -> Void) {
    // 생략
    CKContainer.default().publicCloudDatabase.perform(query, inZoneWith: nil) { records, error in
        // 생략
        let locations = records.map(DDGLocation.init)
        completed(.success(locations))
    }
}
// convert함수가 있던 CKRecord extension 역시 지운다.
- 모델 중심의 설계 (응집도 향상) 기존에는 외부 익스텐션 등에서 CKRecord를 모델로 바꾸는 로직을 관리했으나, 이를 모델(DDGLocation) 내부의 init(record: CKRecord)로 통합했다. 모델 스스로가 원본 레코드로부터 자신을 초기화하는 방법을 정의하게 함으로써 객체 생성의 책임을 명확히 하고 유지보수를 용이하게 했다.
- 클로저의 단계별 축약 과정 records.map을 통해 [CKRecord]를 [DDGLocation]으로 변환하는 코드는 Swift의 문법적 설탕(Syntactic Sugar)을 통해 다음과 같이 축약된다.
- 1단계: 기본 클로저 (Standard Closure) 인자와 반환 타입을 모두 명시하는 가장 기초적인 형태이다.
1
2
3
records.map { (record: CKRecord) -> DDGLocation in
  return DDGLocation(record: record)
}
- 2단계: 단축 인자 이름 (Shorthand Argument Names) $0을 사용하여 인자 선언을 생략하고, 단일 실행문인 경우 return 키워드도 생략한다.
1
records.map { DDGLocation(record: $0) }
- 3단계: 함수 참조 (Function Reference) - 최종형 클로저가 인자를 받아 다른 함수의 인자로 그대로 전달만 하는 경우, 클로저 표현식 자체를 생략하고 생성자(init) 이름만 전달할 수 있다.
1
records.map(DDGLocation.init)
- 결론 및 설계적 이점
- 가독성: map(DDGLocation.init)은 데이터를 하나씩 꺼내서 이 타입으로 초기화하라라는 의도를 가장 간결하고 명확하게 전달한다.
- 안전성: 옵셔널 캐스팅(as?)과 Nil 병합 연산자(??)를 통한 기본값 처리가 모델 생성 단계에서 일괄 수행되므로 뷰에서는 항상 안전한 상태의 데이터를 보장받는다.
- 확장성: 새로운 필드가 추가되더라도 init 내부 로직만 수정하면 되므로 전체적인 코드 확장성이 높아진다.
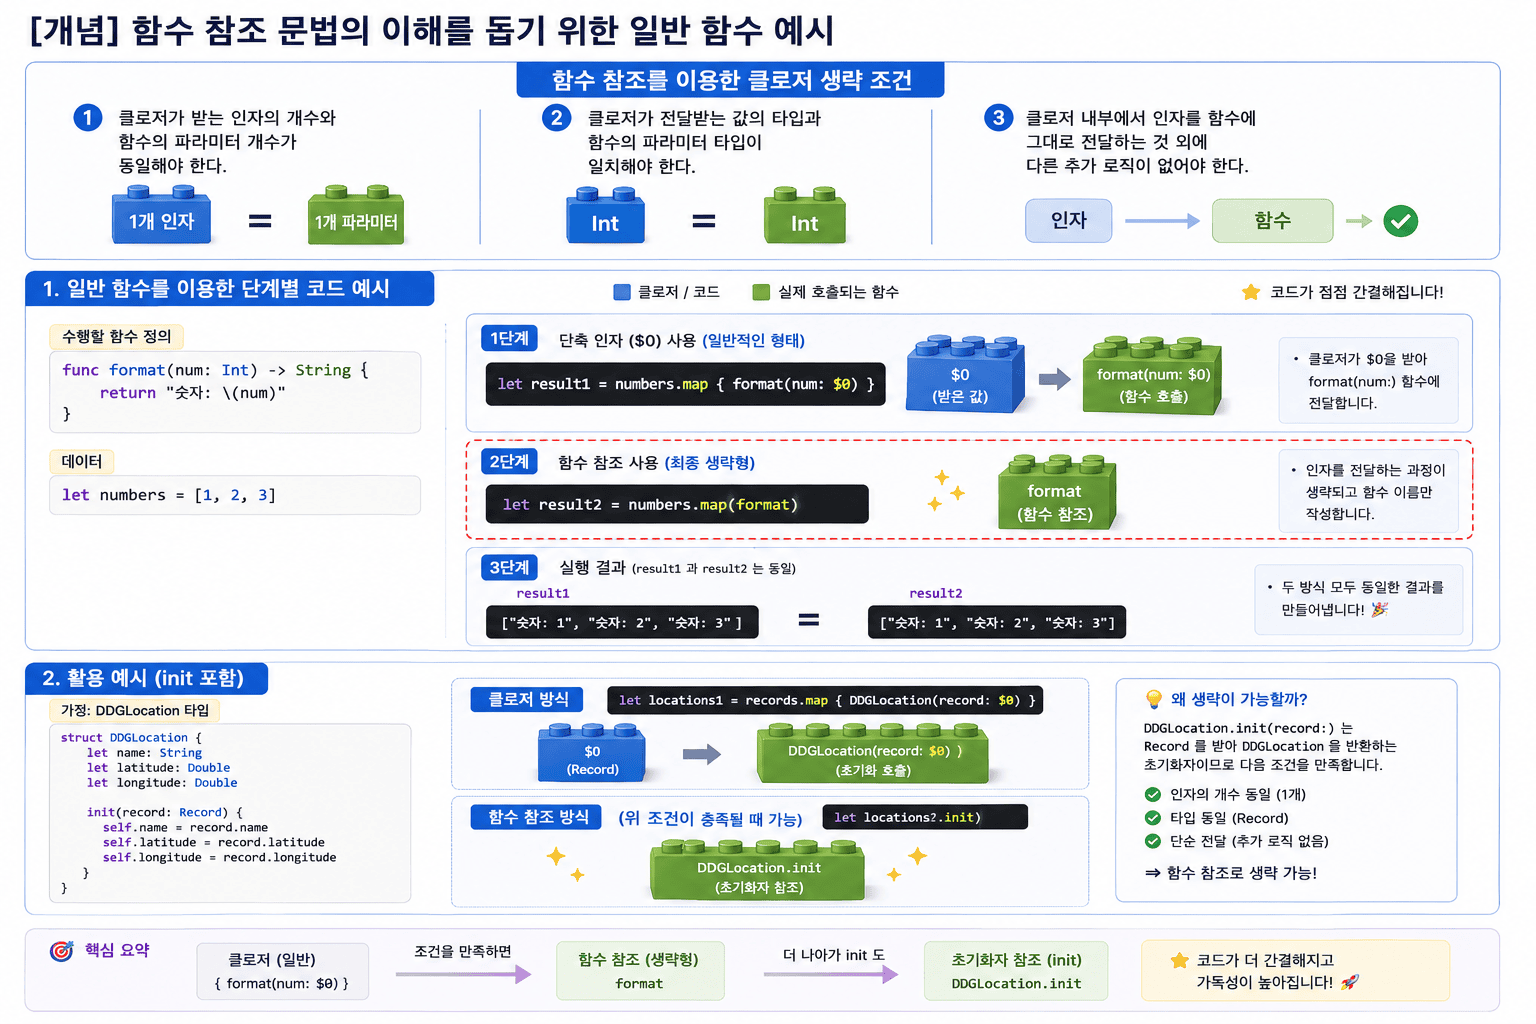
[개념] 함수 참조 문법의 이해를 돕기 위한 일반 함수 예시
그래도 혹시몰라 예시를 하나 만들어 본다.
우선 조건은 다음과 같다.
함수 참조를 이용한 클로저 생략 조건
- 클로저가 받는 인자의 개수와 함수의 파라미터 개수가 동일해야 한다.
- 클로저가 전달받는 값의 타입과 함수의 파라미터 타입이 일치해야 한다.
- 클로저 내부에서 인자를 함수에 그대로 전달하는 것 외에 다른 추가 로직이 없어야 한다.
일반 함수를 이용한 단계별 코드 예시
1
2
3
4
5
6
7
8
9
10
11
12
13
14
15
16
17
18
19
// 수행할 함수 정의
func format(num: Int) -> String {
    return "숫자: \(num)"
}

let numbers = [1, 2, 3]

// 1단계: 단축 인자 ($0) 사용 (일반적인 형태)
let result1 = numbers.map { format(num: $0) }

// 2단계: 함수 참조 사용 (최종 생략형)
// 인자를 전달하는 과정이 생략되고 함수 이름만 작성한다.
let result2 = numbers.map(format)

3. 활용 예시 (init 포함)
// 클로저 방식
let locations = records.map { DDGLocation(record: $0) }
// 함수 참조 방식 (위 조건이 충족될 때 가능)
let locations = records.map(DDGLocation.init)
[심화] 연산자와 함수 참조의 원리: reduce(0, +)
위에서 배운 함수 참조 원리는 연산자에도 동일하게 적용된다.
1. 코드 구조 비교 고차함수 reduce가 요구하는 함수의 형태와, Swift 표준 라이브러리에 정의된 + 연산자의 형태를 비교해 보면 그 비밀을 알 수 있다.
1
2
3
4
5
// 1. reduce 함수의 정의 (표준 라이브러리)
func reduce<Result>(_ initialResult: Result, _ nextPartialResult: (Result, Element) -> Result) -> Result

// 2. + 연산자의 정의 (표준 라이브러리)
func + (lhs: Int, rhs: Int) -> Int
2. 타입 매칭 (Type Matching)의 마법 numbers 배열이 [Int] 타입일 때, reduce는 내부적으로 (Int, Int) -> Int 형식의 함수를 기다린다. 이때 + 연산자 역시 정확히 Int 두 개를 받아 Int 하나를 내놓는 구조이므로, 둘은 완벽하게 결합될 수 있다.
- reduce의 파라미터 구멍:
(Int, Int) -> Int - + 연산자의 실제 형태:
(Int, Int) -> Int
3. 단계별 축약 과정 정석적인 클로저 표현부터 시작해서 연산자만 남기는 최종 단계까지의 변화는 다음과 같다.
1
2
3
4
5
// 1. reduce 함수의 정의 (표준 라이브러리)
func reduce<Result>(_ initialResult: Result, _ nextPartialResult: (Result, Element) -> Result) -> Result

// 2. + 연산자의 정의 (표준 라이브러리)
func + (lhs: Int, rhs: Int) -> Int
💡 한 줄 요약 초기값(0)은 연산의 시작점을 알려주는 데이터(값)이고, 연산자(+)는 그 값들을 요리하는 방법(함수)이다. 입구와 출구의 타입 퍼즐만 맞으면 Swift에서는 함수 이름이나 연산자만으로 코드를 극도로 압축할 수 있다.

Cursor 사용하기
이전에 getCheckedInProfilesDictionary 함수를 만들때 cursor는 나중에 한다고 했는데 (강의에서) 이제 이부분을 해보도록 한다.
1
2
3
4
5
6
7
8
operation.queryCompletionBlock = { cursor, error in
    guard error == nil else {
        completed(.failure(error!))
        return
    }
    // handle cursor in later video
    completed(.success(checkedInProfiles))
}
사실 여기 보면 Completion Block에 cursor와 error 두개를 보낸다.
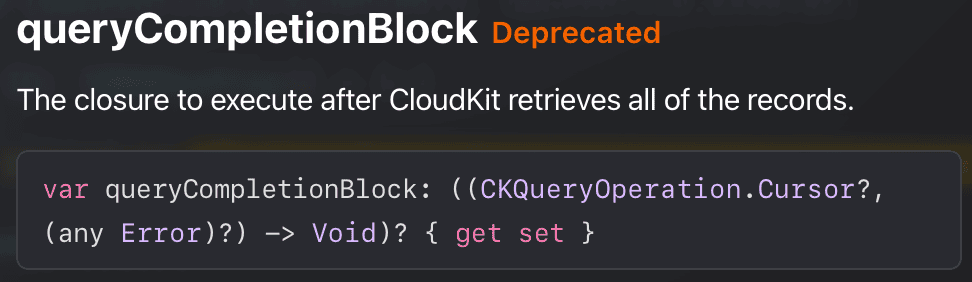
물론 현재는 Deprecated 되어있는 상태 (이후에 버전업에 관한 글을 쓸 예정)
CKQueryOperation.Cursor의 정의와 역할
그렇다면 Cursor는 도대체 뭘까?
CKQueryOperation.Cursor Docs에 따르면 Cursor는 쿼리의 중단점과 남은 결과를 가져오기 위한 시작점을 표시하는 객체이다.
1. 주요 특징
- 시스템 관리 객체: 개발자가 직접 이 클래스의 인스턴스를 생성하지 않는다.
- 자동 생성: 쿼리 결과가 설정된 한도(Limit)를 초과할 경우, CloudKit이 자동으로 Cursor를 제공한다.
- 연속성 보장: 제공받은 Cursor를 사용하여 새로운
CKQueryOperation을 생성하면, 동일한 쿼리의 ‘다음 묶음(Batch)’ 결과를 이어서 가져올 수 있다.
2. 작동 메커니즘 전체 데이터가 100개인데 한 번에 20개만 가져왔다면, 서버는 21번째 데이터의 위치를 가리키는 Cursor를 반환한다. 이 Cursor는 일종의 ‘데이터 책갈피’ 역할을 수행하며, 다음 작업을 어디서부터 재개해야 하는지 알려주는 이정표가 된다.
현재는 데이터가 그리 많지 않기에 사용을 하지 않았으나, 데이터가 많은걸 관리할때는 cursor는 반드시 필요하다.
cursor를 사용한 함수 만들기
continueWithCheckedInProfilesDict라는 함수를 만들어본다.
1
2
3
4
5
6
7
8
9
10
11
12
13
14
15
16
17
18
19
20
21
22
23
24
25
26
27
28
29
30
31
32
33
34
35
36
37
38
39
40
func continueWithCheckedInProfilesDict(cursor: CKQueryOperation.Cursor,
dictionary: [CKRecord.ID: [DDGProfile]],
completed: @escaping (Result<[CKRecord.ID: [DDGProfile]], Error>) -> Void) {
var checkedInProfiles = dictionary
let operation = CKQueryOperation(cursor: cursor)
// operation.resultsLimit = 1
operation.recordFetchedBlock = { record in
let profile = DDGProfile(record: record)
guard let locationReference = record[DDGProfile.kIsCheckedIn] as? CKRecord.Reference else { return }
checkedInProfiles[locationReference.recordID, default: []].append(profile)
}
operation.queryCompletionBlock = { cursor, error in
guard error == nil else {
completed(.failure(error!))
return
}
if let cursor = cursor {
print("⭕️ Recursive cursor is not nil - \(cursor)")
print("👨👩👧👦 Current dictionary - \(checkedInProfiles)")
self.continueWithCheckedInProfilesDict(cursor: cursor, dictionary: checkedInProfiles) { result in
switch result {
case .success(let profiles):
print("😀⭕️ Recursive Success - \(profiles)")
completed(.success(profiles))
case .failure(let error):
print("❌⭕️ Recursive cursor error - \(error)")
completed(.failure(error))
}
}
} else {
completed(.success(checkedInProfiles))
}
}
CKContainer.default().publicCloudDatabase.add(operation)
}
우선 전체적인 틀은 기존에 만든 getCheckedInProfilesDictionary와 유사하다.
사실 코드 전체를 적긴 했지만 포커스를 둬야하는곳은
1
2
3
4
5
6
7
8
9
10
11
12
13
14
15
16
17
18
19
20
21
22
23
operation.queryCompletionBlock = { cursor, error in
guard error == nil else {
completed(.failure(error!))
return
}
if let cursor = cursor {
print("⭕️ Recursive cursor is not nil - \(cursor)")
print("👨👩👧👦 Current dictionary - \(checkedInProfiles)")
self.continueWithCheckedInProfilesDict(cursor: cursor, dictionary: checkedInProfiles) { result in
switch result {
case .success(let profiles):
print("😀⭕️ Recursive Success - \(profiles)")
completed(.success(profiles))
case .failure(let error):
print("❌⭕️ Recursive cursor error - \(error)")
completed(.failure(error))
}
}
} else {
completed(.success(checkedInProfiles))
}
}
여기다.
여기서 봐야하는건 바로 self.continueWithCheckedInProfilesDict를 통해 함수를 재호출 한다는 것.
그리고 이 코드들이 그대로 getCheckedInProfilesDictionary여기에도 그대로 들어간다.
그리고 중간중간 확인을위해 print를 사용해주었다.
또한 현재 operation.resultsLimit = 1 이부분을 주석을 잡았는데, 테스트 용이다. (우리는 데이터 수가 현저하게 작기에 1로 해두고 커서를 확인하기 위함.)
그리고
1
2
3
4
5
6
7
8
9
10
11
//CloudKitManager
func getCheckedInProfilesDictionary(completed: @escaping (Result<[CKRecord.ID: [DDGProfile]], Error>) -> Void) {
        print("✅ Network call fired off")
        // 생략
}

//LocationListView
.onAppear {
    print("👀 onAppear called")
    viewModel.getCheckedInProfilesDictionary()
}
print를 통해 모든 시퀀스 작동을 확인해보도록 한다.
이제 실행해서 콘솔을 확인해보도록 한다.
👀 onAppear called
✅ Network call fired off
1️⃣ Inital cursor is not nil -
👨👩👧👦 Current dictionary -
⭕️ Recursive cursor is not nil -
반복 생략..
😀⭕️ Recursive Success -
반복 생략..
😀1️⃣ Initial Cursor Success -
뭐 대충 이런식으로 나온다. resultsLimit가 1개라서 출력되는게 많다.
Weak Self 사용하기

이건 예전에 한번 다뤄봤는데, 이전글을 한번 읽어보면 좋을듯?
1
2
3
4
5
6
7
8
9
10
11
12
13
// LocationVM
func getCheckedInProfilesDictionary() {
        CloudKitManager.shared.getCheckedInProfilesDictionary { result in
            DispatchQueue.main.async { [weak self] in
                switch result {
                case .success(let checkedInProfiles):
                    self?.self.checkedInProfiles = checkedInProfiles
                case .failure(_):
                    self?.alertItem = AlertContext.unableToGetAllCheckedInProfiles
                }
            }
        }
    }
뭐 알다시피 이런식으로 사용하면 되긴하다.
하지만 강의에선 보여주기만 하고 pass
순간 혼동이 조금 생겼어서 정리를 한다.
self?. 가 두 가지 역할(옵셔널 체이닝 + 변수 구분)을 동시에 하는 이유
[weak self]로 인한 옵셔널 처리와, 변수 이름 충돌로 인한 영역 구분을 각각 별개의 키워드로 처리해야 할 것 같지만, Swift에서는 문법을 단순화하기 위해 self?. 하나로 묶어서 처리한다.
1. 처음에 한 잘못된 생각
self?: [weak self]로 인해 nil일 수도 있는 뷰모델 인스턴스에 접근한다..self:case .success(let checkedInProfiles)와 이름이 겹치니까 “내 프로퍼티 변수”임을 명시한다.- 구조:
(옵셔널 self 정제) -> (프로퍼티 영역 명시) -> (변수명)=self?.self.checkedInProfiles
2. Swift 컴파일러의 처리 방식 (문법적 통합)
- Swift에서는
self?.를 쓰는 순간, 이미 이 키워드가 바깥쪽 클래스(뷰모델)의 인스턴스를 가리키고 있음이 확정된다. - 즉,
self?.뒤에 오는 단어는case문의 지역 변수가 아니라, 무조건 뷰모델 클래스 내부의 프로퍼티로 컴파일러가 알아서 인식한다. - 따라서 영역 구분을 위해
.self를 한 번 더 적을 필요 없이,self?.뒤에 곧바로 변수 이름을 적어주면 두 가지 목적이 한 번에 달성된다.
1
2
3
4
5
6
7
8
9
10
DispatchQueue.main.async { [weak self] in
    switch result {
    case .success(let checkedInProfiles):
        // self?. 가 [1. 옵셔널 체크]와 [2. 클래스 프로퍼티 지정]을 동시에 수행함
        self?.checkedInProfiles = checkedInProfiles

    case .failure(_):
        self?.alertItem = AlertContext.unableToGetAllCheckedInProfiles
    }
}
참고자로 Medium, avanderlee
Github: Dub-Dub-Grub Repository