MapKit (32)
iOS 17 Update
Resource
기존에 Image를 Asset에 넣을경우 아래와 같이 String으로 입력했어야 했다. 이때 오타가 발생하면 해당 이미지를 사용못하는 큰 단점이 존재했다.
1
2
3
4
5
6
7
8
9
10
11
12
13
// Constants
// Before
enum PlaceholderImage {
    static let avatar = UIImage(named: "default-avatar")!
    static let square = UIImage(named: "default-square-asset")!
    static let banner = UIImage(named: "default-banner-asset")!
}
// After
enum PlaceholderImage {
    static let avatar = UIImage(resource: .defaultAvatar)
    static let square = UIImage(resource: .defaultSquareAsset)
    static let banner = UIImage(resource: .defaultBannerAsset)
}
이렇게 resource를 통해 바로 Asset에 등록한 이미지를 사용할수있게 되었다. 그리고 optional이었던지라 Force Unwrapping을 했었는데, 그럴필요또한 없어졌다.
TabView
1
2
3
4
5
init() {
    let appearence = UITabBarAppearance()
    appearence.backgroundEffect = UIBlurEffect(style: .systemUltraThinMaterial)
    UITabBar.appearance().scrollEdgeAppearance = appearence
}
두개 차이가 없다.
아마 바뀐듯?
Preview
1
2
3
4
5
6
7
8
9
10
11
12
13
#Preview("Light Mode") {
    DDGButton(title: "Test Button")
}

#Preview("Dark Mode") {
    DDGButton(title: "Test Button")
        .preferredColorScheme(.dark)
}

#Preview("Dark Landscape", traits: .landscapeRight) {
    DDGButton(title: "Test Button")
        .preferredColorScheme(.dark)
}
이렇게 여러 mode에 대한 preview 설정이 가능하다.
사진은 생략
ContentUnavailableView
기존에는 아무도 체크인을 안했을때 GridEmptyStateTextView를 사용했는데 이제는 ContentUnavailableView라는게 생기면서 굳이 새롭게 View를 만들면서 까지 대체를 할 필요가 없어졌다. (물론 이쁘게 View를 디자인했다면 뭐 사용해도 그만)
1
2
3
4
// before
GridEmptyStateTextView()
// after
ContentUnavailableView("Nobody's Here", systemImage: "person.slash", description: Text("Nobody has checked in yet."))
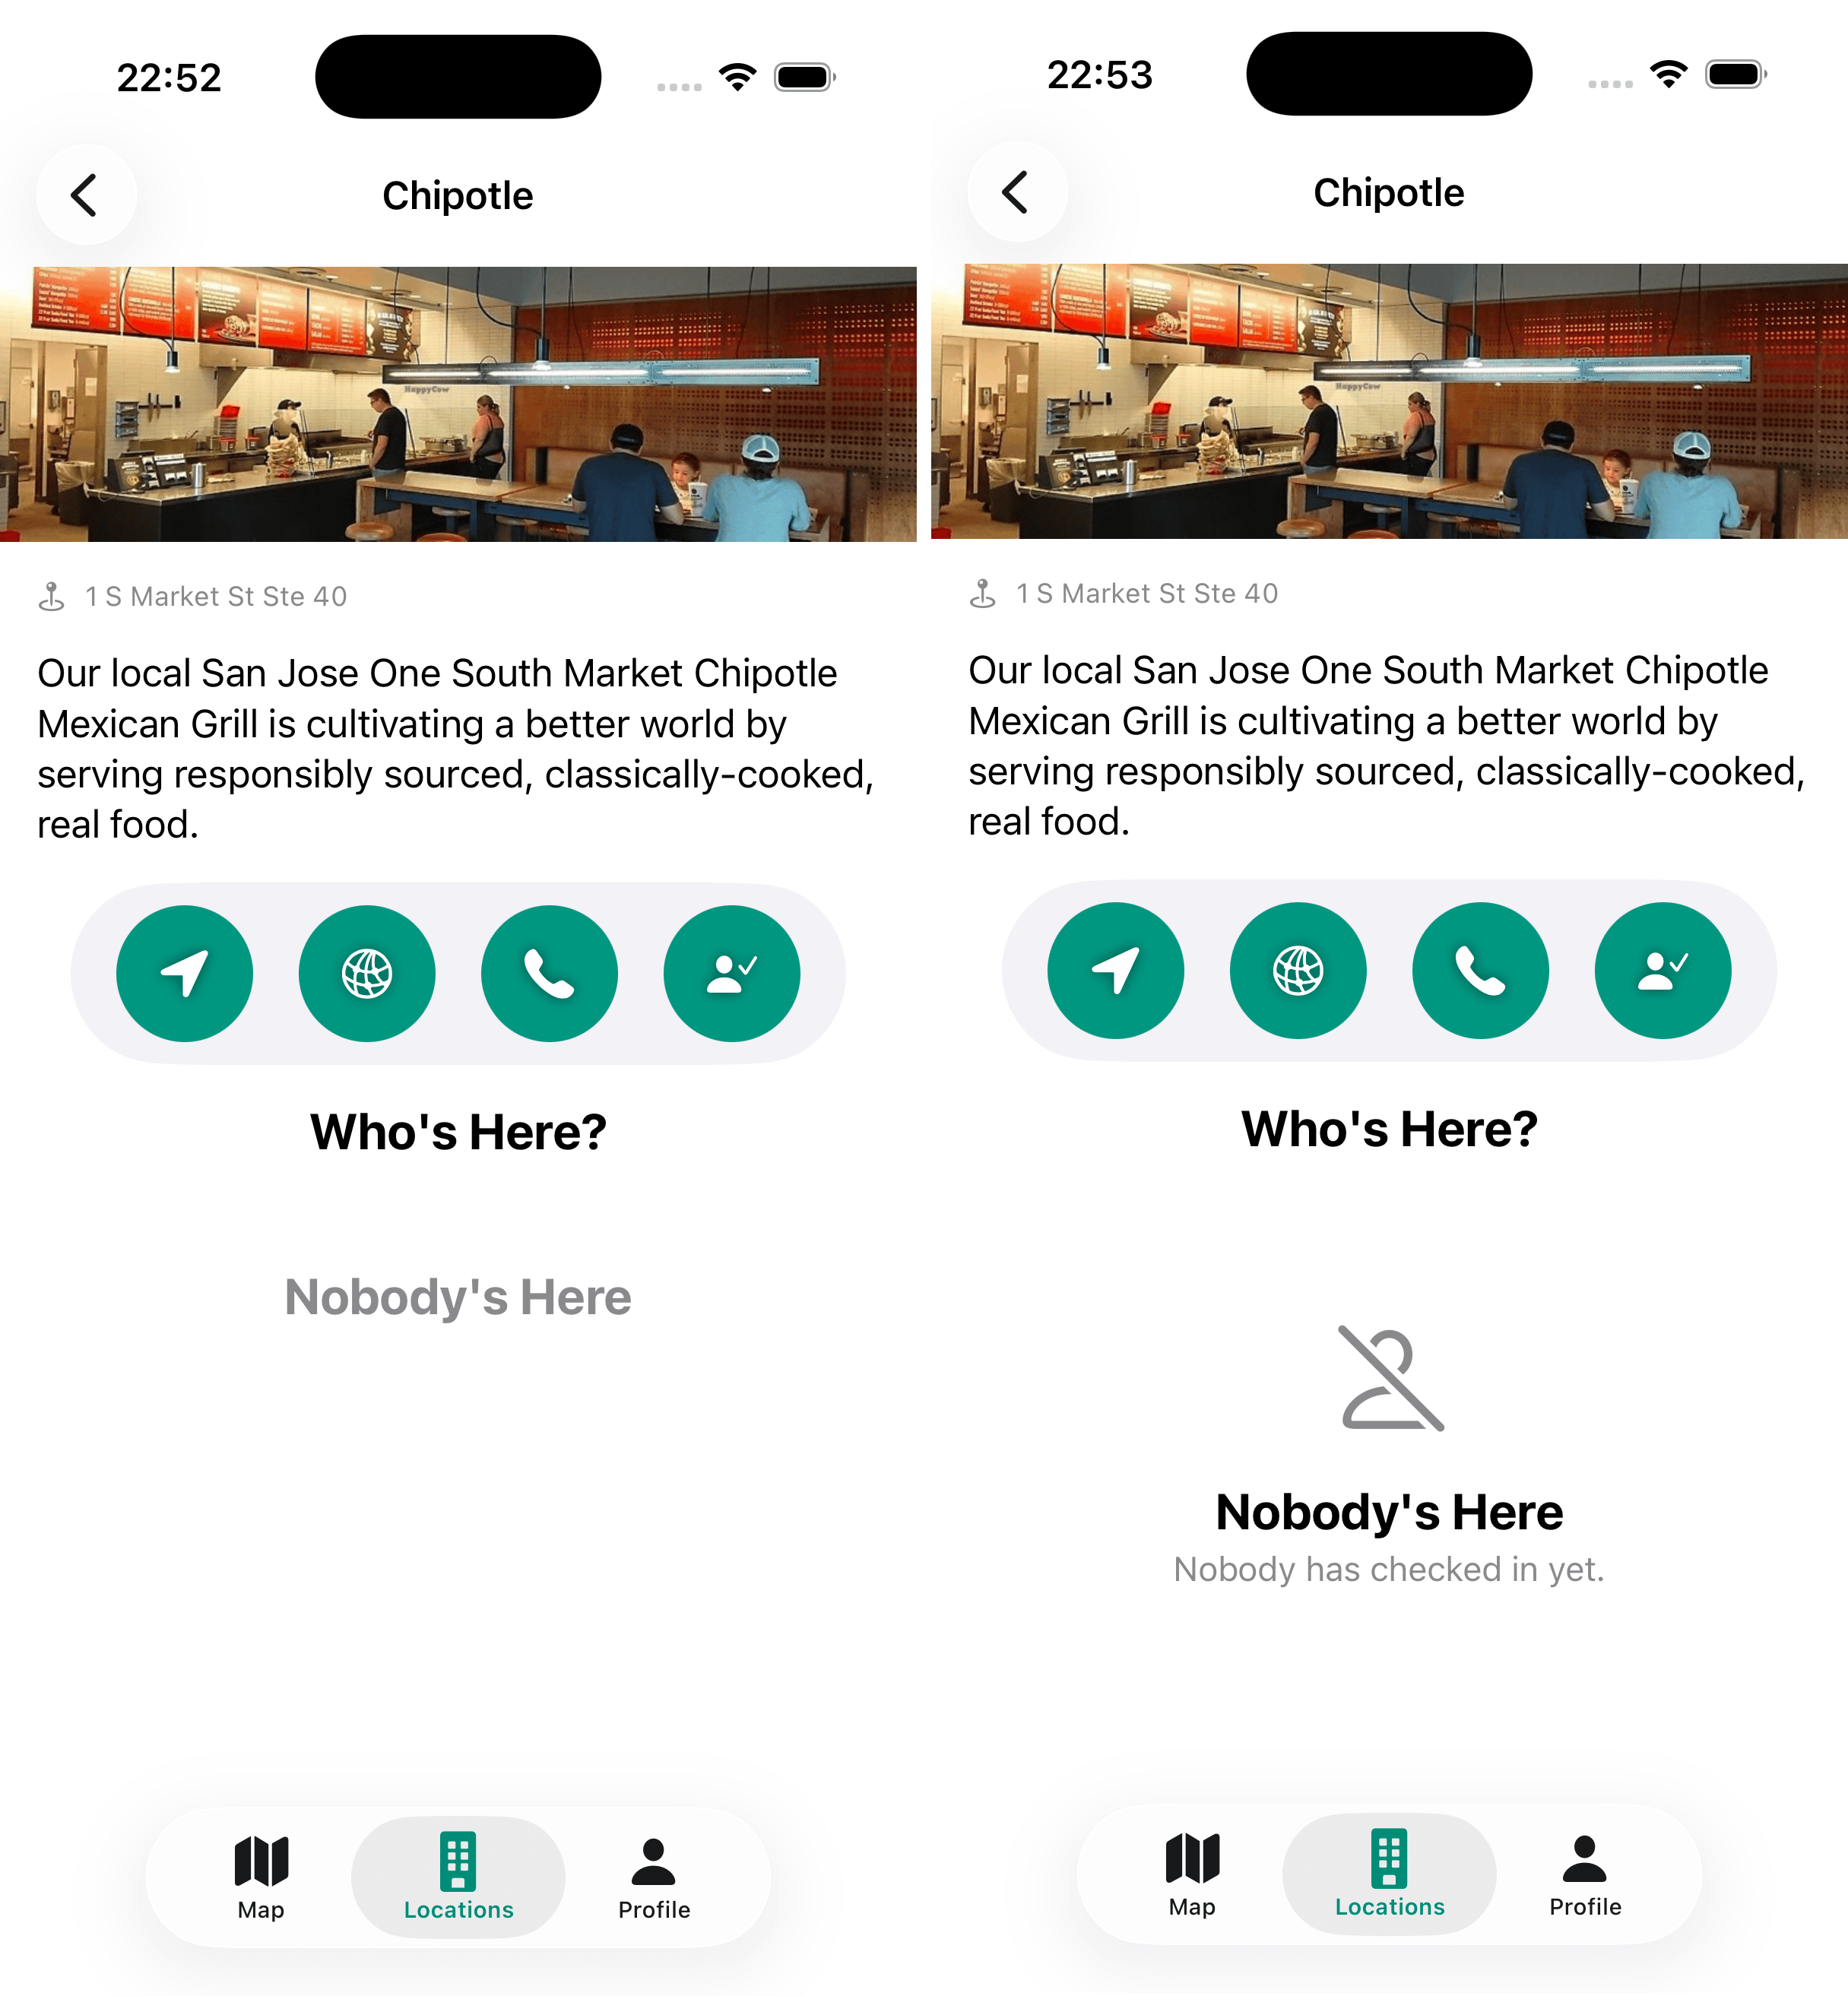
이렇게 바뀌게 된다.
Observation
iOS17에서 관심도가 높은 부분중 하나가 바로 Observation이 새로 생겼다.
WWDC23의 영상 초반부에 이렇게 이야기를 한다.
우선 Observation은 Properties의 변화를 Tracking할 Swift의 새로운 Feature이다.
Observation을 사용함에 따라 Model을 이전보다 더 Simple하게 만들수가 있게 되었다.
@Observable을 사용함에 따라 내가 만든 type이 Observed가 가능하게 해준다.
Medium을 읽어보면 기존 SwiftUI의 핵심인 ObservableObject가 어떻게 동작하는지 알 수 있다. 데이터가 변하면 UI를 자동으로 업데이트한다는 훌륭한 개념이다.
하지만 기존 방식에는 한 가지 아쉬운 점이 있었다. 바로 “데이터와 상관없는 뷰까지 같이 다시 그려진다”는 점이다.
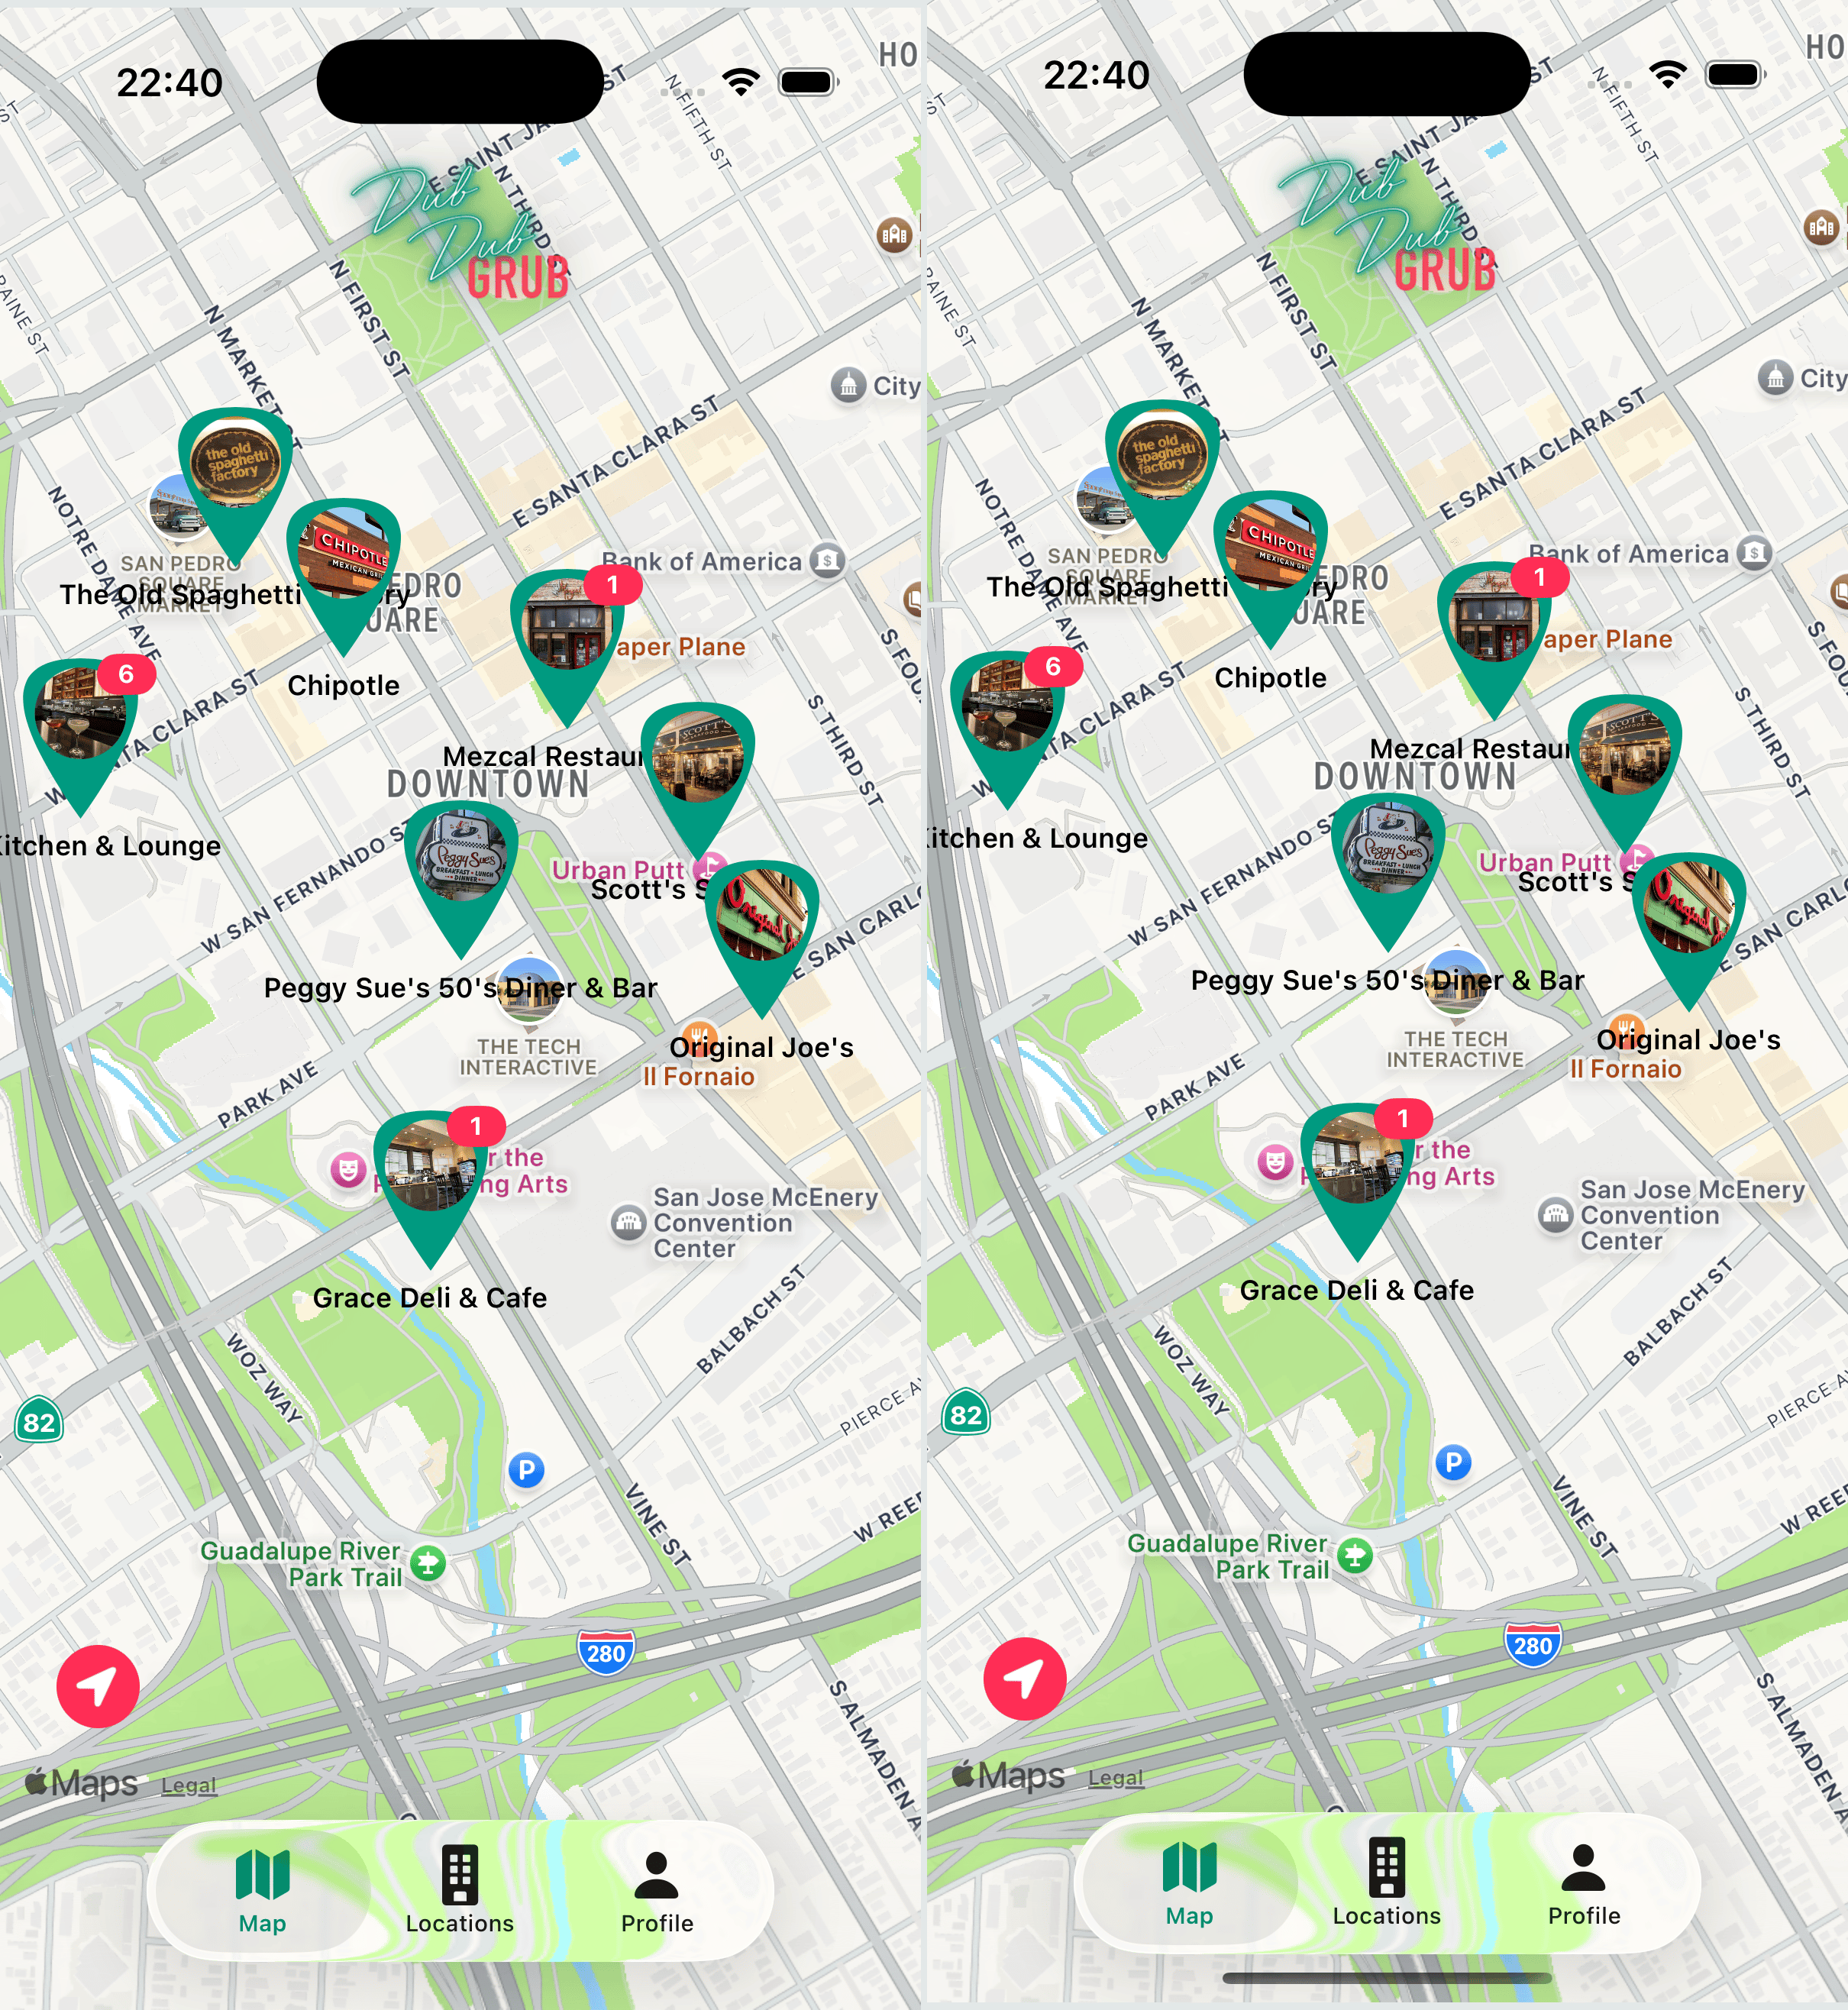
예를 들어 뷰모델 안에 location(위치)과 profileCount(프로필 수) 변수가 있다고 가정해 보자. 어떤 뷰는 오직 location 데이터만 보여주고 있다.
이때 누군가 새로 체크인을 해서 profileCount 값이 바뀌면, 기존 ObservableObject는 객체 전체가 변했다고 신호를 쏴버린다. 그래서 location만 쓰는 뷰조차도, 자신과 상관없는 데이터가 바뀌었다는 이유만으로 화면 전체를 불필요하게 다시 그리게 된다.
iOS 17의 @Observable은 이 방식을 바꿨다. 이제 SwiftUI는 뷰가 어떤 데이터를 사용하고 있는지 정확히 안다. 즉, location만 쓰는 뷰는 profileCount가 아무리 바뀌어도 다시 그려지지 않는다.
객체 전체를 다시 그리는 것이 아니라, 바뀐 데이터가 필요한 뷰만 딱 골라서 새로고침하는 것이다.
아래 시뮬레이터를 통해 기존 방식과 새로운 방식이 어떻게 다른지 눈으로 직접 확인해 보자.
이제 그러면 Migrating Guide를 바탕으로 해서 코드를 수정 해보도록 한다
사실 설명이 자세해서 이거 보면 십중팔구 해결이 가능하다.
ListVM
1
2
3
4
5
6
7
8
9
10
11
12
13
14
// before
@MainActor final class LocationListViewModel: ObservableObject {
    @Published var checkedInProfiles: [CKRecord.ID: [DDGProfile]] = [:]
    @Published var alertItem: AlertItem?
    // 생략
}
// after
import Observation

@MainActor @Observable final class LocationListViewModel {
    var checkedInProfiles: [CKRecord.ID: [DDGProfile]] = [:]
    var alertItem: AlertItem?
    // 생략
}
그런데 import SwiftUI를 했다면 굳이 import Observation 이걸 할필요는 없다. SwiftUI가 이미 가지고있기 때문
Error 해결
바꾸고 나면 여러 에러가 발생한다.
1
2
3
Property wrapper cannot be applied to a computed property

@Published var checkedInProfiles: [CKRecord.ID: [DDGProfile]] = [:]
이건 @Published를 지워주면 해결
1
2
3
Generic struct 'StateObject' requires that 'LocationListView.LocationListViewModel' conform to 'ObservableObject'

@StateObject private var viewModel = LocationListViewModel()
일단 @StateObject, @ObservedObject 이것들은 iOS17로 가면서 더이상 사용하지 않는다.
그러므로 @State private var viewModel = LocationListViewModel() 이렇게 바꿈으로써 해결한다.
DetailVM
1
2
3
4
5
@MainActor @Observable
final class LocationDetailViewModel {

    var checkedInProfiles: [DDGProfile] = []
}
똑같이 지워주면 된다.
이때
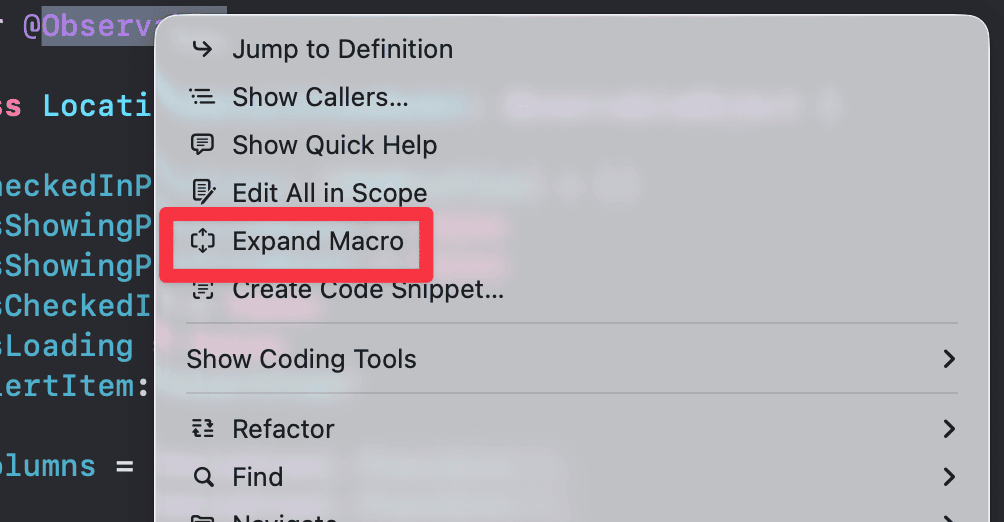
이때 Expand Macro를 하면

이렇게 나온다.
우리는 @Published를 사용한 alertItem까지 @ObservationTracked를 허용하고 그 아래에 있는 location, selectedProfile은 원하지 않는다.
그럴땐
1
2
@ObservationIgnored var location: DDGLocation
@ObservationIgnored var selectedProfile: DDGProfile?
이렇게 @ObservationIgnored를 사용해주면 된다.
말그대로 @ObservationIgnored Wrapper가 붙은 변수들은 우리가 굳이 tracking하면서 데이터의 흐름 자체를 파악하지 않겠다 라는것
기존에는 ObservedObject프로토콜을 사용하고, @Published를 통해 SwiftUI가 Tracking을 하고싶은 변수에만 개별 지정을 해주었다면, @Observable을 사용하게되면 내가 Tracking을 할 의도로 만들지 않은 변수 까지도 Tracking이 될수 있기에 Expand를 통해 확인을 하고 필요하지 않은 변수가 있다면, @ObservationIgnored를 꼭 사용해주도록 하자.
1
2
3
Generic struct 'ObservedObject' requires that 'LocationDetailViewModel' conform to 'ObservableObject'

@ObservedObject var viewModel: LocationDetailViewModel
여기는 @Bindable var viewModel: LocationDetailViewModel로 바꿔주었다.
똑같은 에러가 2군데(ActionButtonHStack, AvatarGridView) 더 발생했는데 한군데를 예로 들면
1
2
3
4
5
6
7
8
9
10
11
12
13
14
15
16
17
18
19
20
21
22
23
24
25
26
27
28
fileprivate struct AvatarGridView: View {

    @Environment(\.dynamicTypeSize) var dynamicTypeSize
    var viewModel: LocationDetailViewModel

    var body: some View {
        ZStack {
            if viewModel.checkedInProfiles.isEmpty {
               // 생략
            } else {
                ScrollView {
                    LazyVGrid(columns: viewModel.determineColumns(for: dynamicTypeSize), content: {
                        ForEach(viewModel.checkedInProfiles) { profile in
                            FirstNameAvatarView(profile: profile)
                                .onTapGesture {
                                    withAnimation {
                                        viewModel.show(profile, in: dynamicTypeSize)
                                    }
                                }
                        }
                    })
                }
            }

            if viewModel.isLoading { LoadingView() }
        }
    }
}
여기는 viewModel 앞에 $가 없다. 즉 바인딩을 할 필요가 없으므로 앞에 어떠한 Wrapper도 사용하지않고 기존것을 지워줌으로써 에러를 해결한다.
ProfileVM
1
2
3
4
5
6
7
8
9
10
11
12
13
14
15
16
17
18
19
20
21
22
@MainActor @Observable
final class ProfileViewModel {

    var firstName = ""
    var lastName = ""
    var companyName = ""
    var bio = ""
    var avatar = PlaceholderImage.avatar
    var isShowingPhotoPicker = false
    var alertItem: AlertItem?
    var isLoading = false
    var isCheckedIn = false

    @ObservationIgnored
    private var existingProfileRecord: CKRecord? {
        didSet { profileContext = .update }
    }

    @ObservationIgnored
    var profileContext: ProfileContext = .create
    // 생략
}
똑같이 해준다.
1
@State private var viewModel = ProfileViewModel()
여기도 변경.
강의에서는 @State로 했을때
1
Call to main actor-isolated initializer 'init()' in a synchronous nonisolated context
에러가 발생하여
1
2
@MainActor
struct ProfileView: View { }
를 사용해주었다.
Swift Forums: @Observable Macro & @MainActor Conflict 참고
MapVM
1
2
3
4
5
6
7
8
9
10
11
12
13
@Observable
final class LocationMapViewModel: NSObject, CLLocationManagerDelegate {

    var checkedInProfiles: [CKRecord.ID: Int] = [:]
    var isShowingDetailView = false
    var alertItem: AlertItem?
    var region = MKCoordinateRegion(
        center: CLLocationCoordinate2D(latitude: 37.331516, longitude: -121.891054),
        span: MKCoordinateSpan(latitudeDelta: 0.01, longitudeDelta: 0.01))
    // 생략
}

@State private var viewModel = LocationMapViewModel()
중복이라 설명은 생략.
Bindable?, State?
분명히 같은 @Observable을 사용 했음에도 불구하고
1
2
3
@Bindable var viewModel: LocationDetailViewModel
@State private var viewModel = LocationMapViewModel()
var viewModel: LocationDetailViewModel
이런식으로 전부 다르게 쓰고있다.
우선 var viewModel: LocationDetailViewModel로 그냥 쓴 부분은 사실 viewModel을 사용하는쪽에서
1
viewModel.getDirectionsToLocation()
이런식으로 viewModel에 접근해서 VM이 가지고 있는 값을 건드리거나, 사용하는게 아닌 그저 Method 만 사용할때는 Wrapper 없이 그냥 만들어 주면 된다.
이제 Wrapper가 있는 저 두개를 보도록 하자.
어떤기준으로 Wrapper를 다르게 쓰고있는걸까? 먼저 우리는 이 Wrapper가 어떤걸 의미하는지를 알아야한다. 이전글에서 한번 간단하게 언급한적이 있긴하다.
표만 가져와보면
| 속성 래퍼 | 역할 | 소유권 | 값 변경 시 | 주 사용 위치 |
|---|---|---|---|---|
@State | 상태를 소유하고 관리함 | 자신(뷰) | 뷰가 다시 렌더링됨 | 부모 뷰 |
@Binding | 다른 뷰의 상태를 참조함 | 다른 뷰(@State) | 참조한 원본 값이 변경됨 | 자식 뷰에서 전달받아 사용 |
이렇게 간단하게 정리가 가능하다.
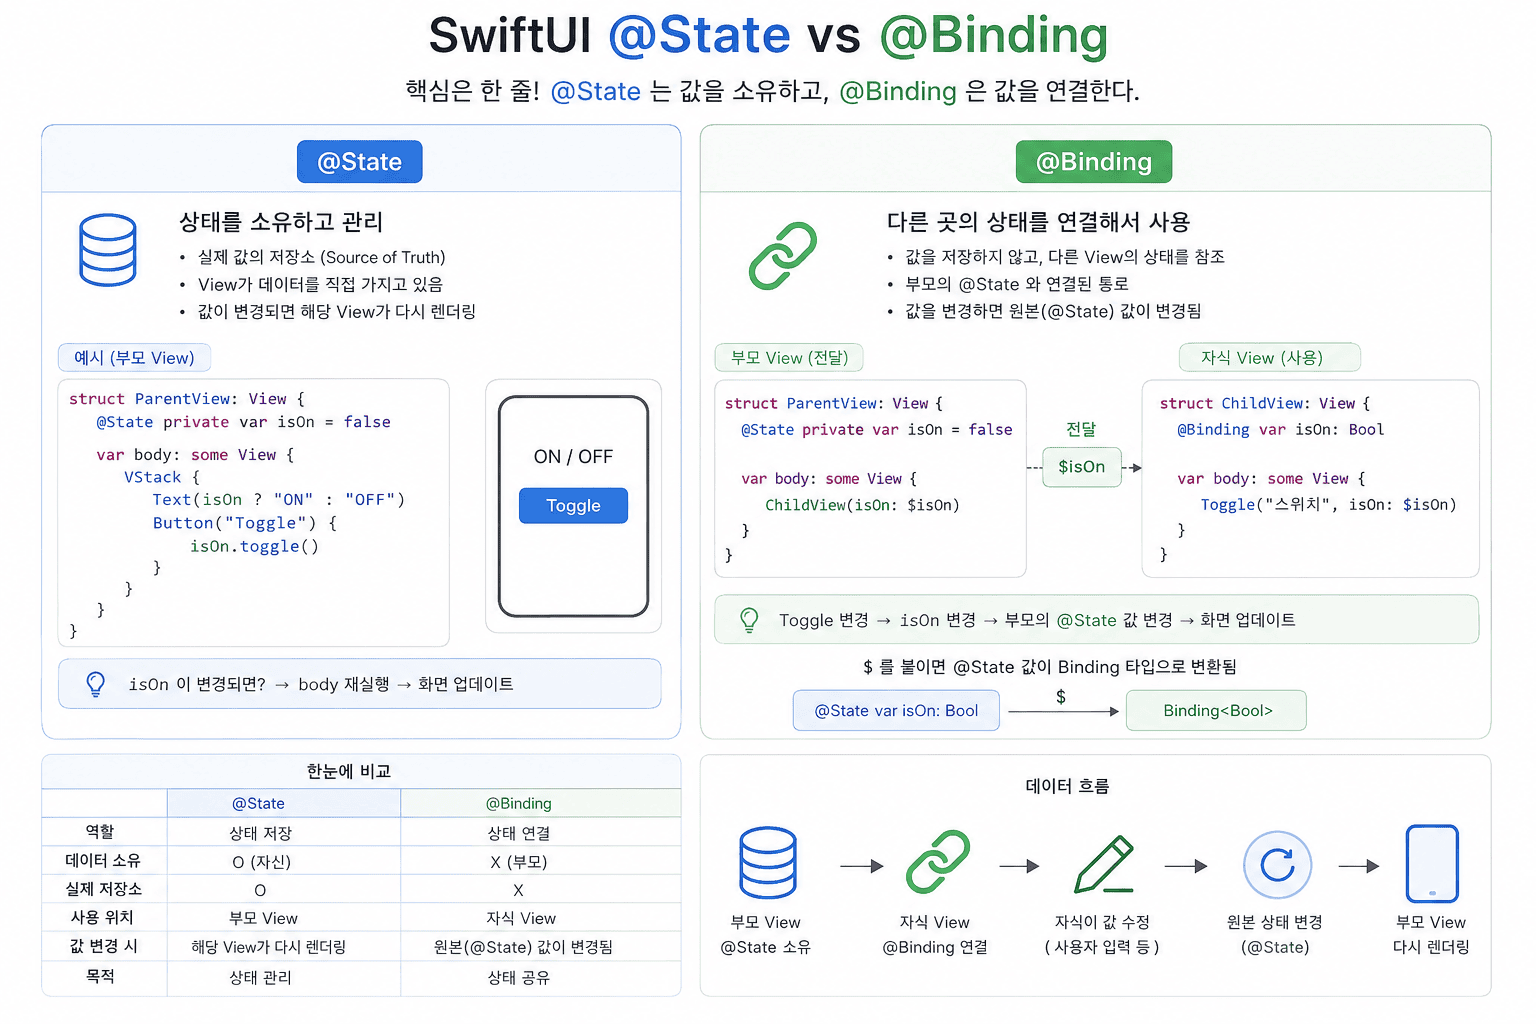
사진은 그냥 AI를 통해 정리해본것
왜 이 둘(@State vs @Bindable)을 헷갈려 했을까?
작업을 하다 보면 뷰마다 각자 ViewModel을 하나씩 달고 있는 것처럼 보인다. 그래서 “굳이 @Bindable을 안 쓰고 전부 @State로 통일해도 똑같이 돌아가지 않을까?” 하는 생각이 들 수 있다. 나 역시 이 둘을 굳이 나눠 써야 하는지 크게 와닿지 않았다.
하지만 이 둘을 명확히 구분해야 하는 핵심적인 이유가 있다. 바로 “누가 생성하고(소유), 누가 전달받아 사용할까?”를 가려내야 하기 때문이다.
Bindable
우선 Bindable부터 본다.
1
2
3
4
5
6
@Bindable var viewModel: LocationDetailViewModel

ProfileModalView(
    isShowingProfileModal: $viewModel.isShowingProfileModal,
    profile: viewModel.selectedProfile!
)
우선 $ 기호를 보니 양방향 바인딩(연결)을 했다.
여기서 아주 중요한 전제 조건이 있는데, @Bindable은 반드시 @Observable 매크로가 적용된 객체와 함께 사용되어야 한다는 점이다.
@Bindable은 ‘외부(부모 뷰 등)에서 이미 생성해 둔 @Observable ViewModel을 그저 전달받아서 쓸 때’ 사용한다. 내가 직접 만든 데이터가 아니니 이 View가 생명주기를 책임질 필요는 없다.
대신, 전달받은 Observable 객체 안에 있는 값들을 UI(모달, 시트, 텍스트 필드 등)와 실시간으로 스위치처럼 연결하고 싶을 때 씌워주는 껍데기다. 즉, 상태 소유가 목적이 아니라 바인딩($)을 추출하여 UI와 연결하는 것 자체가 핵심 목적이다.
State
1
2
3
4
5
@State private var viewModel = LocationMapViewModel()

.sheet(isPresented: $viewModel.isShowingDetailView) {
    // 생략
}
@State는 “이 데이터는 내가 직접 만들었고, 끝까지 내가 책임진다!”라는 뜻이다. 화면이 처음 나타날 때 이 ViewModel도 딱 한 번 새로 만들어진다. 즉, 이 View가 상태의 ‘주인(Owner)’이 되어 생명주기를 주체적으로 관리한다.
원래 @State의 전형적인 사용처는 View의 상태를 직접 관리하는 단순한 값들이다.
1
2
3
@State private var isShowingSheet = false  // 시트 열림/닫힘
@State private var searchText = ""         // 검색창 입력값
@State private var isLoading = false       // 로딩 여부
이 값들의 공통점은 “이 값이 바뀌면 View가 다시 그려진다”는 것이다. 앱이 커지면서 이런 상태들을 ViewModel로 묶어 관리하게 되고, 그 ViewModel 자체를 @State로 소유하는 패턴으로 자연스럽게 발전한 것이다. 본질은 동일하다.
여기서도 필요하면 $viewModel처럼 바인딩을 추출할 수는 있지만, @State의 가장 근본적인 목적은 상태를 직접 생성하고 안전하게 유지(소유)하는 데 있다.
최종 정리
이건 부모, 자식뷰의 관점에서
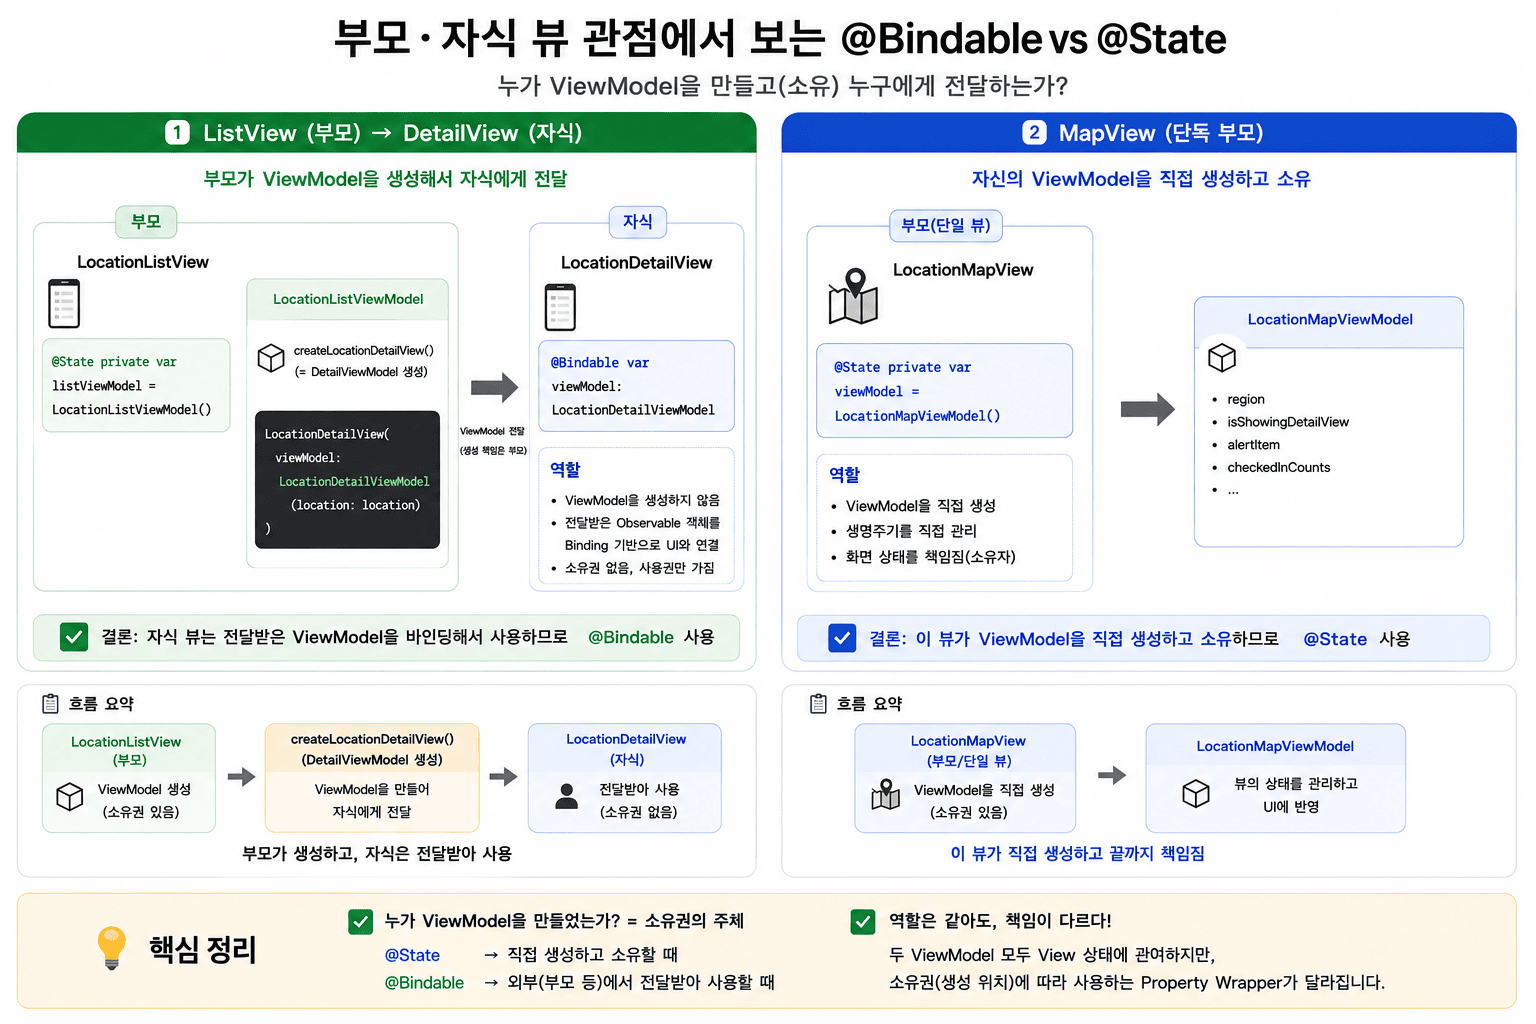
그리고 이건 최종적으로 정리
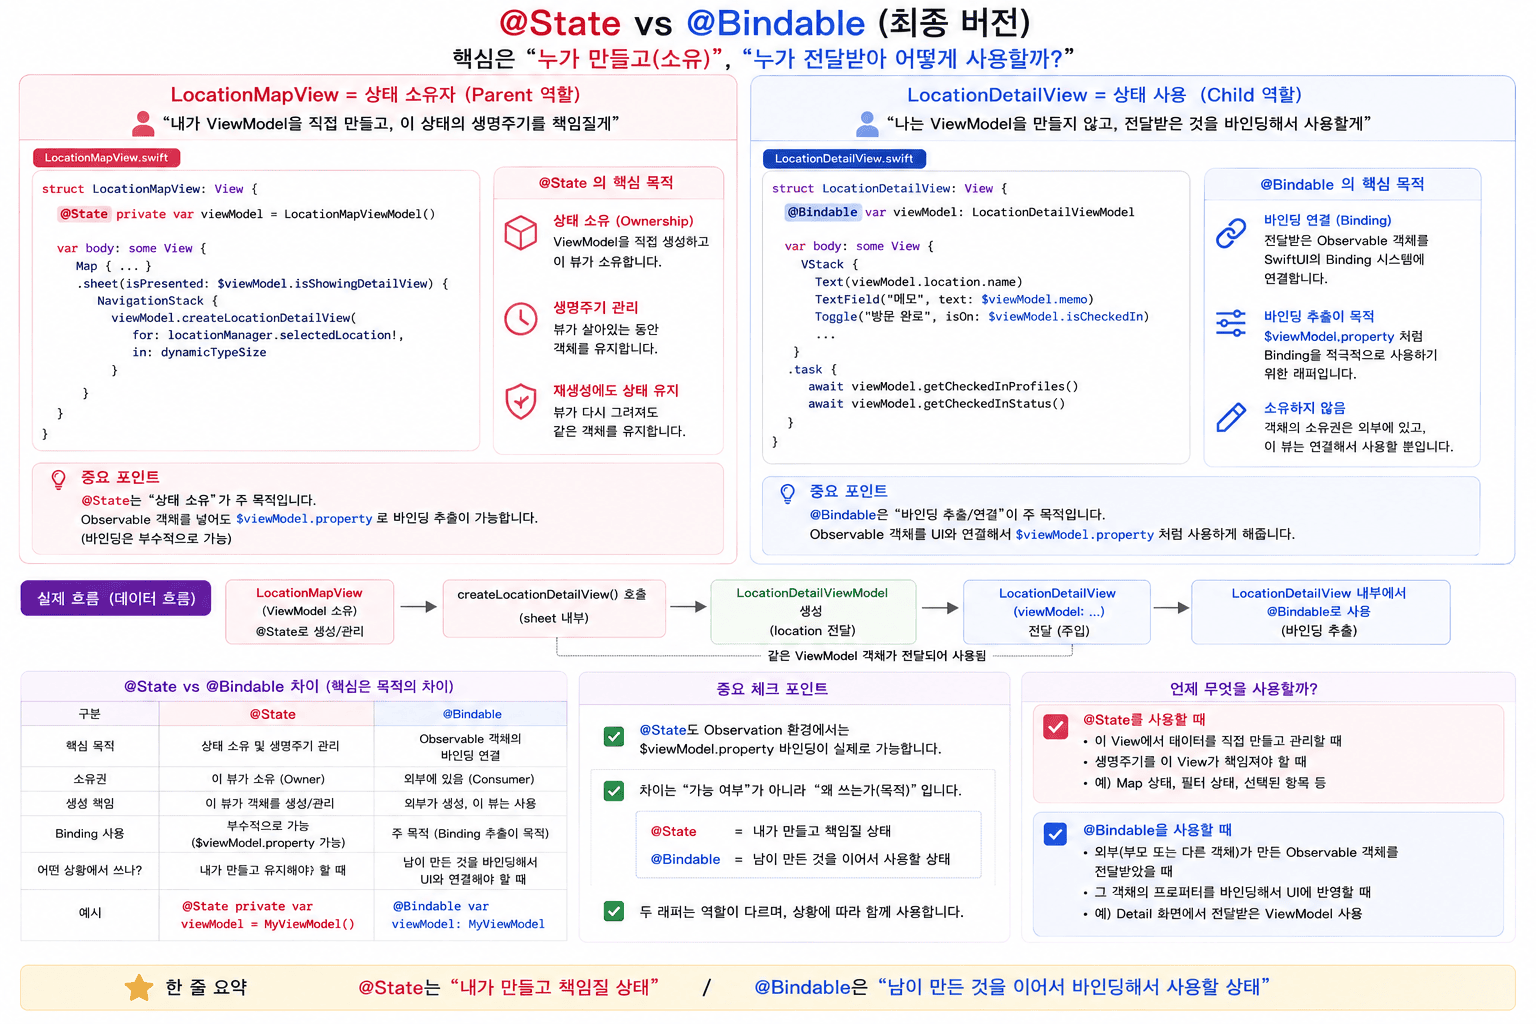
이번 정리를 하면서 생각보다 내용이 길어졌는데, 결국 핵심은 하나였다.
@State와 @Bindable 둘 다 동작하는 상황이 있다고 해서 아무거나 쓰는 게 아니라, “이 ViewModel을 내가 만든 것인가, 전달받은 것인가” 라는 의도를 코드로 명확히 표현하는 것이 중요하다.
기능이 되냐 안 되냐보다, 왜 이 Wrapper를 선택했는가가 더 좋은 코드를 만든다.
참고사이트
Github: Dub-Dub-Grub Repository