프로젝트 3일차
3일차가 시작되었다. 머지 문제가 해결이 되어 새로 프로젝트를 클론하여 시작한다.
내가 맡은 기능은 장바구니 기능이다.
장바구니 버튼을 클릭했을때 사이드 바처럼 새로운 뷰가 나오게 하는것이다.
한번 시작해보도록 하겠다.
ModalViewController로 새로운 파일을 하나 만들어 주었고,
TableView와 관련된 내용을 전부 옮겨둔 상태이다.
우선 해당부분에 대한 레이아웃은 후순위로 미루고 SideView처럼 보이게 하는것이 목표이다.
1. 클릭시 화면 나타내기.
1
2
var modalViewController = ModalViewController() // 새로 보여줄 VC
var dimmingView: UIView? // 어둡게 할 배경
새로만든 VC와, 그걸 view로 보여줄 객체를 생성해준다.
현재 새로만든 VC엔 작동확인을 위해 배경을 검게 해두었다.
그리고 다음과 같이 구현했다.
1
2
3
4
5
6
7
8
9
10
11
12
13
14
15
16
17
18
19
20
21
22
23
24
25
26
27
@IBAction func openCart(_ sender: UIButton) {

        let modalVC = self.modalViewController

        // 사이드 메뉴 뷰 컨트롤러를 자식으로 추가하고 뷰 계층 구조에 추가.
        self.addChild(modalVC)
        self.view.addSubview(modalVC.view)

        let menuWidth = self.view.frame.width // 가로는 현재 화면과 동일하게
        let menuHeight = self.view.frame.height * 0.3 // 높이만 30%로 설정

        // 사이드 메뉴의 시작 위치를 화면 아래로 설정.
        modalVC.view.frame = CGRect(x: 0, y: view.frame.height, width: menuWidth, height: menuHeight)

        // 어두운 배경 뷰를 보이게 한다.
        self.dimmingView?.isHidden = false
        self.dimmingView?.alpha = 0

        UIView.animate(withDuration: 0.3, animations: {
            // 사이드 메뉴를 화면에 표시.
            modalVC.view.frame = CGRect(x: 0, y: self.view.frame.height - menuHeight, width: menuWidth, height: menuHeight)
            // 어두운 배경 뷰의 투명도를 조절.
            self.dimmingView?.alpha = 0.5
        })

    }
버튼을 누르면 아래에서 위로 올라오게 구현은 해두었다.

2. 탭했을때 화면 사라지게 구현.
현재 화면은 올라오지만 내려가지 않는 상황이다.
그리고 어두운 배경인 dimmingView역시 나오지 않는다.
dimmingView에 대한 코드를 작성해준다.
1
2
3
4
5
6
7
8
9
10
11
12
13
14
15
16
17
18
19
20
21
22
23
private func addDimmingView() {

        dimmingView = UIView(frame: self.view.bounds)
        dimmingView?.backgroundColor = UIColor.black.withAlphaComponent(0.5)
        dimmingView?.isHidden = true
        view.addSubview(dimmingView!)
        let tapGesture = UITapGestureRecognizer(target: self, action: #selector(handleDimmingViewTap))
        dimmingView?.addGestureRecognizer(tapGesture)

    }

@objc private func handleDimmingViewTap() {
    let modalVC = self.modalViewController

    UIView.animate(withDuration: 0.3, animations: {
            modalVC.view.frame = CGRect(x: 0, y: self.view.frame.height, width: self.view.frame.width, height: self.view.frame.height)
            self.dimmingView?.alpha = 0
        }) { (finished) in
            modalVC.view.removeFromSuperview()
            modalVC.removeFromParent()
            self.dimmingView?.isHidden = true
        }
    }
그리고 ViewDidload에 adddimmingView를 호출해주자.

기능 구현 완료.
3. ModalVC에 데이터 전달.
가장큰 문제가 남았다.
1
2
modalVC.selectedList.removeAll()
modalVC.selectedList = selectedList
이렇게 리스트를 한번 초기화 하고 다시 담아서 전달 하였다.

전달이 되는걸 확인했다.
4. ModalVC에서 VC로 데이터 전달
새로운 뷰에서 값을 전달했을때 값이 변경되어야 하므로 프로토콜을 사용해서 전달하기로 했다.
1
2
3
4
5
protocol sendList {
    func sendData (dataList: [AppleProduct])
}

를 만들어 주고
값이 변화할때마다 델리게이트를 통해 전달하게 했다.
1
2
3
4
5
6
7
8
9
10
11
12
13
14
15
16
17
18
19
20
21
22
23
24
25
26
27
28
29
30
31
32
33
34
@objc func minusValue(sender: UIButton) {
        var currentValue = selectedList[sender.tag].value
        if let cell = tableView.cellForRow(at: IndexPath(row: sender.tag, section: 0)) as? PriceCell {
            if currentValue != 1 {
                currentValue -= 1
                selectedList[sender.tag].value = currentValue
                cell.valueLabel.text = String(currentValue)
                self.delegate?.sendData(dataList: selectedList) // new
                getData()
            } else {
                currentValue = 1
            }
        }

    }

@objc func plusValue(sender: UIButton) {
        var currentValue = selectedList[sender.tag].value

        if let cell = tableView.cellForRow(at: IndexPath(row: sender.tag, section: 0)) as? PriceCell {
            currentValue += 1
            selectedList[sender.tag].value = currentValue
            cell.valueLabel.text = String(currentValue)
            self.delegate?.sendData(dataList: selectedList) // new
            getData()
        }
    }

@objc func deleteValue(sender: UIButton) {
        selectedList.remove(at: sender.tag)
        tableView.reloadData()
        self.delegate?.sendData(dataList: selectedList) // new
        getData()
    }
값이 잘 전달되는걸 확인했다.
5. 셀 갱신 문제 해결

위와 같이 한번 장바구니를 확인하고 뭔가 리스트에 변경이 생겼을때
추가한 셀이 보이지 않는 것을 확인했다.
처음에는 어디가 문제일까 고민을하다가
viewdidload에 프린트를 했는데,
한번실행되고 더이상 출력이 되지않는다는걸 알았다.
객체화를 해서 실행할때마다 계속 viewdidload가 트리거 되는줄 알았다.
그래서 뷰컨트롤러의 생명주기를 참고하여 개선하였다.
아래가 바로 생명주기.
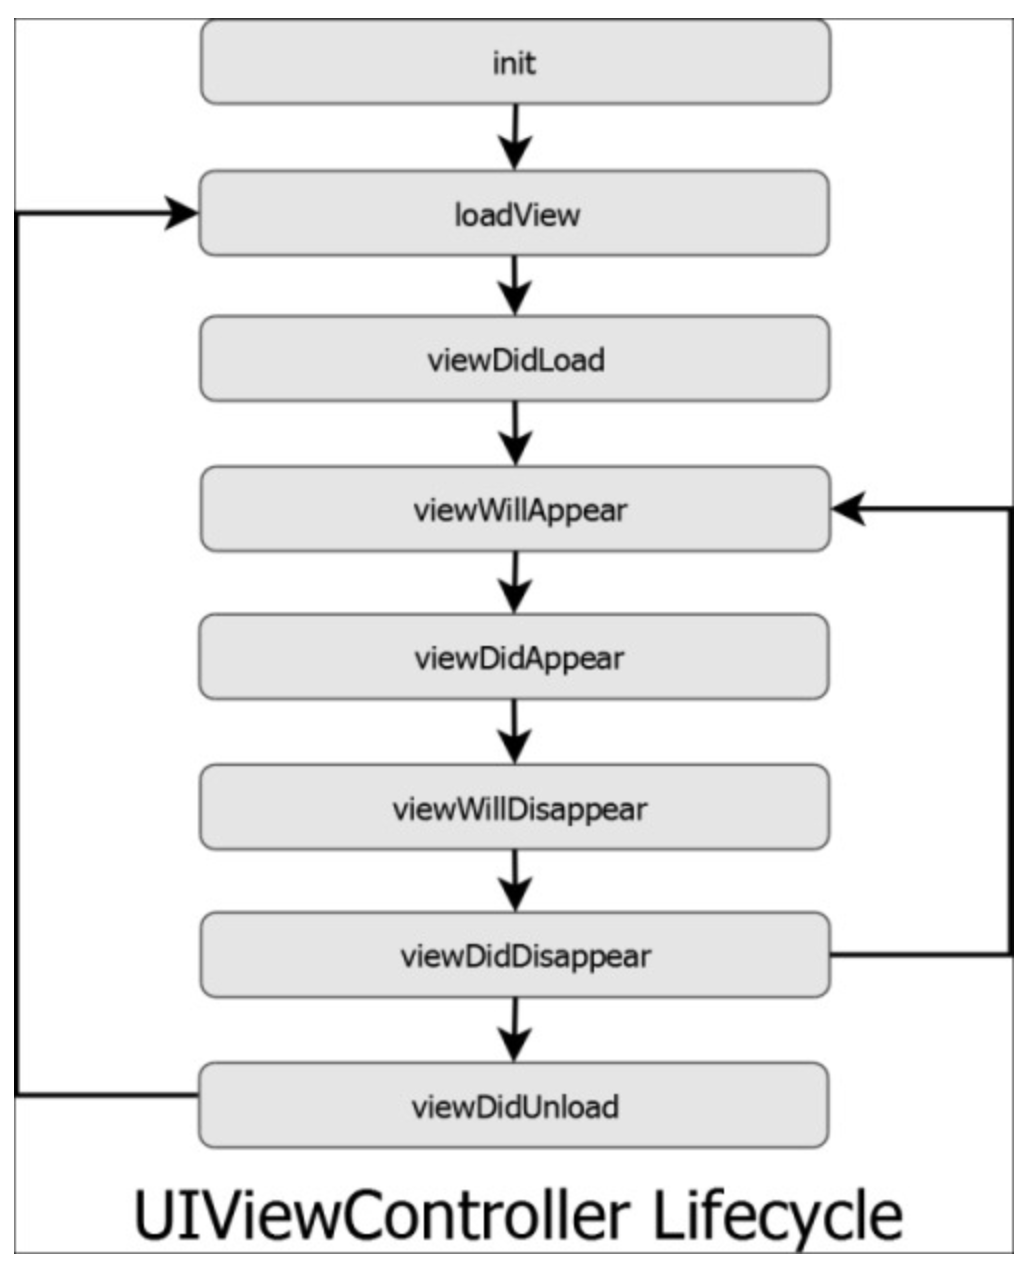
새로 viewWillAppear에서 시작하므로 해당 메서드를 다음과 같이 새로 작성해주었다.
1
2
3
4
override func viewWillAppear(_ animated: Bool) {
        tableView.reloadData()
        getData()
    }
확인 완료.

아무리 테스트 용이지만 역시 디자인 소질은 없는듯 하다.
6. 추가시 장바구니에 개수 표시 구현하기
현재는 그냥 클릭만하면 어떠한 알림 없이 장바구니에 담기게 된다.
유저로 하여금 추가했을때 인지하게끔 구현해보자.
레이블을 하나 만들어 주었다. 아주 작게!
그리고 다음과 같이 함수를 적었다.
1
2
3
4
5
6
7
8
9
func setLabel () {

        if selectedList.count == 0 {
            notiLabel.isHidden = true
        } else {
            notiLabel.text = String(selectedList.map{$0.value}.reduce(0, +))
            notiLabel.isHidden = false
        }
    }
아이템의 변동에 따라 이벤트가 나와야 하므로.
1
2
3
4
5
6
7
8
9
10
11
12
13
14
15
16
17
18
19
20
21
22
23
24
25
26
27
28
29
30
31
32
33
34
35
36
37
38
39
40
41
42
43
44
45
46
47
48
override func viewDidLoad() {
        super.viewDidLoad()

        setupCollectionView()
        productSegment.selectedSegmentIndex = 0
        segmentValueChanged(productSegment)

        numberFormatter.numberStyle = .decimal

        // label 디자인
        notiLabel.backgroundColor = .red
        notiLabel.textColor = .white
        notiLabel.layer.masksToBounds = true
        notiLabel.layer.cornerRadius = notiLabel.frame.width/2

        addDimmingView()
        setLabel() // new
    }

@objc private func handleDimmingViewTap() {
        let modalVC = self.modalViewController

        UIView.animate(withDuration: 0.3, animations: {
            modalVC.view.frame = CGRect(x: 0, y: self.view.frame.height, width: self.view.frame.width, height: self.view.frame.height)
            self.dimmingView?.alpha = 0
        }) { (finished) in
            modalVC.view.removeFromSuperview()
            modalVC.removeFromParent()
            self.dimmingView?.isHidden = true
            self.setLabel() // new
        }

    }

func collectionView(_ collectionView: UICollectionView, didSelectItemAt indexPath: IndexPath) {
        selectedList.append(filteredProducts[indexPath.item])

        if selectedList.map({$0.name}).filter({$0 == filteredProducts[indexPath.item].name}).count == 2 {
            let alert = UIAlertController(title: "중복 선택 확인", message: "중복으로 선택 되었습니다.", preferredStyle: .alert)
            alert.addAction(UIAlertAction(title: "확인", style: .cancel))
            selectedList.removeLast()

            self.present(alert, animated: true)
        }
        setLabel() // new
    }
이렇게 총 3군데에 해당 함수를 적용하게 했다.

구현완료.