Todoey (3)
CoreData 사용해보기.
1. CoreData 모델 만들기

파일을 새로 만들때, 아래르 스크롤을 내리면 보인다.
1
2
3
4
5
6
7
8
9
10
11
12
13
14
15
16
17
18
19
20
21
22
23
24
25
26
27
28
29
30
31
32
33
34
35
36
37
38
39
40
41
42
43
44
// MARK: - Core Data stack

lazy var persistentContainer: NSPersistentContainer = {
    /*
     The persistent container for the application. This implementation
     creates and returns a container, having loaded the store for the
     application to it. This property is optional since there are legitimate
     error conditions that could cause the creation of the store to fail.
    */
    let container = NSPersistentContainer(name: "school")
    container.loadPersistentStores(completionHandler: { (storeDescription, error) in
        if let error = error as NSError? {
            // Replace this implementation with code to handle the error appropriately.
            // fatalError() causes the application to generate a crash log and terminate. You should not use this function in a shipping application, although it may be useful during development.

            /*
             Typical reasons for an error here include:
             * The parent directory does not exist, cannot be created, or disallows writing.
             * The persistent store is not accessible, due to permissions or data protection when the device is locked.
             * The device is out of space.
             * The store could not be migrated to the current model version.
             Check the error message to determine what the actual problem was.
             */
            fatalError("Unresolved error \(error), \(error.userInfo)")
        }
    })
    return container
}()

// MARK: - Core Data Saving support

func saveContext () {
    let context = persistentContainer.viewContext
    if context.hasChanges {
        do {
            try context.save()
        } catch {
            // Replace this implementation with code to handle the error appropriately.
            // fatalError() causes the application to generate a crash log and terminate. You should not use this function in a shipping application, although it may be useful during development.
            let nserror = error as NSError
            fatalError("Unresolved error \(nserror), \(nserror.userInfo)")
        }
    }
}
이전에는 core data를 프로젝트 만들때 체크를 하면 App Delegate 에 위와 같은 코드가 뜬것같다.
혹시나 필요할까 싶어 복사해두었다.
2. Entities 생성하기
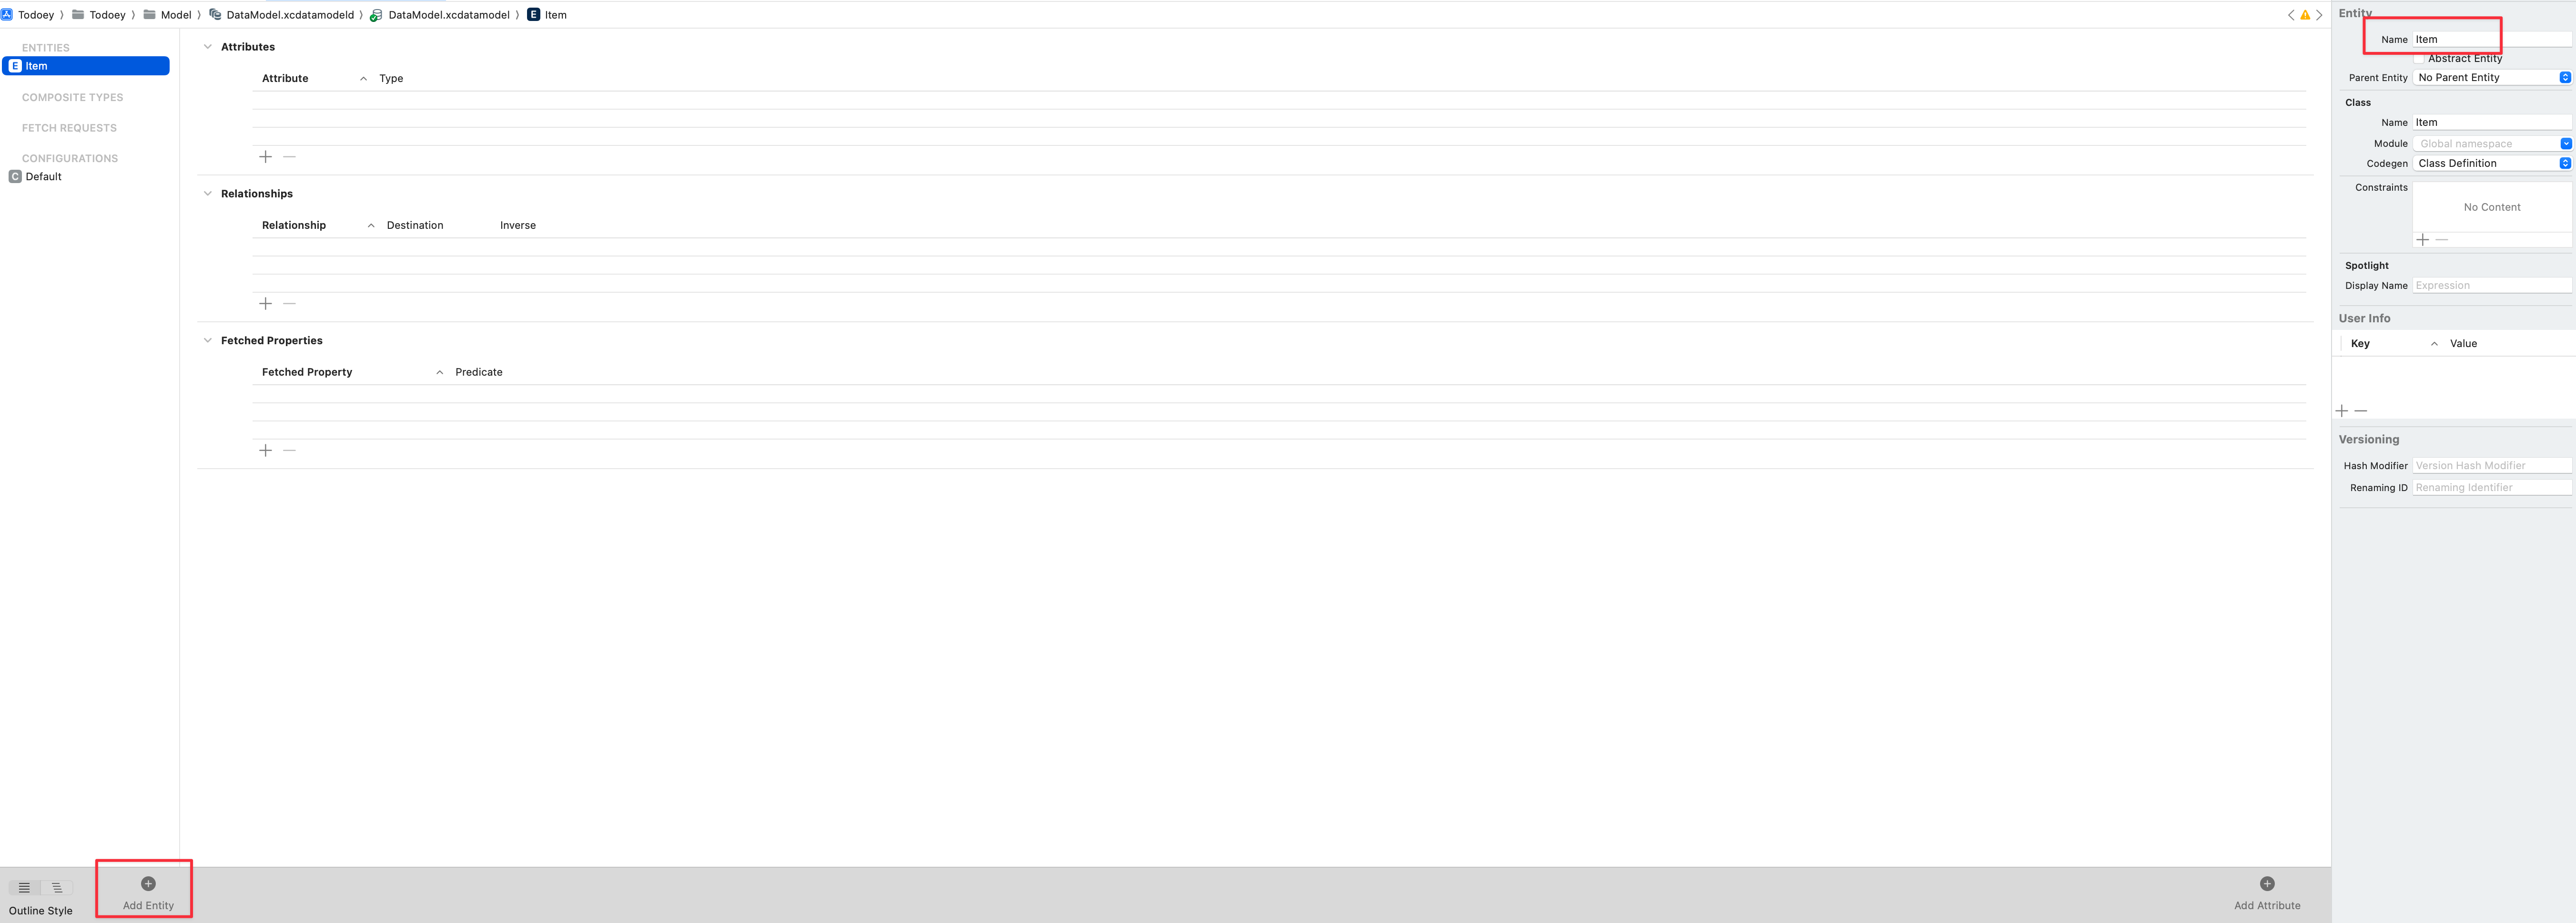

- Entity(Table) : Class
- Attributes : Properties
로 생각하면 된다.
Entity 이름은 우리가 만든 Item.swift와 똑같이 Item으로 이름을 맞춰주자.
1
2
3
4
5
6
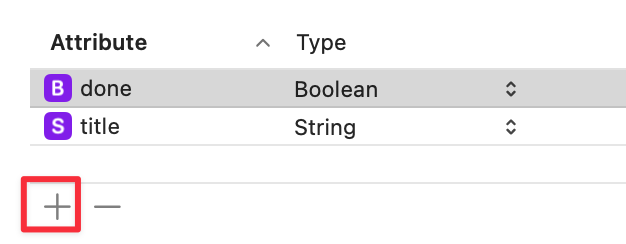
class Item : Codable {
var title : String = ""
var done : Bool = false
}
현재 이렇게 되어있는데, Attributes를 위와 동일하게 추가해준다.
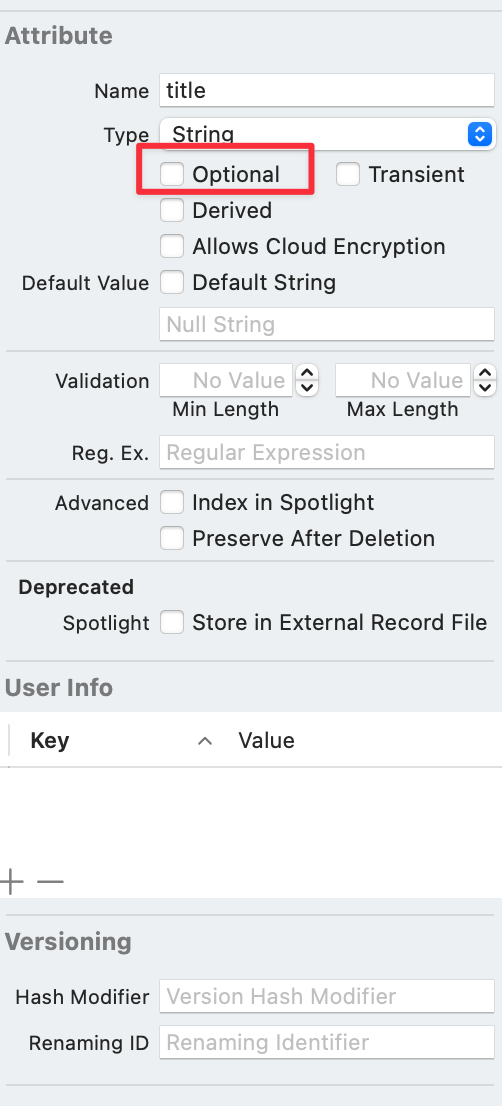
그리고 아래와 같이 Optional로 할지 안할지도 설정이 가능하다.
이렇게 Attributes를 만들었다면.
Item.swift파일은 지워주자.
그리고 코어 데이터가 복잡해지면 (멀티 스레딩이 필요하다면)  해당부분으로 사용하지 않으면 에러가 발생 할 수 있으므로, 모듈도 꼭 세팅해주자.
3. App Delegate 안에있는 내부 자료 이해.
4. CRUD 사용해보기
1. Create
Context를 만들어준다.
AppDelegate.persistentContainer.viewContext를 사용하고 싶지만 불가능하다.
그래서 다운캐스팅을 통하여 접근을 해줘야 한다.
let context = (UIApplication.shared.delegate as! AppDelegate).persistentContainer.viewContext
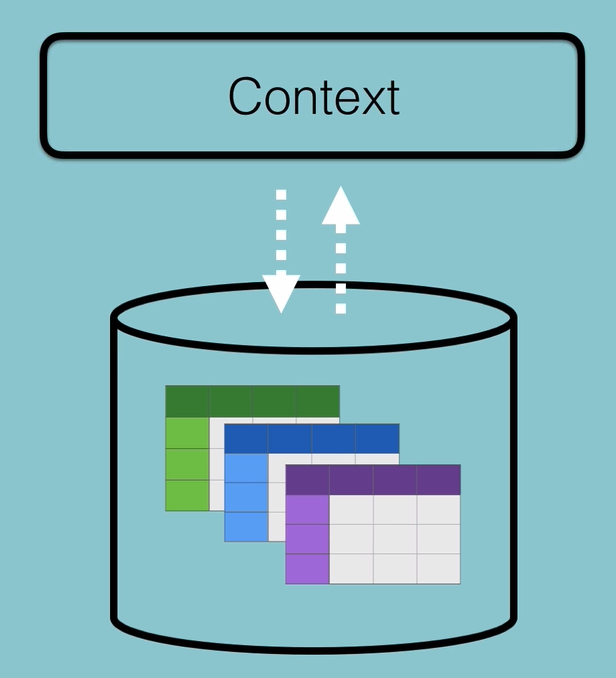
persistentContainer는 일종의 SQL DB가 된다. 우리가 만든 데이터를 보관하는 공간으로 사용한다.
그리고 context를 통해 CRUD 행동을 수행하게 된다
1
2
3
4
5
6
7
8
9
10
11
12
13
14
15
16
17
18
19
20
21
22
23
24
25
26
27
28
29
@IBAction func addButtonPressed(_ sender: UIBarButtonItem) {

        var textField = UITextField()

        let alert = UIAlertController(title: "Add New Todoey Item", message: "", preferredStyle: .alert)

        let action = UIAlertAction(title: "Add Item", style: .default) { (action) in
            // what will happen once the user clicks the Add Item button on our UIAlert


            let newItem = Item(context: self.context)
            newItem.title = textField.text!
            newItem.done = false

            self.itemArray.append(newItem)

            self.saveItems()

        }

        alert.addTextField { (alertTextField) in
            alertTextField.placeholder = "Create new item"
            textField = alertTextField
        }

        alert.addAction(action)

        present(alert, animated: true, completion: nil)
    }
add 버튼을 눌렀을때 작동하게 끔 newItem부분을 바꿔주고.
1
2
3
4
5
6
7
8
9
func saveItems() {
        do {

            try context.save()

        } catch{
              print("Error saving context \(error)")
        }
    }
saveItems() 함수도 이렇게 바꿔주자.
아직 Read부를 구현하지않아 버튼을 눌러 추가해도 보이지는 않지만.
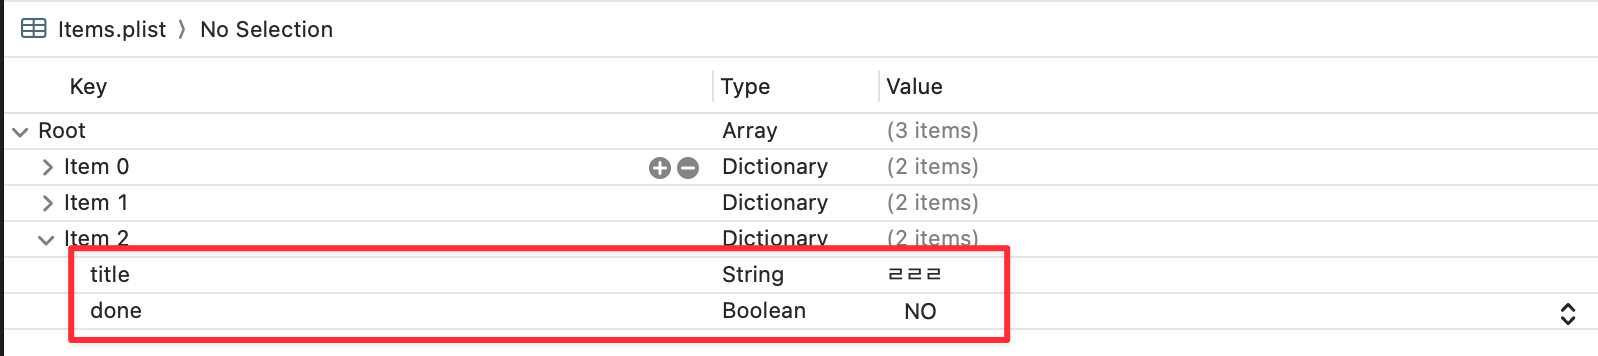
방금전 ㄹㄹㄹㄹ 을 추가했는데, 이젠 여기서 확인 할 수는 없다.
왜냐하면 Encoder, decoder를 사용하지 않았기 때문이다.
저 경로에 낚이지 말자.
viewDidload에 ` print(FileManager.default.urls(for: .documentDirectory, in: .userDomainMask))` 이부분을 제거하니 에러가 발생한다.
파일생성경로를 알려주다보니 없어서는 안되는 부분이다. 참고하자
2. Read
현재 plist 파일이 생성되는 경로에서 Documents가 아닌, Library → Application Support로 가게되면, sqilte파일이 생성되어있는걸 알 수 있다.
이걸 실행해보자

sqlite파일을 열수있는 프로그램을 설치하면 볼 수 있는데, 난 DB Browser for SQLite 라는 앱을 사용했다.
데이터를 보면?
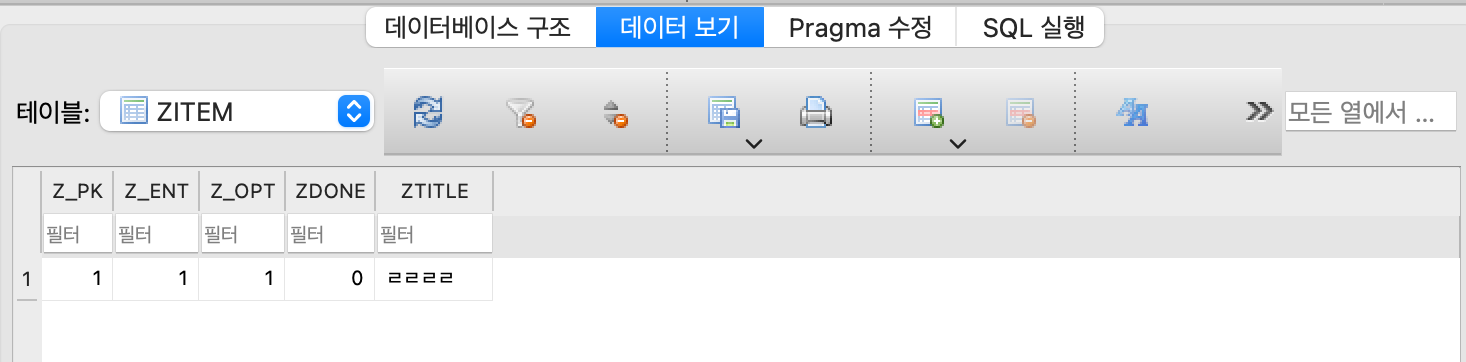
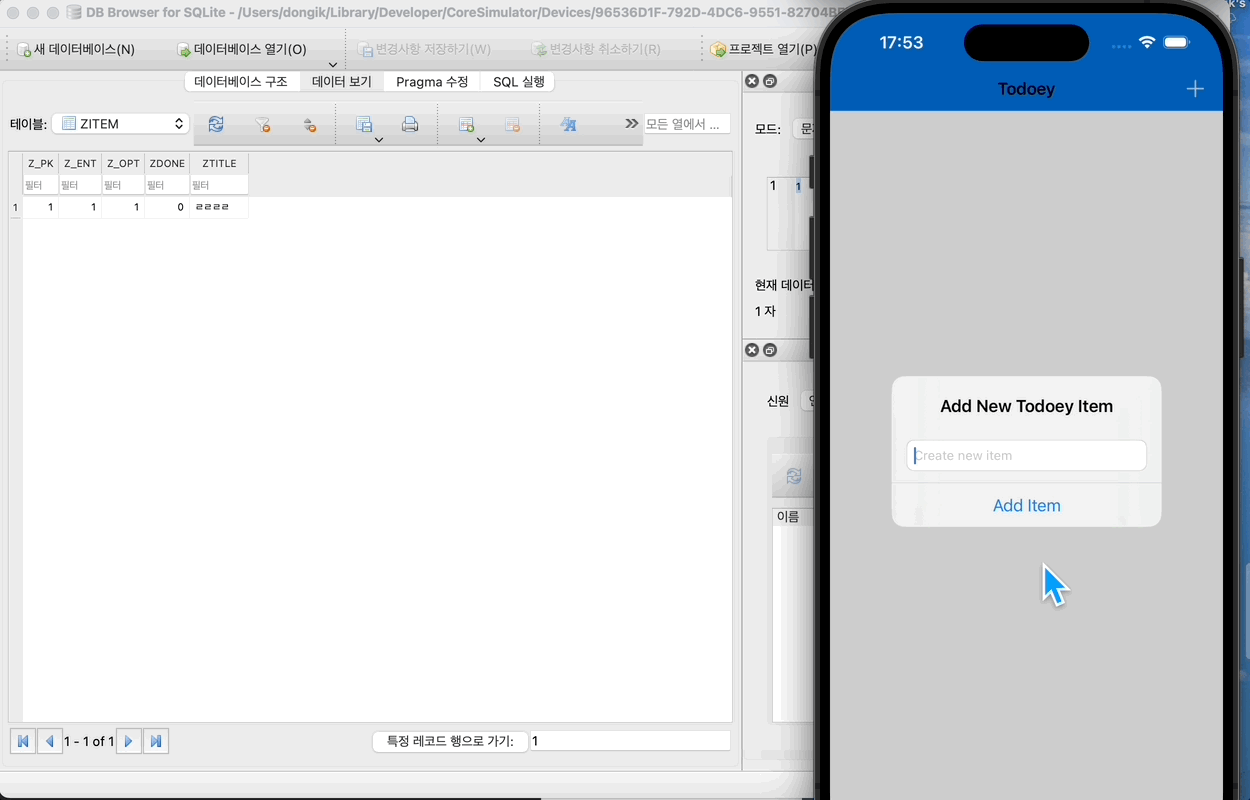
이렇게 값을 추가하고 Refresh를 해보면 입력이 잘 되는걸 알 수있다.
이제 loadItems 함수를 수정해보도록 하겠다.
NSFetchRequest 를 사용하는데 보통 swift는 데이터 형식을 유추할수 있는데, 이녀석은 직접 언급을 해줘야한다.
let request : NSFetchRequest<Item> = Item.fetchRequest()
1
2
3
4
5
6
7
8
9
10
func loadItems () {

        let request : NSFetchRequest<Item> = Item.fetchRequest()
        do {
            itemArray = try context.fetch(request)
        } catch {
            print("Error fetching data from context \(error)")
        }

    }
request가 제대로 이뤄진다면, itemArray에 데이터를 담을 것이다.
그리고 viewDidload 안에 함수를 호출하자
실행해보면?

잘 나온다.
3. Update
itemArray[indexPath.row].setValue("", forKey: "title") setValue를 사용하여 업데이트 할 수 있다.
4. Delete
삭제는 아래 두줄을 추가해주면되는데,
이때 주의 해야할건 아래 두줄의 순서이다.
먼저 배열에서 제거를하고 하게되면 outofrange에러가 발생하므로 DB를 먼저 제거하고 그 이후에 배열에서 제거해주도록 하자.
1
2
context.delete(itemArray[indexPath.row])
itemArray.remove(at: indexPath.row)