RunWay (3) HealthKit
HealthKitService 만들기
이전글에서 구현한 CoreLocation만큼 중요한 기능이다.
여기도 나중에 참고하면 좋게 하기위해 나름 자세하게 써보려 한다.
1. HealthKit 추가하기

이렇게 추가를 해준다.
2. Info.plist에 추가
이젠 수동으로 info를 관리하니 예전처럼 추가만 해주면 된다.
이전글에 있는 2개를 추가하면 된다.
HealthShareUsageDescription→ “러닝 중 심박수와 걸음 수 데이터를 읽기 위해 건강 정보 접근이 필요합니다.”HealthUpdateUsageDescription→ “러닝 운동 기록을 건강 앱에 저장하기 위해 건강 정보 쓰기 권한이 필요합니다.”
내용은 위와같이 해주었다.
그리고 러닝시에 심박수 데이터가 실시간으로 필요하므로
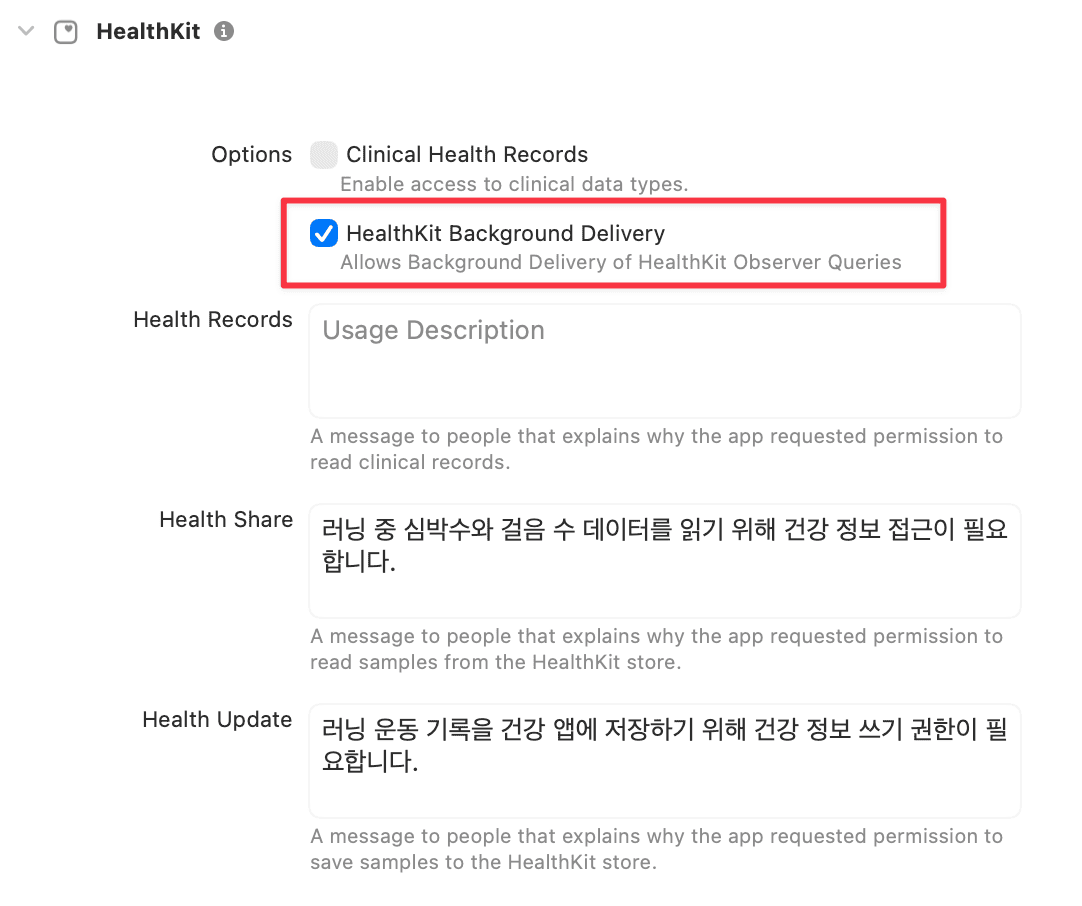
여기에 체크를 해주었다.
사진을 첨부한건 info를 수정하면 이렇게 이제는 보여지기 때문.
물론 저기서 수정해도 되긴하다.
3. HealthKitService 코드 작성
이제 기본적인 코드를 작성해보도록 한다.
1. HKHealthStore 생성
간단하다 let store = HKHealthStore() 이렇게만 해주면 된다.
HKHealthStore가 HealthKit이 관리하는 모든 데이터에 접근하기 위한 진입점. 이라고 되어있다.
즉, 빠져서는 안될 핵심이라는것.
2. 데이터 타입 만들기
사실 HealthKit에서 제공하는 타입은 엄청 많다.
HKQuantityTypeIdentifier Docs를 보면 엄청 많은걸 알 수 있다.
우선 필요한 타입을 아래 표로 정리를 해보았다.
| 타입 | 설명 | 사용 이유 |
|---|---|---|
heartRate | 심박수 (bpm) | FlightPhase 상태 전환 기준. 심박수에 따라 Cruise, Climb 등 비행 단계가 바뀐다 |
stepCount | 걸음 수 | 분당 걸음 수로 케이던스를 계산한다 |
activeEnergyBurned | 소모 칼로리 (kcal) | 러닝 중 에너지 소모량. 비행 연료 소비 개념으로 표현 가능 |
distanceWalkingRunning | 이동 거리 (km) | 러닝 총 거리. 비행 항속 거리 개념으로 표현 가능 |
runningSpeed | 러닝 속도 (m/s) | 현재 페이스 계산. PFD의 속도계 표시에 사용 |
runningGroundContactTime | 지면 접촉 시간 (ms) | 러닝 효율 지표. Apple Watch 필요 |
runningStrideLength | 보폭 (m) | 걸음 효율 분석. Apple Watch 필요 |
이후에 또 구체화하면서 추가가 되면 글을 수정하거나 글을 작성하면서 추가로 적어보도록 하겠다.
1
2
3
4
5
6
7
8
9
private let healthTypes: Set<HKObjectType> = [
    HKQuantityType(.heartRate),
    HKQuantityType(.stepCount),
    HKQuantityType(.activeEnergyBurned),
    HKQuantityType(.distanceWalkingRunning),
    HKQuantityType(.runningSpeed),
    HKQuantityType(.runningGroundContactTime),
    HKQuantityType(.runningStrideLength)
]
Set사용하는 이유는 이전글 참고
이건 우리가 모델링한것과 어떻게 매칭을 할건지에 대해 정리한 표이다.
| HealthKit 타입 | Flight 모델 필드 | 변환 |
|---|---|---|
heartRate | heartRate | 직접 매핑 |
stepCount | cadence | 분당 걸음 수로 변환 |
activeEnergyBurned | fuel | 직접 매핑 |
distanceWalkingRunning | distance | m → km 변환 |
runningSpeed | pace | m/s → min/km 변환 |
runningGroundContactTime | - | 추후 활용 |
runningStrideLength | - | 추후 활용 |
3. 권한 요청
이제 권한을 요청하는 기능을 구현한다. HealthKit 권한 요청 방식은 크게 2가지가 있다.
- UI를 별도 만들어서 요청 - SwiftUI modifier인
.healthDataAccessRequest를 활용해 커스텀 화면에서 권한을 요청하는 방식 - HealthKit 자체 UI를 사용하여 요청 -
requestAuthorization을 호출하면 Apple이 제공하는 기본 권한 시트가 자동으로 띄워지는 방식
어떤 방식을 선택하느냐에 따라 구현 방향이 달라진다.
1. UI를 별도 만들어서 요청
SwiftUI modifier인 .healthDataAccessRequest를 사용하는 방식이다. 이전글에서 했던 방식이 바로 이 방식이다.
1
2
3
4
5
6
7
8
9
10
11
12
.healthDataAccessRequest(
    store: store,
    shareTypes: healthTypes,
    readTypes: healthTypes,
    trigger: isShowingPermission) { result in
        switch result {
        case .success:
            dismiss()
        case .failure:
            dismiss()
        }
}
커스텀 온보딩 화면 등 별도 UI가 필요할 때 적합하다. 다만 그만큼 UI 작업이 추가된다.
2. HealthKit 자체 UI를 사용하여 요청
requestAuthorization을 호출하면 Apple이 제공하는 기본 권한 시트가 자동으로 띄워진다.
requestAuthorization Docs를 보면 아래와 같이 설명하고 있다.
toShare- 저장(쓰기)할 데이터 타입.HKSampleType의 서브클래스(HKQuantityType,HKCategoryType등)read- 읽을 데이터 타입.HKObjectType의 서브클래스
주목할 점은 몇 가지가 있다.
비동기 처리 - 권한 요청은 비동기로 처리된다. 처음 요청 시 권한 시트가 자동으로 표시되고, 이미 허용/거부한 타입이 있으면 시트 없이 바로 반환된다.
타입별 독립 권한 - 읽기와 쓰기 권한은 타입별로 각각 독립적으로 관리된다.
Info.plist 필수 -
NSHealthShareUsageDescription과NSHealthUpdateUsageDescription을 반드시 설정해야 한다. 없으면 크래시가 발생한다. (이미 앞에서 추가했다.)watchOS 지원 - watchOS 6 이상부터는 Watch에서 직접 권한 시트가 표시된다.
코드는 이렇게 작성한다.
1
2
3
4
func requestAuthorization() async throws {
    guard HKHealthStore.isHealthDataAvailable() else { return }
    try await store.requestAuthorization(toShare: [], read: healthTypes)
}
HKHealthStore.isHealthDataAvailable()로 기기의 HealthKit 지원 여부를 먼저 확인한다. iPad처럼 HealthKit을 지원하지 않는 기기에서 호출하면 크래시가 발생할 수 있기 때문이다.
별도 UI 없이 빠르게 권한을 처리할 수 있어서 RunWay에서는 이 방식을 선택했다.
현재 RunWay에서는 HealthKit에 데이터를 저장하는 기능이 없기 때문에 toShare는 빈 배열로 넘긴다.
추후 운동 기록을 건강 앱에 저장하는 기능이 추가되면 그때 타입을 넣으면 된다.
4. MockData 생성
아무래도 러닝앱에선 헬스킷 데이터가 중요하다보니 MockData를 하드코딩하는것보다 이전에 했던것처럼 하나의 메서드로 만들어서 실행하면 바로 랜덤 데이터가 들어가게 해보려 한다.
다만 러닝의 경우는 날짜, 러닝시간도 있다보니 신경 써야할 부분이 더 있는듯하다.
그래서 일주일치 데이터를 만드는데 매일 30~60분 정도의 러닝을 한걸로 데이터를 만들어 본다.
각 세션의 범위는 아래와 같이 잡았다.
| 항목 | 범위 |
|---|---|
| 세션 수 | 7일 (오늘 기준 -6일 ~ 오늘) |
| 러닝 시작 시간 | 하루 중 오전 6시 ~ 오전 8시 사이 랜덤 |
| 러닝 시간 | 30분 ~ 60분 랜덤 |
heartRate | 120 ~ 180 bpm 랜덤 |
stepCount | 3,000 ~ 6,000 보 랜덤 |
activeEnergyBurned | 300 ~ 600 kcal 랜덤 |
distanceWalkingRunning | 3 ~ 8 km 랜덤 |
runningSpeed | 2.5 ~ 4.5 m/s 랜덤 |
runningGroundContactTime | 200 ~ 300 ms 랜덤 |
runningStrideLength | 0.8 ~ 1.2 m 랜덤 |
Health Data
그래서 우선 랜덤값을 부여할 Health Data는 아래와 같이 했다.
1
2
3
4
5
6
7
let avgHeartRate = HKQuantity(unit: HKUnit.count().unitDivided(by: .minute()), doubleValue: .random(in: 120...180))
let stepCount = HKQuantity(unit: .count(), doubleValue: .random(in: 3_000...6_000))
let activeEnergyBurned = HKQuantity(unit: .kilocalorie(), doubleValue: .random(in: 300...600))
let distanceWalkingRunning = HKQuantity(unit: .meter(), doubleValue: .random(in: 3_000...8_000))
let runningSpeed = HKQuantity(unit: .meter().unitDivided(by: .second()), doubleValue: .random(in: 2.5...4.5))
let runningGroundContactTime = HKQuantity(unit: .secondUnit(with: .milli), doubleValue: .random(in: 200...300))
let runningStrideLength = HKQuantity(unit: .meter(), doubleValue: .random(in: 0.8...1.2))
⚠️ HKUnit(from: "count/min")처럼 문자열로 단위를 생성하는 방식은 런타임에 파싱하기 때문에 오타가 있으면 크래시가 발생할 수 있다. HKUnit.count().unitDivided(by: .minute())처럼 타입 안전한 방식을 사용하는 것을 권장한다.
1
2
3
4
5
// Before
let avgHeartRate = HKQuantity(unit: HKUnit(from: "count/min"), doubleValue: .random(in: 120...180))

// After
let avgHeartRate = HKQuantity(unit: HKUnit.count().unitDivided(by: .minute()), doubleValue: .random(in: 120...180))
Date, Time
이제 일주일치를 만드는 시간 설정을 한다, 그리고 러닝은 러닝 시작, 종료 시간이 또 존재한다.
1
2
3
let startDate = Calendar.current.date(byAdding: .day, value: -i, to: .now)!
let runningStart = Calendar.current.date(byAdding: .hour, value: Int.random(in: 6...8), to: startDate)!
let runningEnd = Calendar.current.date(byAdding: .minute, value: Int.random(in: 30...60), to: runningStart)!
runningStart는 시작날짜에 맞추고, runningEnd는 러닝 시작한 시간에 맞춰주도록 한다.
그러면 runningStart는 날짜와 시간을 모두 포함하게 된다.
Sample Data 조립
이렇게 이젠 합쳐주면된다.
이때 QuantityType을 신경써서 해주도록 한다.
1
2
3
4
5
6
7
8
9
10
11
12
13
14
15
16
17
18
19
20
21
22
23
24
25
26
27
28
29
30
31
32
33
34
35
36
37
38
39
40
41
42
43
44
45
46
47
48
let heartRateSample = HKQuantitySample(
    type: HKQuantityType(.heartRate),
    quantity: avgHeartRate,
    start: runningStart,
    end: runningEnd
)

let stepCountSample = HKQuantitySample(
    type: HKQuantityType(.stepCount),
    quantity: stepCount,
    start: runningStart,
    end: runningEnd
)

let activeEnergyBurnedSample = HKQuantitySample(
    type: HKQuantityType(.activeEnergyBurned),
    quantity: activeEnergyBurned,
    start: runningStart,
    end: runningEnd
)

let distanceWalkingRunningSample = HKQuantitySample(
    type: HKQuantityType(.distanceWalkingRunning),
    quantity: distanceWalkingRunning,
    start: runningStart,
    end: runningEnd
)

let runningSpeedSample = HKQuantitySample(
    type: HKQuantityType(.runningSpeed),
    quantity: runningSpeed,
    start: runningStart,
    end: runningEnd
)

let runningGroundContactTimeSample = HKQuantitySample(
    type: HKQuantityType(.runningGroundContactTime),
    quantity: runningGroundContactTime,
    start: runningStart,
    end: runningEnd
)

let runningStrideLengthSample = HKQuantitySample(
    type: HKQuantityType(.runningStrideLength),
    quantity: runningStrideLength,
    start: runningStart,
    end: runningEnd
)
배열에 추가 및 실행
1
2
3
4
5
6
7
8
9
10
11
12
13
14
15
16
17
func addSimulatorData() async {
    var mockSamples: [HKQuantitySample] = []

    for i in 0..<7 {
        // 생략
        mockSamples.append(heartRateSample)
        mockSamples.append(stepCountSample)
        mockSamples.append(activeEnergyBurnedSample)
        mockSamples.append(distanceWalkingRunningSample)
        mockSamples.append(runningSpeedSample)
        mockSamples.append(runningGroundContactTimeSample)
        mockSamples.append(runningStrideLengthSample)
    }

    try! await store.save(mockSamples)
    print("MockData added")
}
이때 save가 async/await를 지원하므로 try await를 해준다. 그래서 addSimulatorData에도 async를 사용한 것
이후 확인용으로 print()를 달아주었다.
일단은 onAppear를 통해 한번만 호출하면 되므로
1
2
3
4
5
6
.onAppear {
    Task {
        try? await healthService.requestAuthorization()
        await healthService.addSimulatorData()
    }
}
이렇게 해준다. 생각해보니 request 하지않아서 같이 겸사겸사 해준다.

하지만
1
Fatal error: 'try!' expression unexpectedly raised an error: Error Domain=com.apple.healthkit Code=4 "Not authorized" UserInfo={NSLocalizedDescription=Not authorized}
이렇게 크래시가 발생 물론 에러가 안뜰거라고 확신하고 try!를 한게 문제이긴 하지만 원인을 파악 해보도록 한다.
1
2
3
4
func requestAuthorization() async throws {
    guard HKHealthStore.isHealthDataAvailable() else { return }
    try await store.requestAuthorization(toShare: [], read: healthTypes)
}
바로 빈배열을 아직도 사용하기 때문
그래서 healthTypes as! Set<HKSampleType>으로 Type Casting을 해주고 넣어준다.
타입 캐스팅을 해주는 이유는 toShare는 Set<HKSampleType>을 요구하지만 healthTypes는 Set<HKObjectType>으로 선언되어 있다.
HKObjectType은 읽기용 상위 타입, HKSampleType은 쓰기용 하위 타입으로 HKQuantityType이 HKSampleType을 상속하고 있기 때문에 강제 캐스팅이 가능하다.
1
try await store.requestAuthorization(toShare: healthTypes as! Set<HKSampleType>, read: healthTypes)
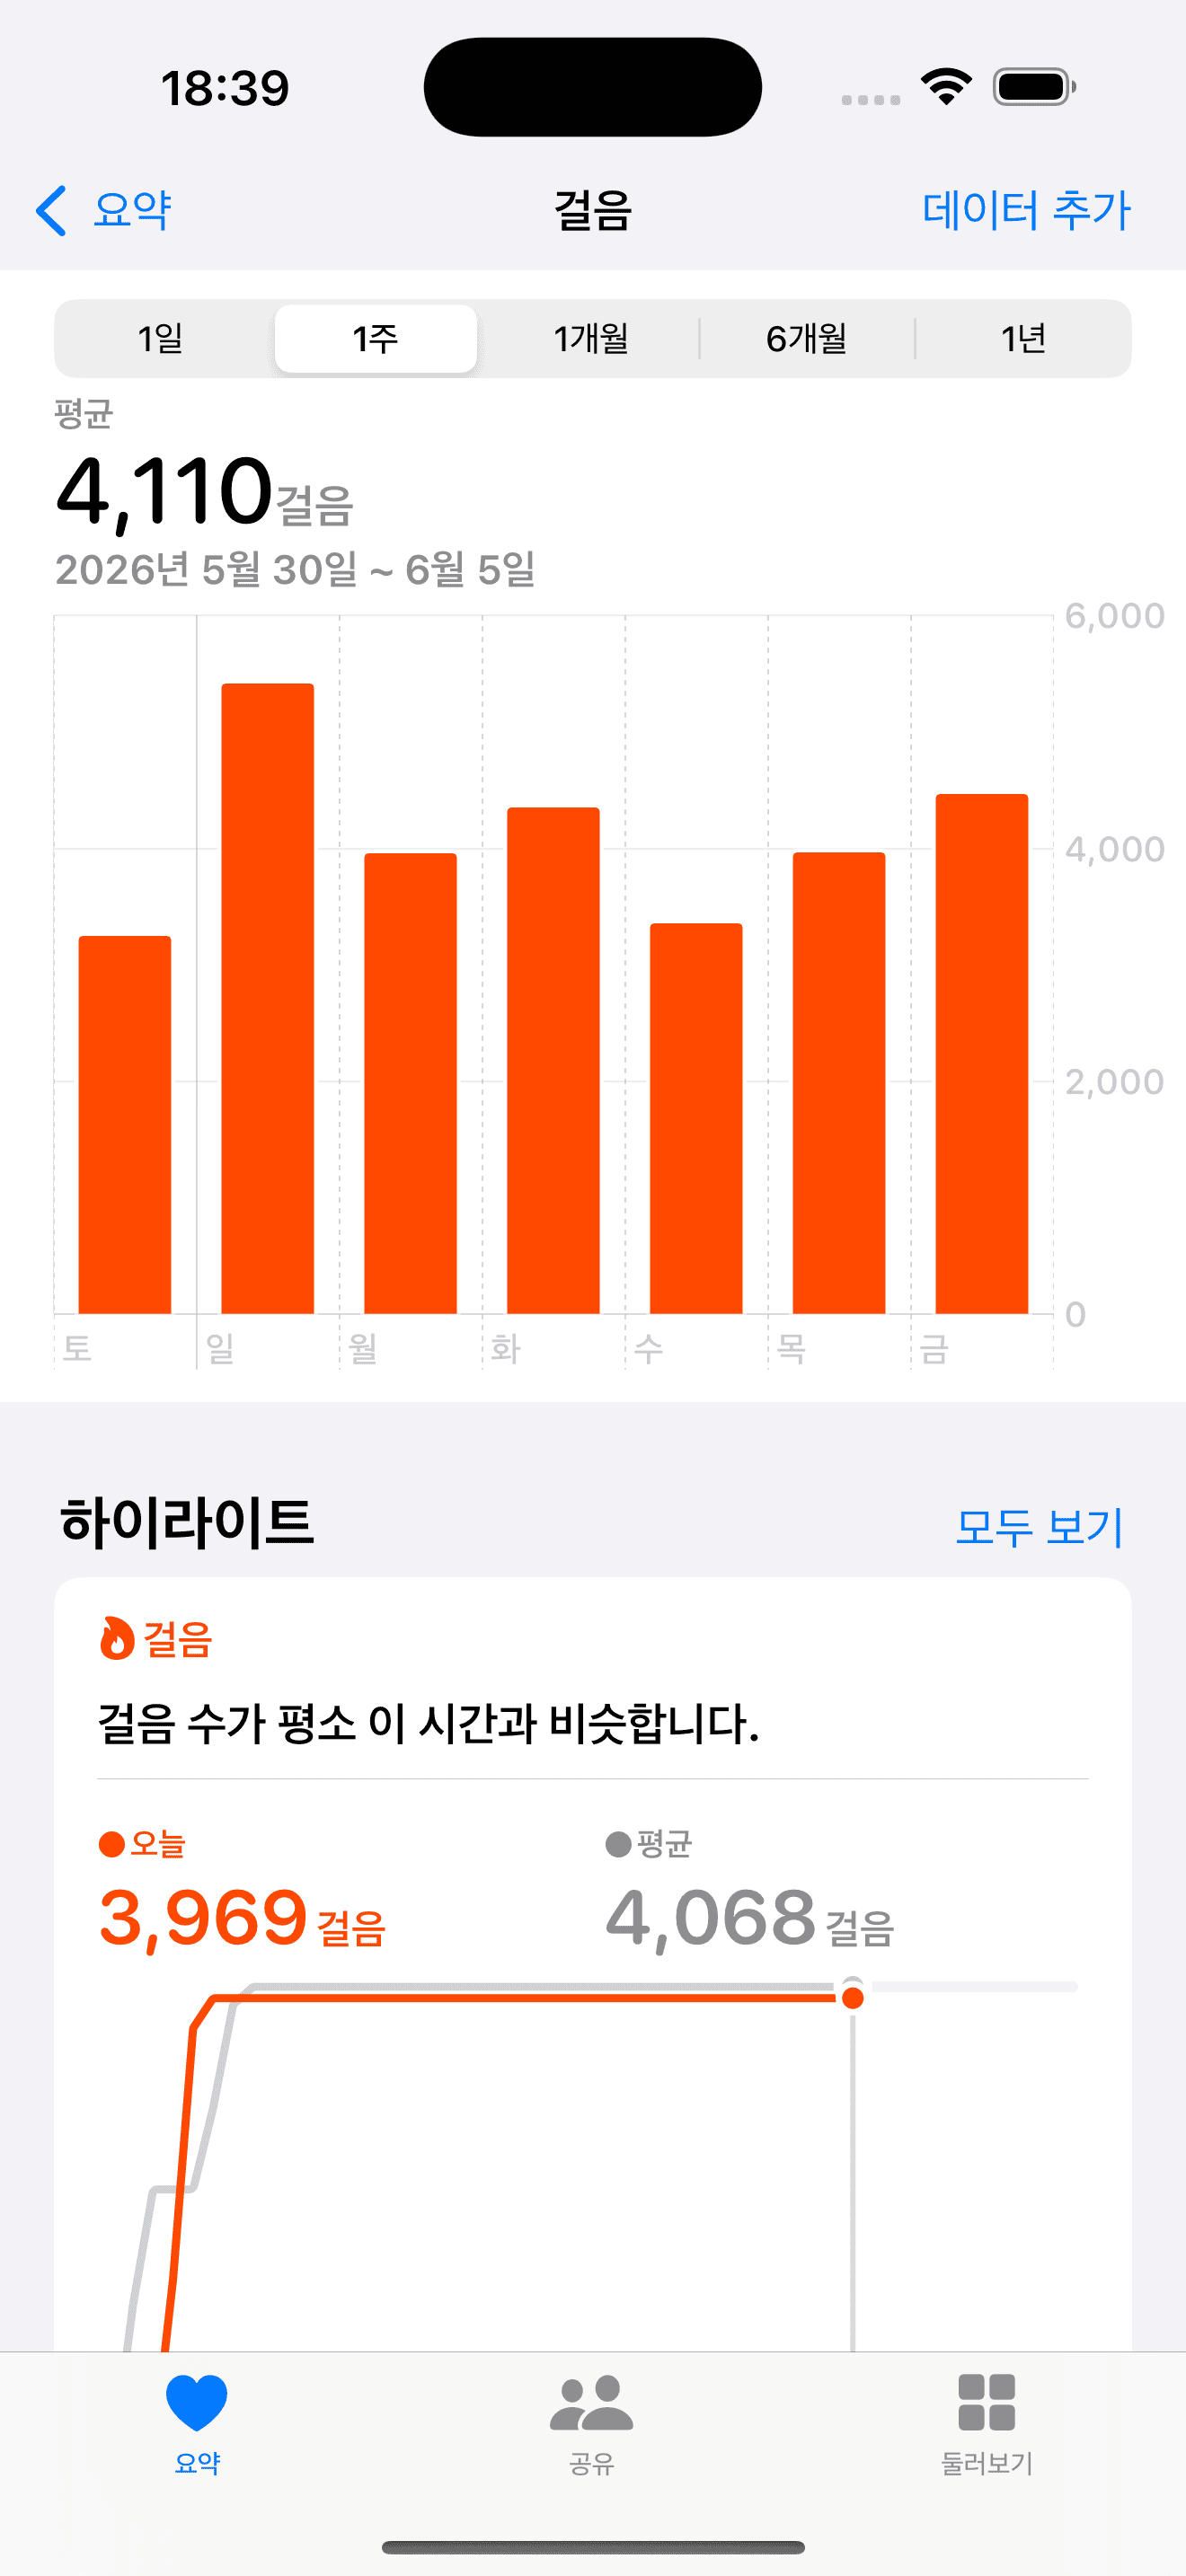
이제 데이터가 잘 들어간걸 확인 할 수 있다.
이제 확인했으니 onAppear 부분은 삭제.
간단하게 정리해보면
- 샘플배열 만들기 (type은 HKQuantitySample)
- 샘플데이터 만들기 (시간과 날짜는 상황에 맞춰서)
- 샘플데이터 조립
- 배열에 담기
- 저장하기
5. 데이터 수집
이제 MockData를 수집하는 메서드를 만들어 보려한다.
하지만 위에서 정의한 타입들은 성격에 따라 수집 방식이 달라진다.
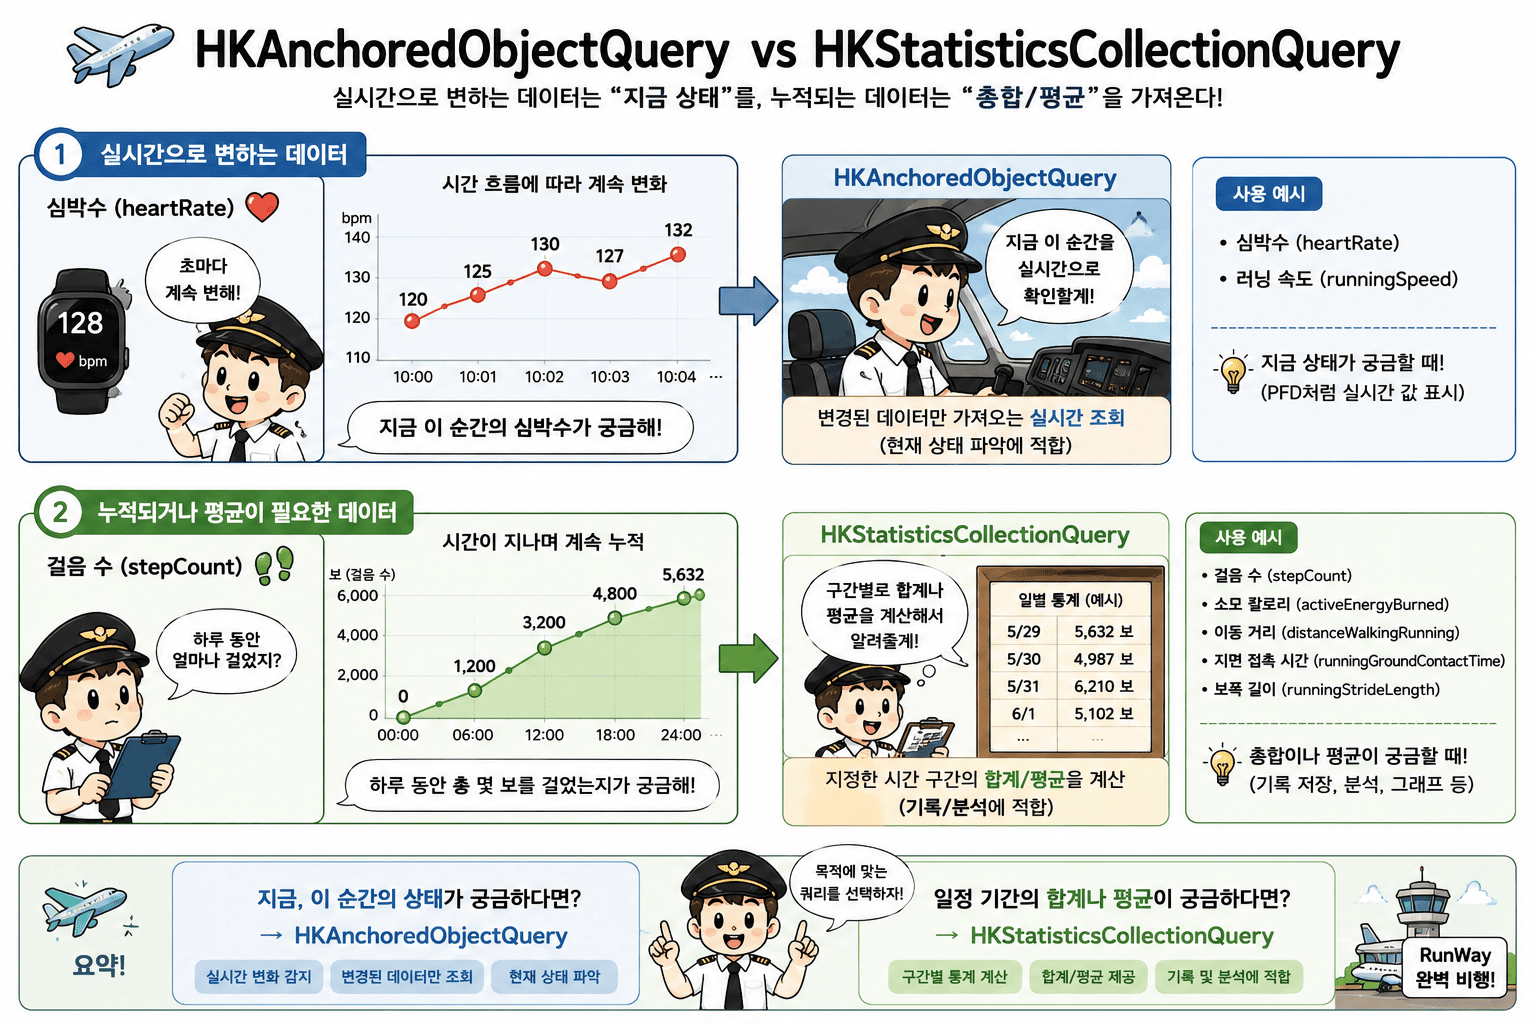
실시간으로 변화하는 데이터와 누적되는 데이터를 구분해야 하기 때문이다.
HKAnchoredObjectQuery Docs, HKStatisticsQuery Docs를 참고하여 간단하게 정리하면,
- HKAnchoredObjectQuery - HealthKit 저장소의 변경사항을 반환하는 쿼리. 스냅샷과 함께 장기 실행 쿼리로 지속적인 모니터링이 가능하다.
- HKStatisticsQuery - 조건에 맞는 수량 샘플들을 대상으로 통계 계산(합계, 평균 등)을 수행하고 결과를 반환하는 쿼리.
그래서 어떤 쿼리를 쓸지 표로 정리를 해보았다.
| 타입 | 수집 방식 |
|---|---|
heartRate | HKAnchoredObjectQuery (실시간) |
stepCount | HKStatisticsQuery |
activeEnergyBurned | HKStatisticsQuery |
distanceWalkingRunning | HKStatisticsQuery |
runningSpeed | HKAnchoredObjectQuery (실시간) |
runningGroundContactTime | HKStatisticsQuery |
runningStrideLength | HKStatisticsQuery |
💡
runningSpeed를 실시간으로 UI에 표시할 때 데이터가 튀거나 주기가 불규칙해서 화면이 출렁거린다면HKStatisticsCollectionQuery를 대안으로 검토해볼 수 있다.HKStatisticsCollectionQuery Docs에 의하면 HKStatisticsCollectionQuery - 고정된 시간 간격으로 여러 통계 쿼리를 수행하는 쿼리이다.
예를 들어 5초 단위의 평균 속도로 묶어서 쿼리를 던지면 실시간성을 유지하면서도 UI를 훨씬 부드럽게 표현할 수 있다.
지금은
HKAnchoredObjectQuery로 구현하고, 실제 테스트 후 출렁거림이 발생하면 그때 교체하는 방향으로 진행한다.
물론 query정리는 이전글에서 간단하게 했던게 있지만 우선 필요한것만 좀 상세하게 적어보았다.
이제 코드를 작성 해본다.
HKAnchoredObjectQueryDescriptor
heartRate, runningSpeed는 실시간으로 변화하는 데이터이므로 HKAnchoredObjectQueryDescriptor를 사용한다.
anchor는 이전에 가져간 데이터의 위치를 기억하는 책갈피 역할을 한다.
nil→ 처음부터 전체 데이터를 가져옴- 이전 쿼리의
anchor값 → 그 이후 추가된 데이터만 가져옴
현재는 MockData 확인 목적이므로 nil로 설정하여 전체를 가져온다. 추후 실시간 모니터링 구현 시 anchor 값을 저장하여 변경된 데이터만 가져오도록 최적화할 수 있다.
1
2
3
4
5
6
7
8
9
10
11
12
13
14
15
16
17
18
19
20
21
22
23
24
25
26
27
28
29
30
31
32
33
func fetchHeartRate() async {
    let startDate = Calendar.current.date(byAdding: .day, value: -7, to: .now)!
    let endDate = Date()

    let queryPredicate = HKQuery.predicateForSamples(withStart: startDate, end: endDate)
    let samplePredicate = HKSamplePredicate.quantitySample(type: HKQuantityType(.heartRate), predicate: queryPredicate)

    let heartRateQuery = HKAnchoredObjectQueryDescriptor(predicates: [samplePredicate], anchor: nil)

    let avgHeartRate = try! await heartRateQuery.result(for: store)

    for sample in avgHeartRate.addedSamples {
        let value = sample.quantity.doubleValue(for: HKUnit.count().unitDivided(by: .minute()))
        print("심박수: \(value) bpm")
    }
}

func fetchRunningSpeed() async {
    let startDate = Calendar.current.date(byAdding: .day, value: -7, to: .now)!
    let endDate = Date()

    let queryPredicate = HKQuery.predicateForSamples(withStart: startDate, end: endDate)
    let samplePredicate = HKSamplePredicate.quantitySample(type: HKQuantityType(.runningSpeed), predicate: queryPredicate)

    let runningSpeedQuery = HKAnchoredObjectQueryDescriptor(predicates: [samplePredicate], anchor: nil)

    let runningRate = try! await runningSpeedQuery.result(for: store)

    for sample in runningRate.addedSamples {
        let value = sample.quantity.doubleValue(for: HKUnit.meter().unitDivided(by: .second()))
        print("🏃 Running Speed: \(value) m/s")
    }
}
HKStatisticsCollectionQueryDescriptor
나머지 5개 타입은 HKStatisticsCollectionQueryDescriptor를 사용한다.
쿼리 생성 시 파라미터를 살펴보면:
predicate- 어떤 데이터를 가져올지 조건 (타입 + 날짜 범위)options- 통계 계산 방식.cumulativeSum- 누적 합산.stepCount,activeEnergyBurned,distanceWalkingRunning에 사용.discreteAverage- 구간 평균.runningGroundContactTime,runningStrideLength에 사용
anchorDate- 시간 간격을 나눌 기준점intervalComponents- 얼마나 잘게 나눌지..init(day: 1)은 하루 단위
결과에서 값을 꺼낼 때도 options에 따라 다르다.
.cumulativeSum→sumQuantity().discreteAverage→averageQuantity()
1
2
3
4
5
6
7
8
9
10
11
12
13
14
15
16
17
18
19
20
21
22
23
24
25
26
27
28
29
30
31
32
33
34
35
36
37
38
39
40
41
42
43
44
45
46
47
48
49
50
51
52
53
54
55
56
57
58
59
func fetchActiveEnergyBurned() async {
    let startDate = Calendar.current.date(byAdding: .day, value: -7, to: .now)!
    let endDate = Date()
    let queryPredicate = HKQuery.predicateForSamples(withStart: startDate, end: endDate)
    let samplePredicate = HKSamplePredicate.quantitySample(type: HKQuantityType(.activeEnergyBurned), predicate: queryPredicate)
    let query = HKStatisticsCollectionQueryDescriptor(predicate: samplePredicate, options: .cumulativeSum, anchorDate: endDate, intervalComponents: .init(day: 1))
    let result = try! await query.result(for: store)
    for stat in result.statistics() {
        let value = stat.sumQuantity()?.doubleValue(for: .kilocalorie()) ?? 0
        print("🔥 Energy: \(value) kcal / \(stat.startDate)")
    }
}

func fetchDistance() async {
    let startDate = Calendar.current.date(byAdding: .day, value: -7, to: .now)!
    let endDate = Date()
    let queryPredicate = HKQuery.predicateForSamples(withStart: startDate, end: endDate)
    let samplePredicate = HKSamplePredicate.quantitySample(type: HKQuantityType(.distanceWalkingRunning), predicate: queryPredicate)
    let query = HKStatisticsCollectionQueryDescriptor(predicate: samplePredicate, options: .cumulativeSum, anchorDate: endDate, intervalComponents: .init(day: 1))
    let result = try! await query.result(for: store)
    for stat in result.statistics() {
        let value = stat.sumQuantity()?.doubleValue(for: .meter()) ?? 0
        print("📍 Distance: \(value) m / \(stat.startDate)")
    }
}

func fetchGroundContactTime() async {
    let startDate = Calendar.current.date(byAdding: .day, value: -7, to: .now)!
    let endDate = Date()

    let queryPredicate = HKQuery.predicateForSamples(withStart: startDate, end: endDate)
    let samplePredicate = HKSamplePredicate.quantitySample(type: HKQuantityType(.runningGroundContactTime), predicate: queryPredicate)

    let query = HKStatisticsCollectionQueryDescriptor(predicate: samplePredicate, options: .discreteAverage, anchorDate: endDate, intervalComponents: .init(day: 1))

    let result = try! await query.result(for: store)

    for stat in result.statistics() {
        let value = stat.averageQuantity()?.doubleValue(for: .secondUnit(with: .milli)) ?? 0
        print("⏱️ Ground Contact: \(value) ms / \(stat.startDate)")
    }
}

func fetchStrideLength() async {
    let startDate = Calendar.current.date(byAdding: .day, value: -7, to: .now)!
    let endDate = Date()

    let queryPredicate = HKQuery.predicateForSamples(withStart: startDate, end: endDate)
    let samplePredicate = HKSamplePredicate.quantitySample(type: HKQuantityType(.runningStrideLength), predicate: queryPredicate)

    let query = HKStatisticsCollectionQueryDescriptor(predicate: samplePredicate, options: .discreteAverage, anchorDate: endDate, intervalComponents: .init(day: 1))

    let result = try! await query.result(for: store)

    for stat in result.statistics() {
        let value = stat.averageQuantity()?.doubleValue(for: .meter()) ?? 0
        print("👣 Stride Length: \(value) m / \(stat.startDate)")
    }
}
아직은 fetch로 할게 없어서 역시나 onAppear를 통해 확인만 해본다.
1
2
3
4
5
6
7
8
9
10
11
.onAppear {
    Task {
        await healthService.fetchHeartRate()
        await healthService.fetchRunningSpeed()
        await healthService.fetchStepsCount()
        await healthService.fetchActiveEnergyBurned()
        await healthService.fetchDistance()
        await healthService.fetchGroundContactTime()
        await healthService.fetchStrideLength()
    }
}
실행하니
1
2
3
4
5
6
7
8
9
10
11
12
심박수: 145.24544232236636 bpm
//생략
🏃 Running Speed: 4.360046790851857 m/s
//생략
👟 Steps: 3247.0712878691106 보 / 2026-05-29 10:12:30 +0000
//생략+0000
🔥 Energy: 484.3454798781095 kcal / 2026-05-29 10:12:30 +0000
//생략 +0000
📍 Distance: 4437.791550372795 m / 2026-05-29 10:12:30 +0000
//생략+0000
⏱️ Ground Contact: 206.74458555440614 ms / 2026-05-29 10:12:30 +0000
//생략
이렇게 잘 되는걸 알 수 있다.
둘의 비교를 만화로 넣어보았다.
4. 시뮬레이터 시간 문제 수정
위에서 생략을 했지만 지금 시간이 일주일 전부 10:12:30+0000 으로 나온다.
알고 보니 두 가지 문제가 겹쳐있었다.
첫 번째 - HKStatisticsCollectionQueryDescriptor의 stat.startDate는 MockData의 실제 등록 시간이 아니라 쿼리가 구간을 나누는 기준 시간이다. 즉 프린트 자체가 잘못된 것이었다.
실제 등록 시간을 확인하려면 sample.startDate로 출력해야 한다.
1
2
3
for sample in result.addedSamples {
    print(sample.startDate) // 실제 MockData 등록 시간
}
두 번째 - 근본적으로도 문제가 있었다. .now에 현재 시각이 그대로 포함되어 있기 때문에 -i일을 빼더라도 시/분/초는 그대로 유지된다. 그래서 startOfDay로 하루의 시작(00:00:00)으로 초기화한 뒤 hour offset을 더해야 날짜별로 오전 6~8시 사이의 랜덤한 시간이 잡힌다.
1
2
3
4
5
6
7
// Before
let startDate = Calendar.current.date(byAdding: .day, value: -i, to: .now)!
let runningStart = Calendar.current.date(byAdding: .hour, value: Int.random(in: 6...8), to: startDate)!

// After
let startDate = Calendar.current.startOfDay(for: Calendar.current.date(byAdding: .day, value: -i, to: .now)!)
let runningStart = Calendar.current.date(byAdding: .hour, value: Int.random(in: 6...8), to: startDate)!