SwiftUI Combine (Fin)
MMAInfoCurrentValueApp (PassthroughSubject)
이번엔 PassthroughSubject를 사용한 앱을 만든다.
Modeling
1
2
3
4
5
6
7
8
9
10
11
12
13
14
15
16
17
struct MMAFighter: Codable, Identifiable {
    var id = UUID()

    let name:String
    let fightTeam:String
    let country:String
    let record:String
    let age:Int

    private enum CodingKeys: String, CodingKey {
        case name, fightTeam, country, record, age
    }
}

struct FightersResponse: Codable {
    let fighters:[MMAFighter]
}
전에 id에 대해 내용을 정리하면서 나왔던 부분이다.
그리고 Identifiable을 프로토콜을 채택했지만, id를 만들지 않을경우?
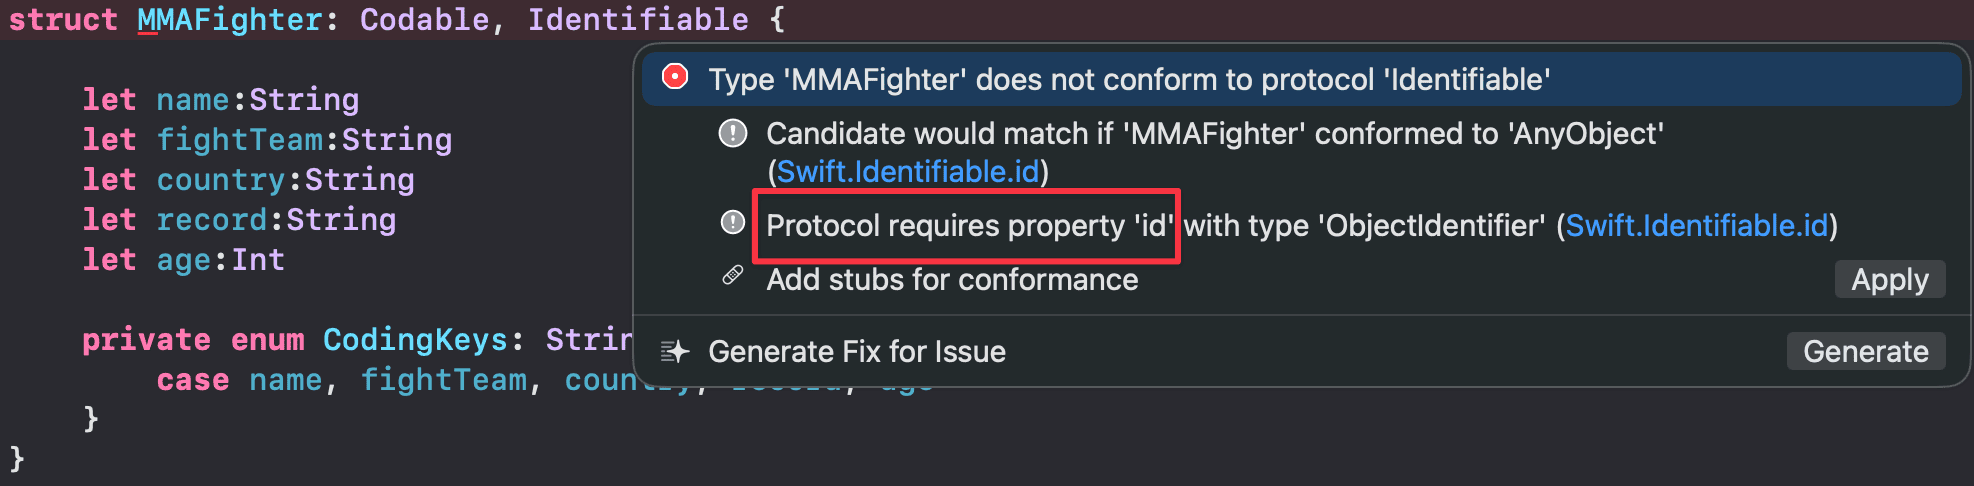
바로 이렇게 id가 필요하다고 에러가 뜬다.
실제로 Apply를 누르면 let id: ObjectIdentifier가 만들어진다.
이전글에 짤막하게 UUID를 왜 사용했는지 적어놨다.
뭐 여기에도 적어보면 중복방지가 가장 큰 이유이다.
무튼 id를 이렇게 만들어주면 에러가 해결이 된다.
또 이런 생각을 가질 수 있다.
1
2
3
4
5
"name": "Jon Jones",
      "fightTeam": "Jackson Wink MMA",
      "country": "USA",
      "record": "28-1 (1 NC)",
      "age": 36
아니 json을 보면 id가 없는데 id써도 되는거야? 라는 생각이 충분히 가능
이유는 id = UUID()가 디코딩 대상이 아니라 앱 내부에서 생성하는 값이기 때문이다.
CodingKeys를 보면 id가 빠져있는데
1
2
3
4
private enum CodingKeys: String, CodingKey {
    case name, fightTeam, country, record, age
    // id 없음
}
CodingKeys에 없으면 디코더가 JSON에서 id를 찾으려 하지 않는다. 그래서 JSON에 id가 없어도 에러가 안 나는 것
대신 var id = UUID()는 JSON 디코딩 후 Swift가 객체를 생성할 때 자동으로 초기값을 채워준다.
즉, JSON에서 오는 값이 아니라 앱이 직접 만드는 값이라서 CodingKeys에서 제외한 것
그렇다면 CodingKeys가 없다면?
Codable은 CodingKeys가 없으면 구조체 안의 모든 프로퍼티를 디코딩 대상으로 자동 합성한다. 즉 var든 let이든 기본값이 있든 없든 상관없이, JSON에서 "id" 키를 찾으려 시도한다. JSON에 "id"가 없으면 keyNotFound 에러가 발생한다.
그래서 CodingKeys는 선택이 아니라 필수다. CodingKeys에서 id를 제외해야 디코더가 id를 건드리지 않고, 그때 비로소 var id = UUID() 기본값이 안전하게 들어간다.
Streaming Service
1
2
3
4
5
6
7
8
9
10
11
12
13
14
15
16
17
18
19
20
21
22
23
24
25
26
27
28
29
30
31
32
33
34
35
36
37
38
39
40
41
42
43
44
45
final class MockCurrentValueStreamingService {
    private let subject = CurrentValueSubject<[[MMAFighter]], Never>([])

    func streamFighters(interval: TimeInterval = 2.0) -> AnyPublisher<[[MMAFighter]], Never> {
        // if let
        if let url = Bundle.main.url(forResource: "MMAFighters", withExtension: "json") {
            print("✅ Found file: \(url.path)")
            do {
                let data = try Data(contentsOf: url)
                let response = try JSONDecoder().decode(FightersResponse.self, from: data)
                print("✅ Decoded \(response.fighters.count) fighters successfully")
            } catch {
                print("❌ Decoding error:", error)
            }
        } else {
            print("❌ Could not find MMAFighters.json in bundle")
        }

        // guard let
        guard let url = Bundle.main.url(forResource: "MMAFighters", withExtension: "json"),
              let data = try? Data(contentsOf: url),
              let response = try? JSONDecoder().decode(FightersResponse.self, from: data)
        else {
            print("Error loading MMAFighters.json")
            return subject.eraseToAnyPublisher()
        }

        let fighters = response.fighters

        var currentRoster: [MMAFighter] = []

        // Simulate streaming over time
        for (index, fighter) in fighters.enumerated() {
            DispatchQueue.main.asyncAfter(deadline: .now() + Double(index) * interval) {
                currentRoster.append(fighter)

                var newSections = self.subject.value
                newSections.append(currentRoster) // each section = snapshot so far
                self.subject.send(newSections)
            }
        }

        return subject.eraseToAnyPublisher()
    }
}
코드가 꽤 긴편인데 별거없다.
우선 3 section으로 나눌 수가 있는데
그중 첫번째 두번째가 json파일을 불러와서 decoding을 하는 코드이다.
단지 if let, guard let으로 가져오는 방식의 차이
물론 guard let일 경우 리턴을 해줘야 하므로 에러를 출력하면서 subject.eraseToAnyPublisher()그대로 리턴을 하게된다.
둘중 하나는 지워도 된다.
그리고 오래간만에 보는 for (index, fighter) in fighters.enumerated()
enumerated()는 보통 배열에 관해서 간단한 코딩테스트 문제를 풀때 종종 사용하곤 했다.
Docs는 여기
보통 배열의 index도 같이 필요할때 enumerated를 사용하면 된다.
DispatchQueue.main.asyncAfter(deadline: .now() + Double(index) * interval)의 경우 일종의 타이머라고 보면 된다.
index와 우리가 설정한 interval의 값을 곱한 초 뒤에 append 하라는것
그리고 또 배열을 만들어서 기존값을 담아서 보낸다.
이게 어떤 의미냐면
1
2
3
4
5
a

a, b

a, b, c
이런식으로 누적시켜서 전달하겠다는것.
ViewModel
1
2
3
4
5
6
7
8
9
10
11
12
13
14
15
final class FighterSectionedViewModel: ObservableObject {
    @Published var sections: [[MMAFighter]] = []

    private let service = MockCurrentValueStreamingService()
    private var cancellables = Set<AnyCancellable>()

    func startStreaming() {
        service.streamFighters(interval: 3.0)
            .receive(on: DispatchQueue.main)
            .sink { [weak self] newSections in
                self?.sections = newSections
            }
            .store(in: &cancellables)
    }
}
여긴 뭐 사실 계속 다뤄왔던 부분이라 pass
View
1
2
3
4
5
6
7
8
9
10
11
12
13
14
15
16
17
18
19
20
21
22
23
24
25
NavigationView {
    VStack {
        List {
            ForEach(vm.sections.indices, id: \.self) { index in
                Section(header: Text("Section \(index + 1)")) {
                    ForEach(vm.sections[index]) { fighter in
                        VStack(alignment: .leading) {
                            Text(fighter.name)
                                .font(.headline)
                            Text("\(fighter.record) • \(fighter.fightTeam)")
                                .font(.subheadline)
                                .foregroundColor(.secondary)
                        }
                    }
                }
            }
        }

        Button("Start Stream") {
            vm.startStreaming()
        }
        .padding()
    }
    .navigationTitle("Streaming Fighters")
}
크게 뭐 없지만 짚고 넘어갈 포인트들이 있다.
먼저 Section이 나왔는데, UIKit에서도 Section이 있어서 그거랑 동일하게 생각하면 된다.
다음으로 짚고 넘어갈 포인트들은
ForEach(vm.sections.indices, id: \.self)
vm.sections는 [[MMAFighter]] 형태의 2차원 배열이다. 바깥쪽 배열인 섹션을 순회할 때 인덱스(indices)를 쓴 이유는 Section(header: Text("Section \(index + 1)")) 처럼 섹션 번호가 필요하기 때문이다.
즉, 배열에서 index만 필요할때 indices를 사용한다. 이것도 역시 enumerated처럼 배열에 관한 코딩문제를 풀때 한번쯤은 접했을것이다.
ForEach(vm.sections[index])
각 섹션 내부의 MMAFighter를 순회한다. MMAFighter가 Identifiable을 채택했기 때문에 별도의 id: 지정 없이 바로 쓸 수 있다.
“Start Stream” 버튼을 누르면 CurrentValueSubject의 특성을 눈으로 확인할 수 있다.
PassthroughSubject처럼 데이터가 하나씩 들어오는 게 아니라, 업데이트될 때마다 이전 데이터 + 새 데이터가 통째로 방출되면서 리스트 전체가 갱신된다.
Identifiable과 CodingKeys 복습
강의 말미에 모델의 중요성을 다시 한 번 강조한다.
Identifiable+UUID()가 필요한 이유: 이름이나 기록이 바뀌더라도 컴파일러가 각 항목을 정확히 추적하려면 내용물과 무관한 고유한 ID가 필요하다.CodingKeys가 필요한 이유: JSON에id가 없기 때문에CodingKeys로 디코딩 대상에서id를 제외해야 파싱 에러 없이UUID를 부여할 수 있다.
실행하면 이렇게 나온다.
마지막으로
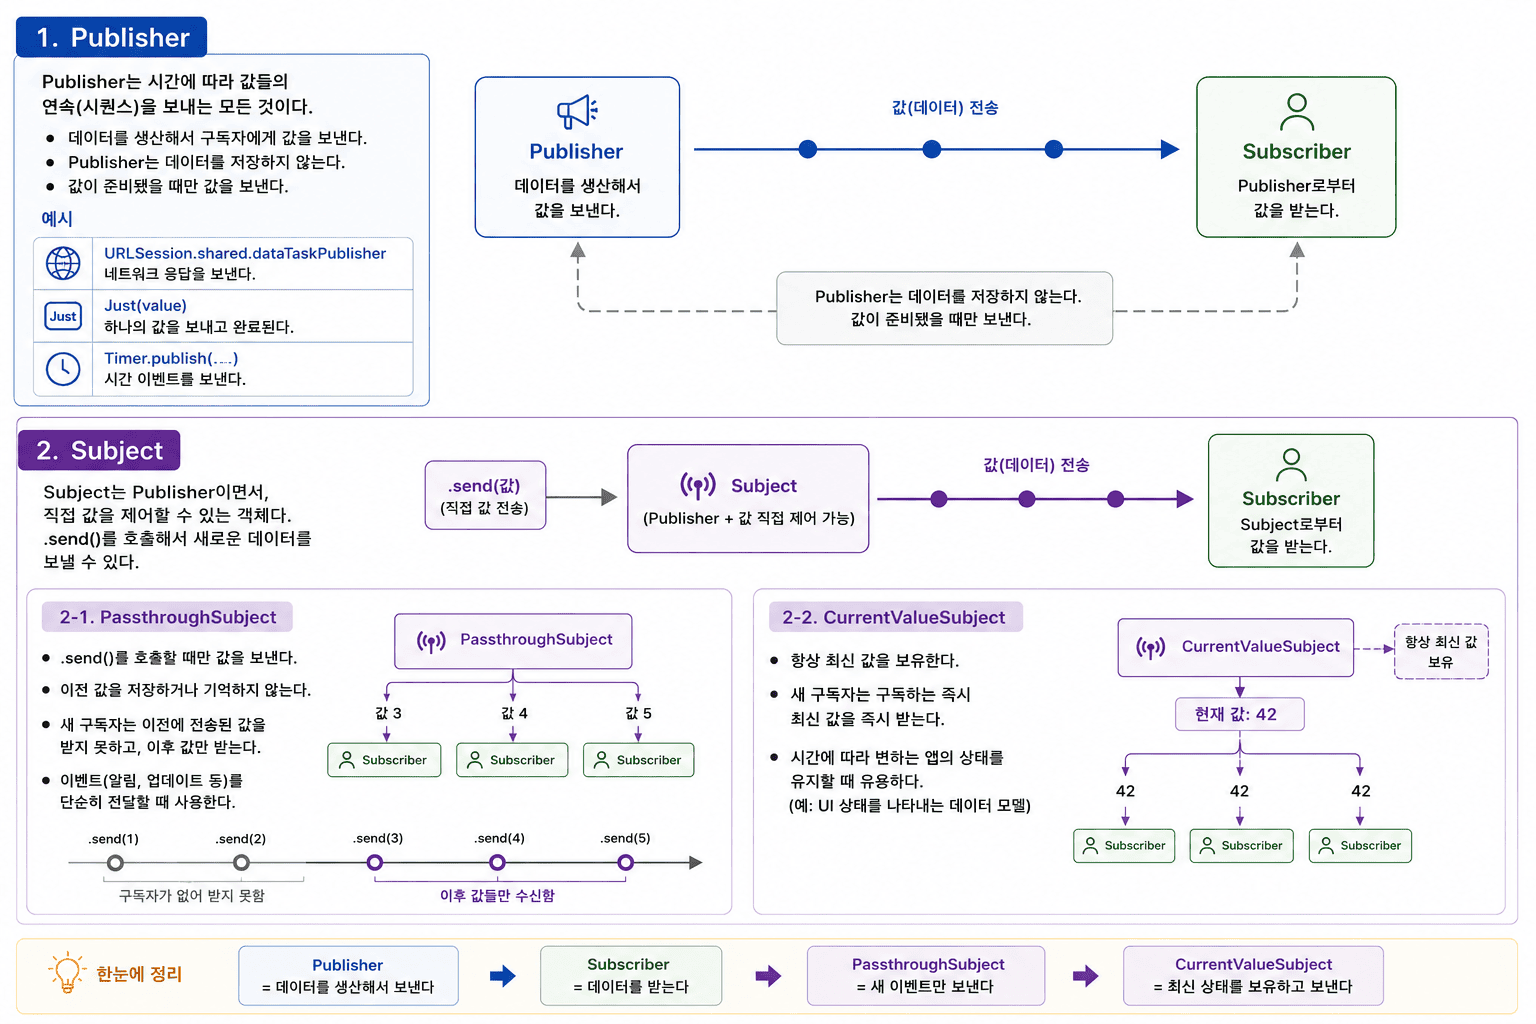
강의 마지막에 핵심 개념을 다시 한번 정리해줬다.
자세한 내용은 Combine (1) 에서 다뤘으니 참고.
- Publisher = 데이터를 생산해서 방출
- Subscriber = 데이터를 수신
- PassthroughSubject = 새 이벤트만 방출
- CurrentValueSubject = 최신 상태를 보유하고 방출
1
2
3
4
5
6
7
8
<iframe
    src="/assets/demo/subject-simulator.html"
    width="100%"
    height="580px"
    frameborder="0"
    style="border-radius: 12px; border: 1px solid #444; overflow: hidden; background-color: #1e1e1e;"
    title="Subject Simulator">
</iframe>
정리 끝