WatchOS 찍먹 (2)
이번엔 2탄이다.
일단 강의에서는
- SwiftUI를 활용한 watchOS 앱 구축
- watchOS에서의 CoreData 연동 및 활용
- CoreData에서 로컬 데이터 불러오기 (로드)
- CoreData 초기화를 위한 PersistentController 구현
- Environment(환경 변수)를 활용한 ManagedObjectContext 주입
- @FetchRequest 및 FetchResults 활용법
- CoreData 내에서 데이터 정렬(Sorting) 및 필터링(Filtering) 처리
- watchOS 환경에서의 화면 간 내비게이션 이동
- CoreData를 활용한 CRUD(생성, 조회, 수정, 삭제) 기능 구현
- SwiftUI를 사용한 watchOS 화면 띄우기(Present) 및 닫기(Dismiss)
- 진입 상황(Context)에 따른 동일한 화면 재활용 방법
- watchOS에 최적화된 SwiftUI 디자인 설계
- watchOS에서의 리스트(List) 뷰 구현
- 뷰 수정자(View Modifiers) 활용법
이렇게 다룬다고 한다.
View가 대부분이라 필요한거만 정리를 할 것 같다.
1. CoreData 세팅
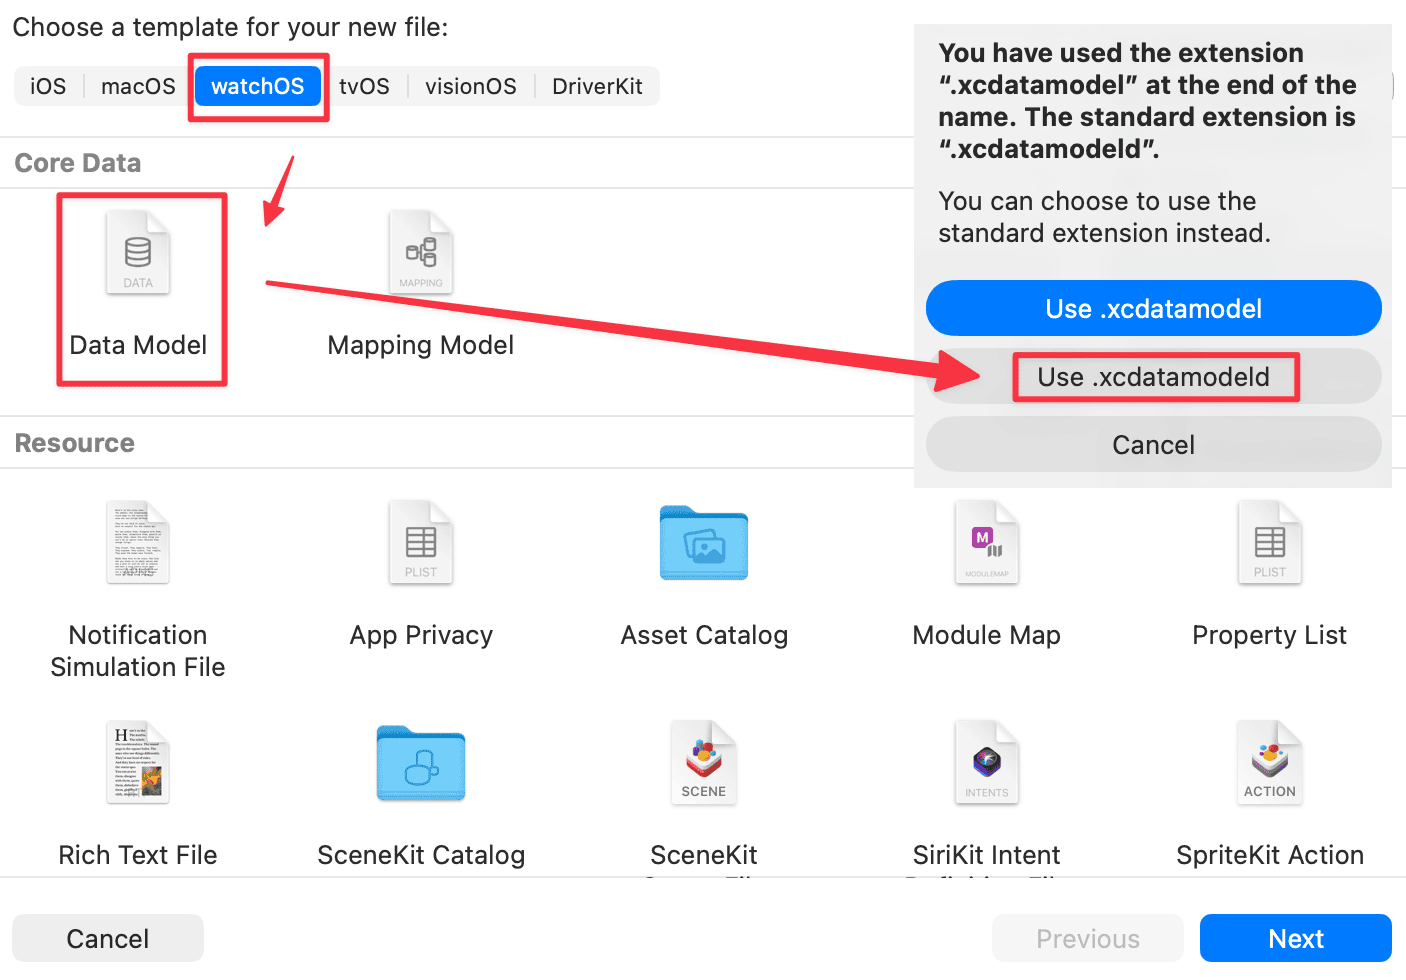
일단은 강의에 따라 확장자가 xcdatamodeld 인 코어데이터 파일을 만들어주었다.
그리고 Entity와 Attributes도 사진과 같이 만들어 주었다.
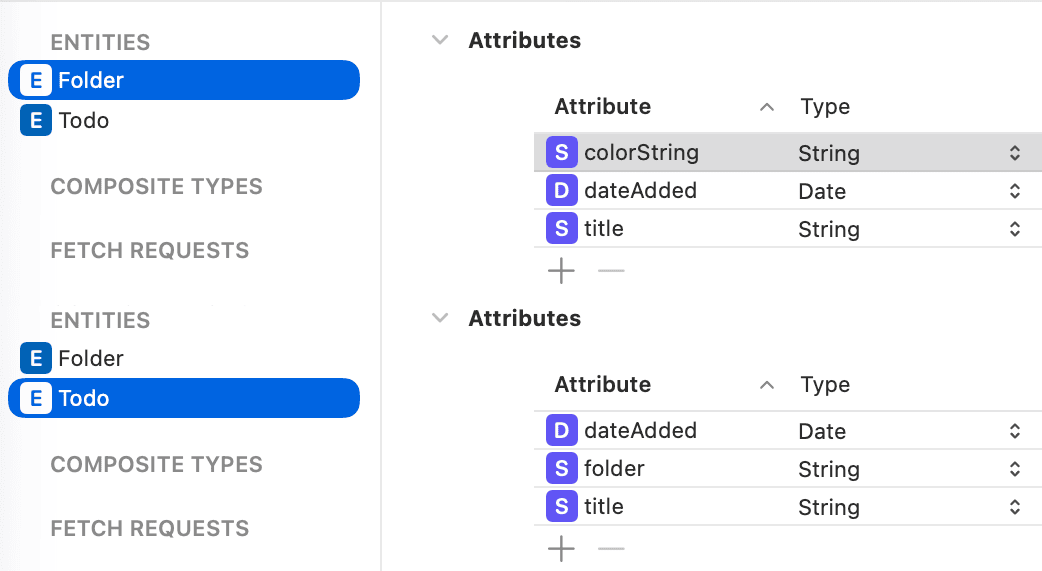
Coredata하면 항상 만들어주었던,
1
2
3
4
5
6
7
8
9
10
11
12
13
14
15
16
17
18
19
struct PersistentController {

    static let shared = PersistentController()

    let container: NSPersistentContainer

    init(inMemory: Bool = false) {
        container = NSPersistentContainer(name: "doit")
        if inMemory {
            container.persistentStoreDescriptions.first!.url = URL(fileURLWithPath: "/dev/null")
        }

        container.loadPersistentStores { (storeDesc, error) in
            if let error = error as NSError? {
                fatalError("Failed to load container \(error)")
            }
        }
    }
}
이걸 만들어 준다. 사실 UIKit에선 AppDelegate에 넣어서 사용을 했었다.
이전글참고
그리고 App swift 파일에 viewcontext를 환경변수로 사용하기위해 등록해준다.
1
2
3
4
5
6
7
8
9
10
11
12
13
14
import SwiftUI
import CoreData

@main
struct PracticeWatchOS2_Watch_AppApp: App {
    var body: some Scene {
        WindowGroup {
             NavigationView {
                FolderView()
            }
        }
        .environment(\.managedObjectContext, PersistentController.shared.container.viewContext)
    }
}
2. FolderList View
1
2
3
4
5
6
7
8
9
10
11
12
13
14
15
16
17
18
19
20
21
22
23
24
25
26
27
28
29
30
31
32
33
34
35
36
37
38
39
40
41
42
43
44
45
46
47
struct FolderView: View {
    @FetchRequest(
        entity: Folder.entity(),
        sortDescriptors: [NSSortDescriptor(keyPath: \Folder.dateAdded, ascending: false)],
        animation: .easeInOut
    )
    var results: FetchedResults<Folder>

    var body: some View {
        List {
            ForEach(results) { item in
                HStack {
                    NavigationLink(
                        destination: Text(item.title ?? ""),
                        label: {
                            Text(item.title ?? "")
                        }
                    )
                    .frame(maxWidth: .infinity)
                    .frame(height: 60)
                    .contentShape(Rectangle())
                    .background(
                        LinearGradient(
                            gradient: Gradient(colors:
                                                [Color(item.colorString ?? "blue"),
                                                 Color(item.colorString ?? "blue").opacity(0.8), Color(item.colorString ?? "blue")]),
                            startPoint: .top, endPoint: .bottom))
                    .cornerRadius(5)
                }
            }

            NavigationLink(
                destination: Text("Add New Folder"),
                label: {
                    HStack {
                        Spacer()
                        Image(systemName: "plus")
                        Text("New Folder")
                        Spacer()
                    }
                }
            )
            .listStyle(CarouselListStyle())
            .navigationTitle("Folders")
        }
    }
}
여긴 @FetchRequest부분만 정리를 해본다면
@FetchRequest는 CoreData에서 데이터를 가져오는 프로퍼티 래퍼다.
1
2
3
4
5
6
@FetchRequest(
    entity: Folder.entity(),
    sortDescriptors: [NSSortDescriptor(keyPath: \Folder.dateAdded, ascending: false)],
    animation: .easeInOut
)
var results: FetchedResults
entity: Folder.entity()로 Folder Entity를 대상으로 지정하고, sortDescriptors로 dateAdded 기준 내림차순 정렬을 설정한다.
animation: .easeInOut은 강의에서 별도 설명은 없었는데, 데이터가 추가/삭제될 때 List에 애니메이션을 적용하는 파라미터다.
fetch한 결과는 FetchedResults<Folder> 타입의 results에 담기고, ForEach에서 바로 순회할 수 있다.
FetchedResults는 우리가 직접 만든 타입이 아니라 @FetchRequest가 자동으로 생성해주는 SwiftUI 내장 타입이다.
CoreData의 fetch 결과를 SwiftUI에서 바로 쓸 수 있도록 래핑해주며, 데이터가 변경되면 자동으로 뷰를 업데이트해준다.
3. New Folder View
1
2
3
4
5
6
7
8
9
10
11
12
13
14
15
16
17
18
19
20
21
22
23
24
25
26
27
28
29
30
31
32
33
34
35
36
37
38
39
40
41
42
43
44
45
46
47
48
49
50
51
52
53
54
55
56
57
58
struct AddNewFolderView: View {
    @State private var folderTitle = ""
    @State private var selectedColor = "blue"

    private var folderColors = ["blue", "orange", "red", "purple", "yellow"]

    @Environment(\.managedObjectContext) var context
    @Environment(\.presentationMode) var presentaionMode

    var body: some View {
        VStack(spacing: 15) {
            TextField("Folder name...", text: $folderTitle)

            HStack {
                ForEach(folderColors, id: \.self) { colorName in
                    Circle()
                        .fill(Color(colorName))
                        .frame(width: 20, height: 20)
                        .overlay(
                            Circle()
                                .stroke(Color.white, lineWidth: selectedColor == colorName ? 2 : 0)
                        )
                        .onTapGesture {
                            selectedColor = colorName
                        }
                        .padding(.vertical)
                }
            }
            .padding(.horizontal)

            Button(action: addFolder) {
                Text("Add Folder")
                    .padding(.vertical, 10)
                    .frame(maxWidth: .infinity, alignment: .center)
                    .background(Color.orange)
                    .cornerRadius(15)
            }
            .padding(.horizontal)
            .buttonStyle(PlainButtonStyle())
            .disabled(folderTitle == "")
        }
        .navigationTitle("Add New Folder")
    }

    private func addFolder() {
        let folder = Folder(context: context)
        folder.title = folderTitle
        folder.dateAdded = Date()
        folder.colorString = selectedColor

        do {
            try context.save()
            presentaionMode.wrappedValue.dismiss()
        } catch let err {
            print(err.localizedDescription)
        }
    }
}
위에서 환경변수로 viewcontext를 사용하기 위해서 @Environment(\.managedObjectContext) var context를 사용해주었다.
이걸통해 Coredata의 CRUD 명령어를 만들 수 있다.
그리고
1
2
// FolderView
destination: AddNewFolderView(),
Text로 되어있던 부분에 이제는 AddNewFolderView로 이동하게끔 연결해주었다.
4. TasksList View (TodoList View)
1
2
3
4
5
6
7
8
9
10
11
12
13
14
15
16
17
18
19
20
21
22
23
24
25
26
27
28
29
30
31
32
33
34
35
36
37
38
39
40
41
42
43
44
45
46
47
48
49
50
51
52
53
54
55
56
57
58
struct TodoListView: View {

    var accentColor: String
    var folderName: String

    @FetchRequest var results: FetchedResults<Todo>

    init(folderName: String, accentColor: String) {
        self.accentColor = accentColor
        self.folderName = folderName

        let predicate = NSPredicate(format: "folder == %@", folderName)
        self._results = FetchRequest(
            entity: Todo.entity(),
            sortDescriptors: [NSSortDescriptor(keyPath: \Todo.dateAdded, ascending: false)],
            predicate: predicate,
            animation: .easeInOut
        )
    }

    var body: some View {
        List {
            ForEach(results) { item in
                HStack {
                    NavigationLink(
                        destination: Text("Update todo"),
                        label: {
                            Text(item.title ?? "")
                                .bold()
                        })
                    .frame(maxWidth: .infinity)
                    .frame(height: 60)
                    .contentShape(Rectangle())
                    .background(
                        RoundedRectangle(cornerRadius: 5)
                            .stroke(LinearGradient(gradient: Gradient(colors: [Color(accentColor), Color(accentColor).opacity(0.8), Color(accentColor)]), startPoint: .top, endPoint: .bottom), lineWidth: 4))
                }
            }

            NavigationLink(
                destination: Text("Add new todo"),
                label: {
                    HStack {
                        Spacer()
                        Image(systemName: "plus")
                        Text("New Todo")
                        Spacer()
                    }
                    .background(
                        RoundedRectangle(cornerRadius: 5)
                            .fill(Color(accentColor))
                            .frame(height: 40)
                    )
                })
        }.listStyle(CarouselListStyle())
            .navigationTitle(folderName)
    }
}
_results에서 _는 Property Wrapper의 래퍼 객체에 직접 접근하는 방식이다. results가 @FetchRequest로 선언되어 있으면 실제 값은 results, 래퍼 객체는 _results로 접근한다. init에서 동적으로 FetchRequest를 설정할 때는 래퍼 객체에 직접 접근해야 하기 때문에 _가 필요하다.
참고: Apple Documentation - Initialize state objects using external data
그리고 이것도 FolderView에서
1
destination: TodoListView(folderName: item.title ?? "", accentColor: item.colorString ?? "blue")
추가해준다.
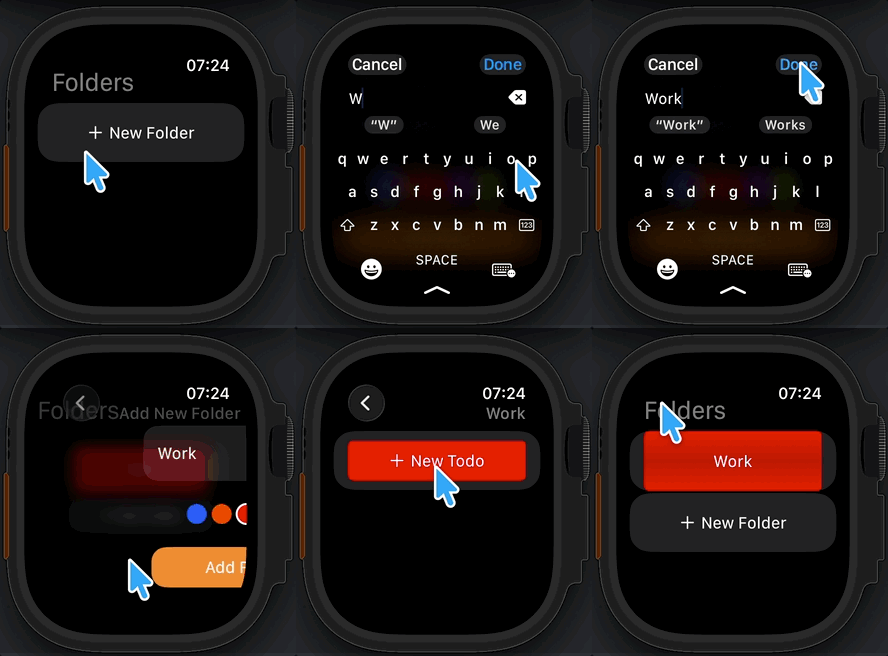
잘되는걸 알 수 있다.
다만 다른 워치 기종으로 했을때 키보드도 그렇고, 입력 자체가 안되는 문제가 있었는데 ultra로 바꾸니 되었다. 이유는 잘 모르겠다.
5. Add, Update, Delete Task
1
2
3
4
5
6
7
8
9
10
11
12
13
14
15
16
17
18
19
20
21
22
23
24
25
26
27
28
29
30
31
32
33
34
35
36
37
38
39
40
41
42
43
44
45
46
47
48
49
50
51
52
53
54
55
56
57
58
59
60
61
62
63
64
65
66
67
68
69
struct AddNewTodoView: View {
    var todoItem: Todo?

    var accentColor: String
    var folderName: String

    @Environment(\.managedObjectContext) var context
    @Environment(\.presentationMode) var presentationMode

    @State private var todoTitle = ""

    var body: some View {
        VStack(spacing: 15) {
            TextField("Add new todo...", text: $todoTitle)

            Button(action: addUpdateTodo) {
                Text(todoItem == nil ? "Add Todo" : "Update")
                    .padding(.vertical, 10)
                    .frame(maxWidth: .infinity, alignment: .center)
                    .background(Color(accentColor))
                    .cornerRadius(10)
            }.padding(.horizontal)
                .buttonStyle(PlainButtonStyle())
                .disabled(todoTitle == "")

            Button(action: deleteTodo) {
                Text("Delete")
                    .padding(.vertical, 10)
                    .frame(maxWidth: .infinity, alignment: .center)
                    .background(Color.red)
                    .cornerRadius(10)
            }.padding(.horizontal)
                .buttonStyle(PlainButtonStyle())
                .opacity(todoItem == nil ? 0.0 : 1.0)
        }
        .navigationTitle(todoItem == nil ? "Add Todo" : "Update Todo")
        .onAppear {
            if let todo = todoItem {
                todoTitle = todo.title ?? ""
            }
        }
    }

    private func addUpdateTodo() {
        let todo = todoItem == nil ? Todo(context: context) : todoItem
        todo?.title = todoTitle
        todo?.dateAdded = Date()
        todo?.folder = folderName

        do {
            try context.save()
            presentationMode.wrappedValue.dismiss()
        } catch let err {
            print(err.localizedDescription)
        }
    }

    private func deleteTodo() {
        if let todo = todoItem {
            context.delete(todo)
            do {
                try context.save()
            } catch let err {
                print(err.localizedDescription)
            }
            presentationMode.wrappedValue.dismiss()
        }
    }
}
여기도 TodoListView에 있는 destination을 바꿔준다.
1
2
destination: AddNewTodoView(todoItem: item, accentColor: accentColor, folderName: folderName)
destination: AddNewTodoView(accentColor: accentColor, folderName: folderName)
실행하면
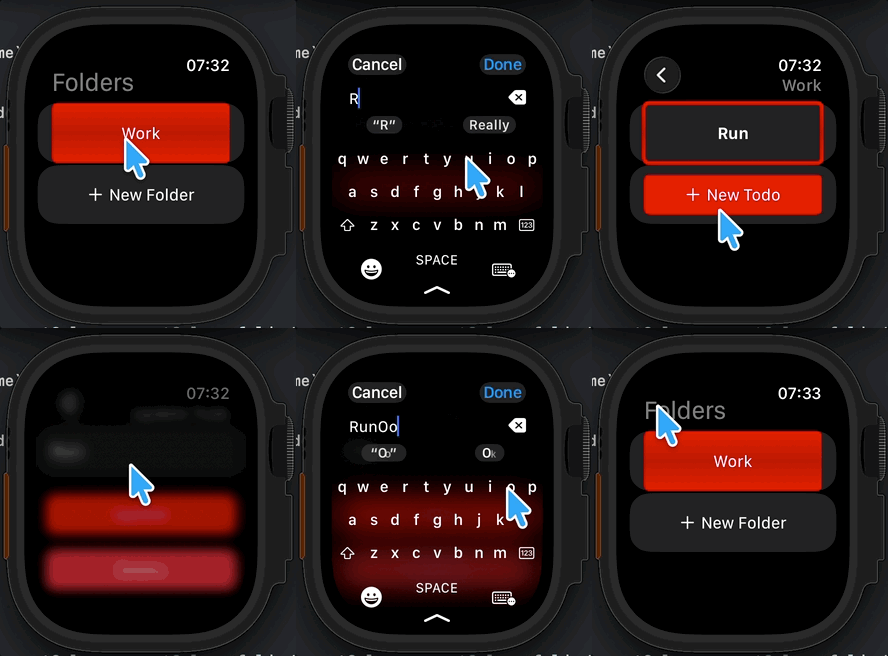
잘된다.
여긴 view 중심으로 코드가 전개 되었는데 막상까보면 사실 일반 iOS App 만드는것과 별 차이가 없다.